Intro to Web3.js · Ethereum Blockchain Developer Crash Course
By Gregory McCubbin ·
Hey everybody, it’s Gregory from Dapp University!
Today I'm going to you how to get started using the Web3.js library, the main JavaScript library for interacting with The Ethereum Blockchain. I'll show you what Web3.js is, how to use it to talk to the Ethereum blockchain in this 8-part tutorial series.
#1 · What is Web3.js?
The above video is the first in this 8-part tutorial series. In this lesson, I'll give you an overview of the Web3.js library, and then I'll show you how to check the balance of an Ethereum account.
There are a few different aspects to developing blockchain applications with Ethereum:
- Smart contract development - writing code that gets deployed to the blockchain with the Solidity programming language.
- Developing websites or clients that interact with the blockchain - writing code that reads and writes data from the blockchain with smart contracts.
Web3.js enables you to fulfill the second responsibility: developing clients that interact with The Etherem Blockchain. It is a collection of libraries that allow you to perform actions like send Ether from one account to another, read and write data from smart contracts, create smart contracts, and so much more!
If you have a web development background, you might have used jQuery to make Ajax calls to a web server. That's a good starting point for understanding the function of Web3.js. Instead of using a jQuery to read and write data from a web server, you can use Web3.js to read and write to The Ethereum Blockchain.
Let me explain how you can use Web3.js to talk to The Ethereum Blockchain. Here is a diagram of how a client talks to Ethereum:
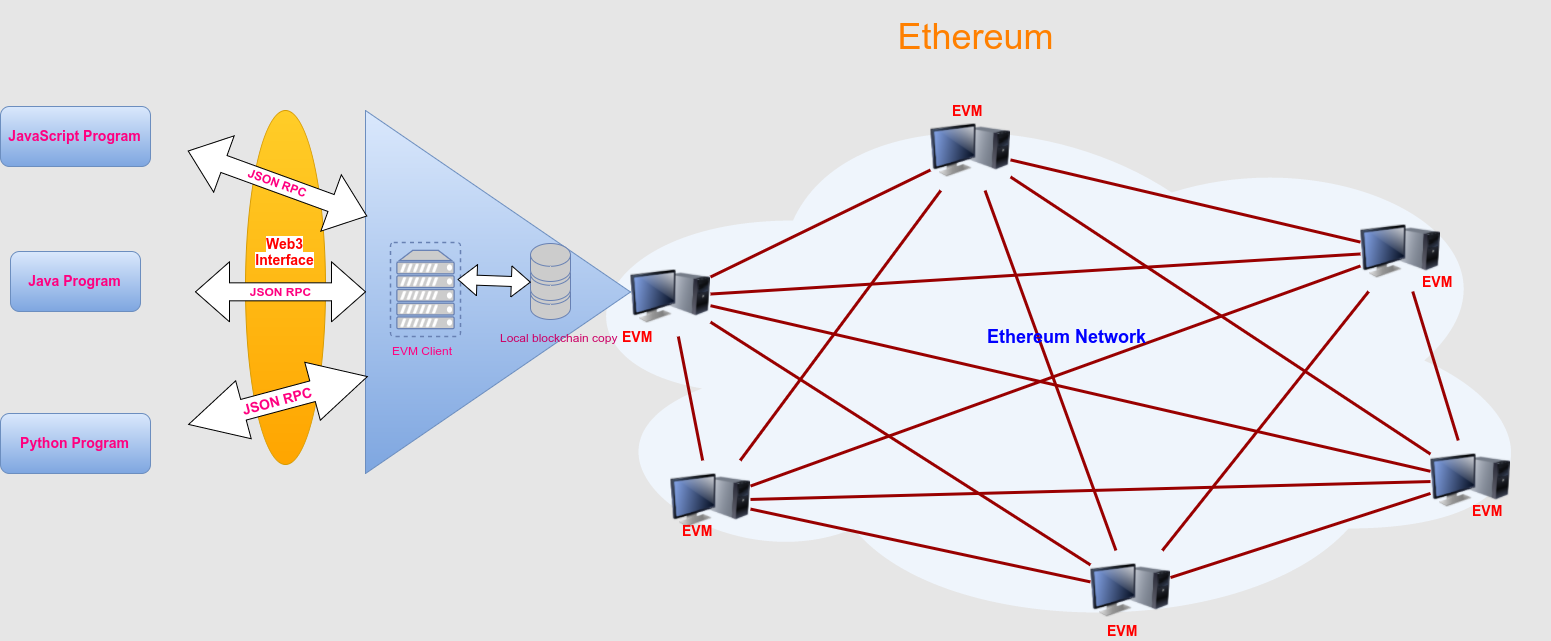
Image credit: iotbl.
Web3.js talks to The Ethereum Blockchain with JSON RPC, which stands for "Remote Procedure Call" protocol. Ethereum is a peer-to-peer network of nodes that stores a copy of all the data and code on the blockchain. Web3.js allows us to make requests to an individual Ethereum node with JSON RPC in order to read and write data to the network. It's kind of like using jQuery with a JSON API to read and write data with a web server.
Dependencies
There are a few dependencies that will help you start developing with Web3.js.
Node Package Manager (NPM)
The first dependency we need is Node Package Manager, or NPM, which comes with Node.js. You can see if you have node already installed by going to your termial and typing:
$ node -vWeb3.js Library
You can install the Web3.js library with NPM in your terminal like this:
$ npm install web3Infura RPC URL
In order to connect to an Ethereum node with JSON RPC on the Main Net, we need access to an Ethereum node. There are a few ways you could do this. For one, you could run your own Ethereum node with Geth or Parity. But this requires you to download a lot of data from the blockchain and keep it in sync. This is a huge headache if you've ever tried to do this before.
Mostly for convenience, you can use Infura to access an Ethereum node without having to run one yourself. Infura is a service that provides a remote Ethereum node for free. All you need to do is sign up and obtain an API key and the RPC URL for the network you want to connect to.
Once you've signed up, your Infura RPC URL should look like this:
https://mainnet.infura.io/YOUR_INFURA_API_KEYChecking Account Balances
Now that all of your dependencies are installed, you can start developing with Web3.js! First, you should fire up the Node console in your terminal like this:
$ nodeNow you've got the Node console open! Inside the Node console, you can require Web3.js like this:
const Web3 = require('web3')Now you have access to a variable where you can create a new Web3 connection! Before we generate a Web3 connection, we must first assign the Infura URL to a variable like this:
const rpcURL = "https://mainnet.infura.io/YOUR_INFURA_API_KEY"Make sure that you replace YOUR_INFURA_API_KEY with your actual Infura API key that you obtained earlier. Now you can instantiate a Web3 connection like this:
const web3 = new Web3(rpcURL)Now you have a live Web3 connection that will allow you to talk to the Ethereum main net! Let's use this connection to check the account balance for this account: 0x90e63c3d53E0Ea496845b7a03ec7548B70014A91. We can see how much Ether this account holds by checking its balance with web3.eth.getBalance().
First, let's assign the address to a variable:
const account = "0x90e63c3d53E0Ea496845b7a03ec7548B70014A91"Now, let's check the account balance like this:
web3.eth.getBalance(address, (err, wei) => {
  balance = web3.utils.fromWei(wei, 'ether')
})
Let me explain this code. First, we use check the balance by calling web3.eth.getBalance(), which accepts a callback function with two arguments, an error and the balance itself. We'll ignore the error argument for now, and reference the balance with the wei argument. Ethereum expresses balances in Wei, which is the smallest subdivision of Ether, kind of like a tiny penny. We can convert this balance to Ether with web3.utils.fromWei(wei, 'ether').
And that's it! That's the conclusion to the first part of this tutorial. Now you've seen what the Web3.js library is and you can get started using it to check Ethereum account balances. Here is a summary of the code we wrote in this tutorial:
const Web3 = require('web3')
const rpcURL = '' // Your RPC URL goes here
const web3 = new Web3(rpcURL)
const address = '' // Your account address goes here
web3.eth.getBalance(address, (err, wei) => {
  balance = web3.utils.fromWei(wei, 'ether')
})
You can also download all the code examples in this tutorial series from github.
I will also mention that reading through the Web3.js documentation will give you a thorough overview of what you can do with the library. I highly recommend browsing through it, even if you don't understand every aspect of its functionality. You can find the full documentation for Web3.js here:
https://web3js.readthedocs.io/en/1.0/
Additionally, note that Web3.js is under active development. You can visit the Web3.js github repository to follow along with its progress, and also read through the code to gain a better understanding of the library itself. You can find the github repository here:
https://github.com/ethereum/web3.js/
#2 · Read Data from Smart Contracts with Web3.js
This is the second video in the 8-part tutorial series. In this video, I will show you how to read smart contract data from The Ethereum Blockchain.
In order to read data from smart contracts with Web3.js, we need two things:
- A JavaScript representation of the smart contract we want to interact with
- A way to call the functions on the smart contract when reading the data
We can get a JavaScript representation of an Ethereum smart contract with the web3.eth.Contract() function. This function expects two arguments: one for the smart contract ABI and one for the smart contract address.
A smart contract ABI stands for "Abstract Binary Interface", and is a JSON array that describes how a specific smart contract works. Here is an example an ABI:
const abi = [{"constant":true,"inputs":[],"name":"mintingFinished","outputs":[{"name":"","type":"bool"}],"payable":false,"type":"function"},{"constant":true,"inputs":[],"name":"name","outputs":[{"name":"","type":"string"}],"payable":false,"type":"function"},{"constant":false,"inputs":[{"name":"_spender","type":"address"},{"name":"_value","type":"uint256"}],"name":"approve","outputs":[],"payable":false,"type":"function"},{"constant":true,"inputs":[],"name":"totalSupply","outputs":[{"name":"","type":"uint256"}],"payable":false,"type":"function"},{"constant":false,"inputs":[{"name":"_from","type":"address"},{"name":"_to","type":"address"},{"name":"_value","type":"uint256"}],"name":"transferFrom","outputs":[],"payable":false,"type":"function"},{"constant":true,"inputs":[],"name":"decimals","outputs":[{"name":"","type":"uint256"}],"payable":false,"type":"function"},{"constant":false,"inputs":[],"name":"unpause","outputs":[{"name":"","type":"bool"}],"payable":false,"type":"function"},{"constant":false,"inputs":[{"name":"_to","type":"address"},{"name":"_amount","type":"uint256"}],"name":"mint","outputs":[{"name":"","type":"bool"}],"payable":false,"type":"function"},{"constant":true,"inputs":[],"name":"paused","outputs":[{"name":"","type":"bool"}],"payable":false,"type":"function"},{"constant":true,"inputs":[{"name":"_owner","type":"address"}],"name":"balanceOf","outputs":[{"name":"balance","type":"uint256"}],"payable":false,"type":"function"},{"constant":false,"inputs":[],"name":"finishMinting","outputs":[{"name":"","type":"bool"}],"payable":false,"type":"function"},{"constant":false,"inputs":[],"name":"pause","outputs":[{"name":"","type":"bool"}],"payable":false,"type":"function"},{"constant":true,"inputs":[],"name":"owner","outputs":[{"name":"","type":"address"}],"payable":false,"type":"function"},{"constant":true,"inputs":[],"name":"symbol","outputs":[{"name":"","type":"string"}],"payable":false,"type":"function"},{"constant":false,"inputs":[{"name":"_to","type":"address"},{"name":"_value","type":"uint256"}],"name":"transfer","outputs":[],"payable":false,"type":"function"},{"constant":false,"inputs":[{"name":"_to","type":"address"},{"name":"_amount","type":"uint256"},{"name":"_releaseTime","type":"uint256"}],"name":"mintTimelocked","outputs":[{"name":"","type":"address"}],"payable":false,"type":"function"},{"constant":true,"inputs":[{"name":"_owner","type":"address"},{"name":"_spender","type":"address"}],"name":"allowance","outputs":[{"name":"remaining","type":"uint256"}],"payable":false,"type":"function"},{"constant":false,"inputs":[{"name":"newOwner","type":"address"}],"name":"transferOwnership","outputs":[],"payable":false,"type":"function"},{"anonymous":false,"inputs":[{"indexed":true,"name":"to","type":"address"},{"indexed":false,"name":"value","type":"uint256"}],"name":"Mint","type":"event"},{"anonymous":false,"inputs":[],"name":"MintFinished","type":"event"},{"anonymous":false,"inputs":[],"name":"Pause","type":"event"},{"anonymous":false,"inputs":[],"name":"Unpause","type":"event"},{"anonymous":false,"inputs":[{"indexed":true,"name":"owner","type":"address"},{"indexed":true,"name":"spender","type":"address"},{"indexed":false,"name":"value","type":"uint256"}],"name":"Approval","type":"event"},{"anonymous":false,"inputs":[{"indexed":true,"name":"from","type":"address"},{"indexed":true,"name":"to","type":"address"},{"indexed":false,"name":"value","type":"uint256"}],"name":"Transfer","type":"event"}]That's a really long unbroken array, I know! Don't worry if it looks overwhelming. :) This example is the ABI for the OmiseGo token, which implements the ERC-20 token standard (if you're unfamiliar with this standard, you can watch this video). You can find more details about this token, including its abi and address on Etherscan. We'll use this smart contract ABI for the rest of the example.
While we're here, I'll go ahead and store the address to the OMG token from the Ethereum main net:
const address = "0xd26114cd6EE289AccF82350c8d8487fedB8A0C07"Now that we have both of these values assigned, we can create a complete JavaScript representation of the OMG token smart contract like this:
const contract = new web3.eth.Contract(abi, address)Now that the first part of this lesson is complete, we need to fulfill the second part: reading data from the smart contract by calling its functions. All of the smart contract functions are listed under the contract.methods namespace within the assigned Web3 contract. For example, we can call contract.methods.myFunction() if the contract implements myFunction().
Great! So we can theoretically call any function that the smart contract implements. But how do we know which functions it implements? For one, we could log contract.methods to the console, and see what's returned (you can watch me do this in the video above). However, since this smart contract implements the ERC-20 standard, we know that it implements several functions like totalSupply(), name(), symbol(), and balanceOf(). We can read each of those values individually, like this:
First, the total supply of all OMG tokens in existence:
contract.methods.totalSupply().call((err, result) => { console.log(result) })
// > 140245398
Second, the name of the OMG token:
contract.methods.name().call((err, result) => { console.log(result) })
// > OMG Token
Third, the symbol of the OMG token:
contract.methods.symbol().call((err, result) => { console.log(result) })
// > OMG
Last, we can check the balance for a given account. I looked for a rich OMG holder on Etherscan, and found this address 0xd26114cd6EE289AccF82350c8d8487fedB8A0C07. We can check the balance for this account like this:
contract.methods.balanceOf('0xd26114cd6EE289AccF82350c8d8487fedB8A0C07').call((err, result) => { console.log(result) })
// > A very large number...
And that's it! That's how easy it is to read data from smart contracts with Web3.js. Here is a summary of all the code from this lesson:
const Web3 = require('web3')
const rpcURL = '' // Your RCP URL goes here
const web3 = new Web3(rpcURL)

const abi = [{"constant":true,"inputs":[],"name":"mintingFinished","outputs":[{"name":"","type":"bool"}],"payable":false,"type":"function"},{"constant":true,"inputs":[],"name":"name","outputs":[{"name":"","type":"string"}],"payable":false,"type":"function"},{"constant":false,"inputs":[{"name":"_spender","type":"address"},{"name":"_value","type":"uint256"}],"name":"approve","outputs":[],"payable":false,"type":"function"},{"constant":true,"inputs":[],"name":"totalSupply","outputs":[{"name":"","type":"uint256"}],"payable":false,"type":"function"},{"constant":false,"inputs":[{"name":"_from","type":"address"},{"name":"_to","type":"address"},{"name":"_value","type":"uint256"}],"name":"transferFrom","outputs":[],"payable":false,"type":"function"},{"constant":true,"inputs":[],"name":"decimals","outputs":[{"name":"","type":"uint256"}],"payable":false,"type":"function"},{"constant":false,"inputs":[],"name":"unpause","outputs":[{"name":"","type":"bool"}],"payable":false,"type":"function"},{"constant":false,"inputs":[{"name":"_to","type":"address"},{"name":"_amount","type":"uint256"}],"name":"mint","outputs":[{"name":"","type":"bool"}],"payable":false,"type":"function"},{"constant":true,"inputs":[],"name":"paused","outputs":[{"name":"","type":"bool"}],"payable":false,"type":"function"},{"constant":true,"inputs":[{"name":"_owner","type":"address"}],"name":"balanceOf","outputs":[{"name":"balance","type":"uint256"}],"payable":false,"type":"function"},{"constant":false,"inputs":[],"name":"finishMinting","outputs":[{"name":"","type":"bool"}],"payable":false,"type":"function"},{"constant":false,"inputs":[],"name":"pause","outputs":[{"name":"","type":"bool"}],"payable":false,"type":"function"},{"constant":true,"inputs":[],"name":"owner","outputs":[{"name":"","type":"address"}],"payable":false,"type":"function"},{"constant":true,"inputs":[],"name":"symbol","outputs":[{"name":"","type":"string"}],"payable":false,"type":"function"},{"constant":false,"inputs":[{"name":"_to","type":"address"},{"name":"_value","type":"uint256"}],"name":"transfer","outputs":[],"payable":false,"type":"function"},{"constant":false,"inputs":[{"name":"_to","type":"address"},{"name":"_amount","type":"uint256"},{"name":"_releaseTime","type":"uint256"}],"name":"mintTimelocked","outputs":[{"name":"","type":"address"}],"payable":false,"type":"function"},{"constant":true,"inputs":[{"name":"_owner","type":"address"},{"name":"_spender","type":"address"}],"name":"allowance","outputs":[{"name":"remaining","type":"uint256"}],"payable":false,"type":"function"},{"constant":false,"inputs":[{"name":"newOwner","type":"address"}],"name":"transferOwnership","outputs":[],"payable":false,"type":"function"},{"anonymous":false,"inputs":[{"indexed":true,"name":"to","type":"address"},{"indexed":false,"name":"value","type":"uint256"}],"name":"Mint","type":"event"},{"anonymous":false,"inputs":[],"name":"MintFinished","type":"event"},{"anonymous":false,"inputs":[],"name":"Pause","type":"event"},{"anonymous":false,"inputs":[],"name":"Unpause","type":"event"},{"anonymous":false,"inputs":[{"indexed":true,"name":"owner","type":"address"},{"indexed":true,"name":"spender","type":"address"},{"indexed":false,"name":"value","type":"uint256"}],"name":"Approval","type":"event"},{"anonymous":false,"inputs":[{"indexed":true,"name":"from","type":"address"},{"indexed":true,"name":"to","type":"address"},{"indexed":false,"name":"value","type":"uint256"}],"name":"Transfer","type":"event"}]
const address = '0xd26114cd6EE289AccF82350c8d8487fedB8A0C07'

const contract = new web3.eth.Contract(abi, address)

contract.methods.totalSupply().call((err, result) => { console.log(result) })
contract.methods.name().call((err, result) => { console.log(result) })
contract.methods.symbol().call((err, result) => { console.log(result) })
contract.methods.balanceOf('0xd26114cd6EE289AccF82350c8d8487fedB8A0C07').call((err, result) => { console.log(result) })
You can also download all the code examples in this tutorial series from github.
#3 · Inside Ethereum Transactions
This is the third video in the 8-part tutorial series. This video will show you how to create transactions on The Ethereum Blockchain with Web3.js. This lesson will go from beginner to slightly advanced. I'll show you what happens when an Etherum transaction is created, and I'll show you how to broadcast a transaction manually to the network with Web3.js.
In addition to learning Web3.js, the purpose of this lesson is to help you understand the fundamentals about how transactions work on The Ethereum Blockchain. Whenever you create a transaction, you're writing data to the blockchain and updating its state. There are several ways to do this, like sending Ether from one account to another, calling a smart contract function that writes data, and deploying a smart contract to the blockchain. We can get a greater understanding of these concepts by performing these actions with the Web3.js library and observing how each step works.
In order to broadcast transactions to the network, we'll need to sign them first. I'm going to use an additional JavaScript library to do this called ethereumjs-tx. You can install this dependency from the command line like this:
$ npm install ethereumjs-txThe reason we're going to use this library is that we want to sign all of the transactions locally. If we were running our own Ethereum node locally, we could unlock an account that was stored locally and sign all of our transactions locally. If that were the case, we would not necessarily need to use this library. However, we're using a remote node hosted by Infura in this tutorial. While Infura is a trustworthy service, we still want to sign the transactions locally rather than giving the remote node manage our private keys.
That's exactly what we'll do in this lesson. I'll show you how to create the raw transaction, sign it, then send the transaction and broadcast it to the network! In order to do this, I'm going to create a simple app.js file to run the code in this lesson, rather than doing everything in the console.
Inside the app.js file, we'll first require the newly installed library like this:
var Tx = require('ethereumjs-tx')Next, we'll set up a Web3 connection like we did in the previous lessons:
const Web3 = require('web3')
const web3 = new Web3('https://ropsten.infura.io/YOUR_INFURA_API_KEY')
Notice, that we're using the Ropsten test network, which is different from the Ethereum main net that we used in the previous lesson. We want to use a test network because all transactions cost gas in the form of Ether. We can use fake Ether on the Ropsten test net without worrying about spending any money. You can obtain fake Ether from a faucet on the Ropsten test network with a faucet. Here are two faucets you can use:
http://faucet.ropsten.be:3001/
In this lesson, we're going to create a transaction that sends fake Ether from one account to another. In order to do this, we'll need two accounts and their private keys. You can actually create new accounts with Web3.js like this:
web3.eth.accounts.create()
// > {
//    address: "0xb8CE9ab6943e0eCED004cDe8e3bBed6568B2Fa01",
//    privateKey: "0x348ce564d427a3311b6536bbcff9390d69395b06ed6c486954e971d960fe8709",
//    signTransaction: function(tx){...},
//    sign: function(data){...},
//    encrypt: function(password){...}
// }
Once you have created both of these accounts, make sure you load them up with fake Ether from a faucet. Now, we'll assign them to variables in our script like this:
const account1 = '0xb8CE9ab6943e0eCED004cDe8e3bBed6568B2Fa01'
const account2 = '0xb8CE9ab6943e0eCED004cDe8e3bBed6568B2Fa02'
Be sure to use the accounts you generated, as these accounts won't work for this lesson. Now, let's save the private keys to the environment like this:
export PRIVATE_KEY_1='your private key 1 here'
export PRIVATE_KEY_1='your private key 2 here'
We want to save these private keys to our environment so that we don't hard code them into our file. It's bad practice to expose private keys like that. What if we accidentally committed them to source in a real project? Someone could steal our Ether! Now we want to read these private keys from our environment and store them to variables. We can do this with the process global object in NodeJS like this:
const privateKey1 = process.env.PRIVATE_KEY_1
const privateKey2 = process.env.PRIVATE_KEY_2
In order to sign transactions with the private keys, we must convert them to a string of binary data with a Buffer, a globally available module in NodeJS. We can do that like this:
const privateKey1 = Buffer.from(process.env.PRIVATE_KEY_1)
const privateKey1 = Buffer.from(process.env.PRIVATE_KEY_2)
Alright, now we've got all of our variables set up! I know some of this might be a little confusing at this point. Stick with me; it will all make sense shortly. :) You can also reference the video above if you get stuck.
From this point, we want to do a few things:
- Build a transaction object
- Sign the transaction
- Broadcast the transaction to the network
We can build the transaction object like this:
const txObject = {
    nonce:    web3.utils.toHex(txCount),
    to:       account2,
    value:    web3.utils.toHex(web3.utils.toWei('0.1', 'ether')),
    gasLimit: web3.utils.toHex(21000),
    gasPrice: web3.utils.toHex(web3.utils.toWei('10', 'gwei'))
  }
Let me explain this code. We're building an object that has all the values needed to generate a transaction, like nonce, to, value, gasLimit, and gasPrice. Let's break down each of these values:
nonce- this is the previous transaction count for the given account. We'll assign the value of this variable momentarily. We also must convert this value to hexidecimal. We can do this with the Web3.js utilitlyweb3.utils.toHex()to- the account we're sending Ether to.value- the amount of Ether we want to send. This value must be expressed in Wei and converted to hexidecimal. We can convert the value to we with the Web3.js utilityweb3.utils.toWei().gasLimit- this is the maximum amount of gas consumed by the transaction. A basic transaction like this always costs 21000 units of gas, so we'll use that for the value here.gasPrice- this is the amount we want to pay for each unit of gas. I'll use 10 Gwei here.
Note, that there is no from field in this transaction object. That will be inferred whenever we sign this transaction with account1's private key.
Now let's get assign the value for the nonce variable. We can get the transaction nonce with web3.eth.getTransactionCount() function. We'll wrap all of our code inside a callback function like this:
web3.eth.getTransactionCount(account1, (err, txCount) => {
  const txObject = {
    nonce:    web3.utils.toHex(txCount),
    to:       account2,
    value:    web3.utils.toHex(web3.utils.toWei('0.1', 'ether')),
    gasLimit: web3.utils.toHex(21000),
    gasPrice: web3.utils.toHex(web3.utils.toWei('10', 'gwei'))
  }
})
And there is the completed transaction object! We've completed step 1. :) Now we must move on to step 2 where we sign the transaction. We can do that like this:
const tx = new Tx(txObject)
tx.sign(privateKey1)

const serializedTx = tx.serialize()
const raw = '0x' + serializedTx.toString('hex')
Here we're using the etheremjs-tx library to create a new Tx object. We also use this library to sign the transaction with privateKey1. Next, we serialize the transaction and convert it to a hexidecimal string so that it can be passed to Web3.
Finally, we send this signed serialized transaction to the test network with the web3.eth.sendSignedTransaction() function like this:
web3.eth.sendSignedTransaction(raw, (err, txHash) => {
  console.log('txHash:', txHash)
})
And there you go! That's the final step of this lesson that sends the transaction and broadcasts it to the network. At this point, your completed app.js file should look like this:
var Tx     = require('ethereumjs-tx')
const Web3 = require('web3')
const web3 = new Web3('https://ropsten.infura.io/YOUR_INFURA_API_KEY')

const account1 = '' // Your account address 1
const account2 = '' // Your account address 2

const privateKey1 = Buffer.from('YOUR_PRIVATE_KEY_1', 'hex')
const privateKey2 = Buffer.from('YOUR_PRIVATE_KEY_2', 'hex')

web3.eth.getTransactionCount(account1, (err, txCount) => {
  // Build the transaction
  const txObject = {
    nonce:    web3.utils.toHex(txCount),
    to:       account2,
    value:    web3.utils.toHex(web3.utils.toWei('0.1', 'ether')),
    gasLimit: web3.utils.toHex(21000),
    gasPrice: web3.utils.toHex(web3.utils.toWei('10', 'gwei'))
  }

  // Sign the transaction
  const tx = new Tx(txObject)
  tx.sign(privateKey1)

  const serializedTx = tx.serialize()
  const raw = '0x' + serializedTx.toString('hex')

  // Broadcast the transaction
  web3.eth.sendSignedTransaction(raw, (err, txHash) => {
    console.log('txHash:', txHash)
    // Now go check etherscan to see the transaction!
  })
})
You can run the app.js file from your terminal with NodeJS like this:
$ node app.jsOr simply:
$ node appFeel free to reference the video above if you get stuck! You can also download all the code examples in this tutorial series from github.
#4 · Deploying Smart Contracts with Web3.js
This is the fourth video in the 8-part tutorial series. This video will show you how to deploy smart contracts to The Ethereum Blockchain with Web3.js.
There are multiple ways you can deploy smart contracts to The Ethereum Blockchain. There are even multiple ways to deploy them within Web3.js itself. Like the previous lesson in this series, I'm going to demonstrate one method that will help you better understand what happens when a smart contract is deployed to The Ethereum Blockchain. This example is designed to break the deployment down in to each step in the process.
This lesson will use the same app.js file that we used in the previous lesson. We'll set it up like this:
Check out this code to follow along with the tutorial:
var Tx = require('ethereumjs-tx')
const Web3 = require('web3')
const web3 = new Web3('https://ropsten.infura.io/YOUR_INFURA_API_KEY')

const account1 = '' // Your account address 1

const privateKey1 = Buffer.from('YOUR_PRIVATE_KEY_1', 'hex')
This lesson example will consist of the same three basic steps as the previous lesson:
- Build a transaction object
- Sign the transaction
- Send the transaction
These steps are the same because anytime we write data to the blockchain, it always consists of these same basic steps. I'm trying to show you that deploying a smart contact actually looks a lot like sending Ether from one account to another, or calling a smart contract function. We're still building a transaction and sending it to the network. The only difference is the transaction parameters.
Let's go ahead and build the transaction object like this:
const txObject = {
  nonce:    web3.utils.toHex(txCount),
  gasLimit: web3.utils.toHex(1000000), // Raise the gas limit to a much higher amount
  gasPrice: web3.utils.toHex(web3.utils.toWei('10', 'gwei')),
  data: data
}
We're building this transaction object that has many of the same fields as the object from the previous lesson like nonce, gasLimit, and gasPrice. There are also some key differences. Let's break down each of these:
nonce- this is the previous transaction count for the given account. This is the same a the previous lesson.gasLimit- this is the maximum amount of gas consumed by the transaction. We'll raise this limit because deploying smart contracts requires much more gas than sending Ether.gasPrice- this is the amount we want to pay for each unit of gas. This is the same as the previous lesson.value- this parameter is absent in this example because we aren't sending any Ether in this transaction.to- this parameter is absent because we aren't sending this transaction to a particular account. Instead we're sending it to the entire network because we're deploying a smart contract!data- this will be the bytecode of the smart contract that we want to deploy. We'll assign this variable value, and I'll explain this more momentarily.
Let's talk about the data parameter. This is the compiled bytecode representation of the smart contract in hexidecimal. In order to obtain this value, we first need a smart contract, and then we need to compile it! You are welcome to use any smart contract you like, especially since we're deploying this to a test network. However, I'm going to use an ERC-20 token smart contract that I built in this video. You can follow along with me in the accompanying Web3.js tutorial video above to watch me compile this particular ERC-20 smart contract with Remix to obtain this data string. Once you've compiled your contract, you can assign the data value to a variable like this:
const data = '0x60806040526040805190810160405280600a81526020017f4441707020546f6b656e000000000000000000000000000000000000000000008152506000908051906020019061004f92919061014e565b506040805190810160405280600481526020017f44415050000000000000000000000000000000000000000000000000000000008152506001908051906020019061009b92919061014e565b506040805190810160405280600f81526020017f4441707020546f6b656e2076312e300000000000000000000000000000000000815250600290805190602001906100e792919061014e565b503480156100f457600080fd5b506000620f4240905080600460003373ffffffffffffffffffffffffffffffffffffffff1673ffffffffffffffffffffffffffffffffffffffff1681526020019081526020016000208190555080600381905550506101f3565b828054600181600116156101000203166002900490600052602060002090601f016020900481019282601f1061018f57805160ff19168380011785556101bd565b828001600101855582156101bd579182015b828111156101bc5782518255916020019190600101906101a1565b5b5090506101ca91906101ce565b5090565b6101f091905b808211156101ec5760008160009055506001016101d4565b5090565b90565b610b99806102026000396000f300608060405260043610610099576000357c0100000000000000000000000000000000000000000000000000000000900463ffffffff16806306fdde031461009e578063095ea7b31461012e57806318160ddd1461019357806323b872dd146101be5780635a3b7e421461024357806370a08231146102d357806395d89b411461032a578063a9059cbb146103ba578063dd62ed3e1461041f575b600080fd5b3480156100aa57600080fd5b506100b3610496565b6040518080602001828103825283818151815260200191508051906020019080838360005b838110156100f35780820151818401526020810190506100d8565b50505050905090810190601f1680156101205780820380516001836020036101000a031916815260200191505b509250505060405180910390f35b34801561013a57600080fd5b50610179600480360381019080803573ffffffffffffffffffffffffffffffffffffffff16906020019092919080359060200190929190505050610534565b604051808215151515815260200191505060405180910390f35b34801561019f57600080fd5b506101a8610626565b6040518082815260200191505060405180910390f35b3480156101ca57600080fd5b50610229600480360381019080803573ffffffffffffffffffffffffffffffffffffffff169060200190929190803573ffffffffffffffffffffffffffffffffffffffff1690602001909291908035906020019092919050505061062c565b604051808215151515815260200191505060405180910390f35b34801561024f57600080fd5b5061025861089b565b6040518080602001828103825283818151815260200191508051906020019080838360005b8381101561029857808201518184015260208101905061027d565b50505050905090810190601f1680156102c55780820380516001836020036101000a031916815260200191505b509250505060405180910390f35b3480156102df57600080fd5b50610314600480360381019080803573ffffffffffffffffffffffffffffffffffffffff169060200190929190505050610939565b6040518082815260200191505060405180910390f35b34801561033657600080fd5b5061033f610951565b6040518080602001828103825283818151815260200191508051906020019080838360005b8381101561037f578082015181840152602081019050610364565b50505050905090810190601f1680156103ac5780820380516001836020036101000a031916815260200191505b509250505060405180910390f35b3480156103c657600080fd5b50610405600480360381019080803573ffffffffffffffffffffffffffffffffffffffff169060200190929190803590602001909291905050506109ef565b604051808215151515815260200191505060405180910390f35b34801561042b57600080fd5b50610480600480360381019080803573ffffffffffffffffffffffffffffffffffffffff169060200190929190803573ffffffffffffffffffffffffffffffffffffffff169060200190929190505050610b48565b6040518082815260200191505060405180910390f35b60008054600181600116156101000203166002900480601f01602080910402602001604051908101604052809291908181526020018280546001816001161561010002031660029004801561052c5780601f106105015761010080835404028352916020019161052c565b820191906000526020600020905b81548152906001019060200180831161050f57829003601f168201915b505050505081565b600081600560003373ffffffffffffffffffffffffffffffffffffffff1673ffffffffffffffffffffffffffffffffffffffff16815260200190815260200160002060008573ffffffffffffffffffffffffffffffffffffffff1673ffffffffffffffffffffffffffffffffffffffff168152602001908152602001600020819055508273ffffffffffffffffffffffffffffffffffffffff163373ffffffffffffffffffffffffffffffffffffffff167f8c5be1e5ebec7d5bd14f71427d1e84f3dd0314c0f7b2291e5b200ac8c7c3b925846040518082815260200191505060405180910390a36001905092915050565b60035481565b6000600460008573ffffffffffffffffffffffffffffffffffffffff1673ffffffffffffffffffffffffffffffffffffffff16815260200190815260200160002054821115151561067c57600080fd5b600560008573ffffffffffffffffffffffffffffffffffffffff1673ffffffffffffffffffffffffffffffffffffffff16815260200190815260200160002060003373ffffffffffffffffffffffffffffffffffffffff1673ffffffffffffffffffffffffffffffffffffffff16815260200190815260200160002054821115151561070757600080fd5b81600460008673ffffffffffffffffffffffffffffffffffffffff1673ffffffffffffffffffffffffffffffffffffffff1681526020019081526020016000206000828254039250508190555081600460008573ffffffffffffffffffffffffffffffffffffffff1673ffffffffffffffffffffffffffffffffffffffff1681526020019081526020016000206000828254019250508190555081600560008673ffffffffffffffffffffffffffffffffffffffff1673ffffffffffffffffffffffffffffffffffffffff16815260200190815260200160002060003373ffffffffffffffffffffffffffffffffffffffff1673ffffffffffffffffffffffffffffffffffffffff168152602001908152602001600020600082825403925050819055508273ffffffffffffffffffffffffffffffffffffffff168473ffffffffffffffffffffffffffffffffffffffff167fddf252ad1be2c89b69c2b068fc378daa952ba7f163c4a11628f55a4df523b3ef846040518082815260200191505060405180910390a3600190509392505050565b60028054600181600116156101000203166002900480601f0160208091040260200160405190810160405280929190818152602001828054600181600116156101000203166002900480156109315780601f1061090657610100808354040283529160200191610931565b820191906000526020600020905b81548152906001019060200180831161091457829003601f168201915b505050505081565b60046020528060005260406000206000915090505481565b60018054600181600116156101000203166002900480601f0160208091040260200160405190810160405280929190818152602001828054600181600116156101000203166002900480156109e75780601f106109bc576101008083540402835291602001916109e7565b820191906000526020600020905b8154815290600101906020018083116109ca57829003601f168201915b505050505081565b600081600460003373ffffffffffffffffffffffffffffffffffffffff1673ffffffffffffffffffffffffffffffffffffffff1681526020019081526020016000205410151515610a3f57600080fd5b81600460003373ffffffffffffffffffffffffffffffffffffffff1673ffffffffffffffffffffffffffffffffffffffff1681526020019081526020016000206000828254039250508190555081600460008573ffffffffffffffffffffffffffffffffffffffff1673ffffffffffffffffffffffffffffffffffffffff168152602001908152602001600020600082825401925050819055508273ffffffffffffffffffffffffffffffffffffffff163373ffffffffffffffffffffffffffffffffffffffff167fddf252ad1be2c89b69c2b068fc378daa952ba7f163c4a11628f55a4df523b3ef846040518082815260200191505060405180910390a36001905092915050565b60056020528160005260406000206020528060005260406000206000915091505054815600a165627a7a723058204c3f690997294d337edc3571d8e77afc5b0e56a2f4bfae6fb59139c8e4eb2f7e0029'Now we can also assign the nonce value by getting the transaction count, just like the previous lesson:
web3.eth.getTransactionCount(account1, (err, txCount) => {
  const data = '' // Your data value goes here...

  const txObject = {
    nonce:    web3.utils.toHex(txCount),
    gasLimit: web3.utils.toHex(1000000),
    gasPrice: web3.utils.toHex(web3.utils.toWei('10', 'gwei')),
    data: data
  }
})
And finally, we can sign this transaction and send it, just like the previous lesson. At this point, the completed tutorial code should look like this:
var Tx = require('ethereumjs-tx')
const Web3 = require('web3')
const web3 = new Web3('https://ropsten.infura.io/YOUR_INFURA_API_KEY')

const account1 = '' // Your account address 1
const account2 = '' // Your account address 2

const privateKey1 = Buffer.from('YOUR_PRIVATE_KEY_1', 'hex')
const privateKey2 = Buffer.from('YOUR_PRIVATE_KEY_2', 'hex')

// Deploy the contract
web3.eth.getTransactionCount(account1, (err, txCount) => {
  const data = '0x60806040526040805190810160405280600a81526020017f4441707020546f6b656e000000000000000000000000000000000000000000008152506000908051906020019061004f92919061014e565b506040805190810160405280600481526020017f44415050000000000000000000000000000000000000000000000000000000008152506001908051906020019061009b92919061014e565b506040805190810160405280600f81526020017f4441707020546f6b656e2076312e300000000000000000000000000000000000815250600290805190602001906100e792919061014e565b503480156100f457600080fd5b506000620f4240905080600460003373ffffffffffffffffffffffffffffffffffffffff1673ffffffffffffffffffffffffffffffffffffffff1681526020019081526020016000208190555080600381905550506101f3565b828054600181600116156101000203166002900490600052602060002090601f016020900481019282601f1061018f57805160ff19168380011785556101bd565b828001600101855582156101bd579182015b828111156101bc5782518255916020019190600101906101a1565b5b5090506101ca91906101ce565b5090565b6101f091905b808211156101ec5760008160009055506001016101d4565b5090565b90565b610b99806102026000396000f300608060405260043610610099576000357c0100000000000000000000000000000000000000000000000000000000900463ffffffff16806306fdde031461009e578063095ea7b31461012e57806318160ddd1461019357806323b872dd146101be5780635a3b7e421461024357806370a08231146102d357806395d89b411461032a578063a9059cbb146103ba578063dd62ed3e1461041f575b600080fd5b3480156100aa57600080fd5b506100b3610496565b6040518080602001828103825283818151815260200191508051906020019080838360005b838110156100f35780820151818401526020810190506100d8565b50505050905090810190601f1680156101205780820380516001836020036101000a031916815260200191505b509250505060405180910390f35b34801561013a57600080fd5b50610179600480360381019080803573ffffffffffffffffffffffffffffffffffffffff16906020019092919080359060200190929190505050610534565b604051808215151515815260200191505060405180910390f35b34801561019f57600080fd5b506101a8610626565b6040518082815260200191505060405180910390f35b3480156101ca57600080fd5b50610229600480360381019080803573ffffffffffffffffffffffffffffffffffffffff169060200190929190803573ffffffffffffffffffffffffffffffffffffffff1690602001909291908035906020019092919050505061062c565b604051808215151515815260200191505060405180910390f35b34801561024f57600080fd5b5061025861089b565b6040518080602001828103825283818151815260200191508051906020019080838360005b8381101561029857808201518184015260208101905061027d565b50505050905090810190601f1680156102c55780820380516001836020036101000a031916815260200191505b509250505060405180910390f35b3480156102df57600080fd5b50610314600480360381019080803573ffffffffffffffffffffffffffffffffffffffff169060200190929190505050610939565b6040518082815260200191505060405180910390f35b34801561033657600080fd5b5061033f610951565b6040518080602001828103825283818151815260200191508051906020019080838360005b8381101561037f578082015181840152602081019050610364565b50505050905090810190601f1680156103ac5780820380516001836020036101000a031916815260200191505b509250505060405180910390f35b3480156103c657600080fd5b50610405600480360381019080803573ffffffffffffffffffffffffffffffffffffffff169060200190929190803590602001909291905050506109ef565b604051808215151515815260200191505060405180910390f35b34801561042b57600080fd5b50610480600480360381019080803573ffffffffffffffffffffffffffffffffffffffff169060200190929190803573ffffffffffffffffffffffffffffffffffffffff169060200190929190505050610b48565b6040518082815260200191505060405180910390f35b60008054600181600116156101000203166002900480601f01602080910402602001604051908101604052809291908181526020018280546001816001161561010002031660029004801561052c5780601f106105015761010080835404028352916020019161052c565b820191906000526020600020905b81548152906001019060200180831161050f57829003601f168201915b505050505081565b600081600560003373ffffffffffffffffffffffffffffffffffffffff1673ffffffffffffffffffffffffffffffffffffffff16815260200190815260200160002060008573ffffffffffffffffffffffffffffffffffffffff1673ffffffffffffffffffffffffffffffffffffffff168152602001908152602001600020819055508273ffffffffffffffffffffffffffffffffffffffff163373ffffffffffffffffffffffffffffffffffffffff167f8c5be1e5ebec7d5bd14f71427d1e84f3dd0314c0f7b2291e5b200ac8c7c3b925846040518082815260200191505060405180910390a36001905092915050565b60035481565b6000600460008573ffffffffffffffffffffffffffffffffffffffff1673ffffffffffffffffffffffffffffffffffffffff16815260200190815260200160002054821115151561067c57600080fd5b600560008573ffffffffffffffffffffffffffffffffffffffff1673ffffffffffffffffffffffffffffffffffffffff16815260200190815260200160002060003373ffffffffffffffffffffffffffffffffffffffff1673ffffffffffffffffffffffffffffffffffffffff16815260200190815260200160002054821115151561070757600080fd5b81600460008673ffffffffffffffffffffffffffffffffffffffff1673ffffffffffffffffffffffffffffffffffffffff1681526020019081526020016000206000828254039250508190555081600460008573ffffffffffffffffffffffffffffffffffffffff1673ffffffffffffffffffffffffffffffffffffffff1681526020019081526020016000206000828254019250508190555081600560008673ffffffffffffffffffffffffffffffffffffffff1673ffffffffffffffffffffffffffffffffffffffff16815260200190815260200160002060003373ffffffffffffffffffffffffffffffffffffffff1673ffffffffffffffffffffffffffffffffffffffff168152602001908152602001600020600082825403925050819055508273ffffffffffffffffffffffffffffffffffffffff168473ffffffffffffffffffffffffffffffffffffffff167fddf252ad1be2c89b69c2b068fc378daa952ba7f163c4a11628f55a4df523b3ef846040518082815260200191505060405180910390a3600190509392505050565b60028054600181600116156101000203166002900480601f0160208091040260200160405190810160405280929190818152602001828054600181600116156101000203166002900480156109315780601f1061090657610100808354040283529160200191610931565b820191906000526020600020905b81548152906001019060200180831161091457829003601f168201915b505050505081565b60046020528060005260406000206000915090505481565b60018054600181600116156101000203166002900480601f0160208091040260200160405190810160405280929190818152602001828054600181600116156101000203166002900480156109e75780601f106109bc576101008083540402835291602001916109e7565b820191906000526020600020905b8154815290600101906020018083116109ca57829003601f168201915b505050505081565b600081600460003373ffffffffffffffffffffffffffffffffffffffff1673ffffffffffffffffffffffffffffffffffffffff1681526020019081526020016000205410151515610a3f57600080fd5b81600460003373ffffffffffffffffffffffffffffffffffffffff1673ffffffffffffffffffffffffffffffffffffffff1681526020019081526020016000206000828254039250508190555081600460008573ffffffffffffffffffffffffffffffffffffffff1673ffffffffffffffffffffffffffffffffffffffff168152602001908152602001600020600082825401925050819055508273ffffffffffffffffffffffffffffffffffffffff163373ffffffffffffffffffffffffffffffffffffffff167fddf252ad1be2c89b69c2b068fc378daa952ba7f163c4a11628f55a4df523b3ef846040518082815260200191505060405180910390a36001905092915050565b60056020528160005260406000206020528060005260406000206000915091505054815600a165627a7a723058204c3f690997294d337edc3571d8e77afc5b0e56a2f4bfae6fb59139c8e4eb2f7e0029'

  const txObject = {
    nonce:    web3.utils.toHex(txCount),
    gasLimit: web3.utils.toHex(1000000), // Raise the gas limit to a much higher amount
    gasPrice: web3.utils.toHex(web3.utils.toWei('10', 'gwei')),
    data: data
  }

  const tx = new Tx(txObject)
  tx.sign(privateKey1)

  const serializedTx = tx.serialize()
  const raw = '0x' + serializedTx.toString('hex')

  web3.eth.sendSignedTransaction(raw, (err, txHash) => {
    console.log('err:', err, 'txHash:', txHash)
    // Use this txHash to find the contract on Etherscan!
  })
})
Now you can run the app.js file from your terminal with NodeJS like this:
$ node app.jsOr simply:
$ node appFeel free to reference the video above if you get stuck! You can also download all the code examples in this tutorial series from github.
#5 · Calling Smart Contract Functions with Web3.js
This is the fourth video in the 8-part tutorial series. This video will show you how to write data to smart contracts with Web3.js.
This lesson will use many of the same basic tutorial steps as the previous lessons because, like the previous lessons, it's designed to show you all the basic steps required when creating transactions on The Ethereum Blockchain. We'll use the same basic setup with an app.js file that will look like this:
const Web3 = require('web3')
const web3 = new Web3('https://ropsten.infura.io/YOUR_INFURA_API_KEY')

const account1 = '' // Your account address 1
const account2 = '' // Your account address 2

const privateKey1 = Buffer.from('YOUR_PRIVATE_KEY_1', 'hex')
const privateKey2 = Buffer.from('YOUR_PRIVATE_KEY_2', 'hex')
We'll also build out a transaction object, just like this:
const txObject = {
  nonce:    web3.utils.toHex(txCount),
  gasLimit: web3.utils.toHex(800000),
  gasPrice: web3.utils.toHex(web3.utils.toWei('10', 'gwei')),
  to: contractAddress,
  data: data
}
If you've been following along with the previous lessons, many of these values should look familiar to you. Let's make a note of some changes.
to- this parameter will be the address of the deployed contract. We'll obtain that value and assign it momentarily.data- this will be the hexidecimal representation of the function we want to call on the smart contract. We'll also assign this value momentarily.
In order to fill these values out, we'll need to get the smart contract ABI for this ERC-20 token. You can follow along with me in the video above as I obtain the ABI from Remix. I'll also need to get the smart contract address from Etherscan (this was available whenever we deployed the smart contract in the last lesson). Now that we have both of these things, we can create a JavaScript representation of the smart contract with Web3.js like this:
const contractAddress = '0xd03696B53924972b9903eB17Ac5033928Be7D3Bc'
const contractABI = [{"constant":true,"inputs":[],"name":"name","outputs":[{"name":"","type":"string"}],"payable":false,"stateMutability":"view","type":"function"},{"constant":false,"inputs":[{"name":"_spender","type":"address"},{"name":"_value","type":"uint256"}],"name":"approve","outputs":[{"name":"success","type":"bool"}],"payable":false,"stateMutability":"nonpayable","type":"function"},{"constant":true,"inputs":[],"name":"totalSupply","outputs":[{"name":"","type":"uint256"}],"payable":false,"stateMutability":"view","type":"function"},{"constant":false,"inputs":[{"name":"_from","type":"address"},{"name":"_to","type":"address"},{"name":"_value","type":"uint256"}],"name":"transferFrom","outputs":[{"name":"success","type":"bool"}],"payable":false,"stateMutability":"nonpayable","type":"function"},{"constant":true,"inputs":[],"name":"standard","outputs":[{"name":"","type":"string"}],"payable":false,"stateMutability":"view","type":"function"},{"constant":true,"inputs":[{"name":"","type":"address"}],"name":"balanceOf","outputs":[{"name":"","type":"uint256"}],"payable":false,"stateMutability":"view","type":"function"},{"constant":true,"inputs":[],"name":"symbol","outputs":[{"name":"","type":"string"}],"payable":false,"stateMutability":"view","type":"function"},{"constant":false,"inputs":[{"name":"_to","type":"address"},{"name":"_value","type":"uint256"}],"name":"transfer","outputs":[{"name":"success","type":"bool"}],"payable":false,"stateMutability":"nonpayable","type":"function"},{"constant":true,"inputs":[{"name":"","type":"address"},{"name":"","type":"address"}],"name":"allowance","outputs":[{"name":"","type":"uint256"}],"payable":false,"stateMutability":"view","type":"function"},{"inputs":[],"payable":false,"stateMutability":"nonpayable","type":"constructor"},{"anonymous":false,"inputs":[{"indexed":true,"name":"_from","type":"address"},{"indexed":true,"name":"_to","type":"address"},{"indexed":false,"name":"_value","type":"uint256"}],"name":"Transfer","type":"event"},{"anonymous":false,"inputs":[{"indexed":true,"name":"_owner","type":"address"},{"indexed":true,"name":"_spender","type":"address"},{"indexed":false,"name":"_value","type":"uint256"}],"name":"Approval","type":"event"}]

const contract = new web3.eth.Contract(abi, contractAddress)
Great! Now we have a JavaScript representation of the deployed contract. Now we can fill out the data field of the transaction by converting the contract's transfer() function to bytecode (that's the function we'll call on this smart contract). We can do this with the Web3.js function encodeABI() that is available on the contract object. That looks like this:
const data = contract.methods.transfer(account2, 1000).encodeABI()That's it! That's how easy it is to encode this function call for the transaction! Note that we're transferring 1,000 tokens to account2. This method takes care of encoding these function parameters for us, too!
Now that's everything we need to build the transaction object. Just like the previous lessons, we can now sign this transaction and send it. Once we do, we can log the values of the account balances to see that the smart contract function was called, and that the token transfers were complete. The complete tutorial code will look like this:
const Web3 = require('web3')
const web3 = new Web3('https://ropsten.infura.io/YOUR_INFURA_API_KEY')

const account1 = '' // Your account address 1
const account2 = '' // Your account address 2

const privateKey1 = Buffer.from('YOUR_PRIVATE_KEY_1', 'hex')
const privateKey2 = Buffer.from('YOUR_PRIVATE_KEY_2', 'hex')

// Read the deployed contract - get the addresss from Etherscan
const contractAddress = '0xd03696B53924972b9903eB17Ac5033928Be7D3Bc'
const contractABI = [{"constant":true,"inputs":[],"name":"name","outputs":[{"name":"","type":"string"}],"payable":false,"stateMutability":"view","type":"function"},{"constant":false,"inputs":[{"name":"_spender","type":"address"},{"name":"_value","type":"uint256"}],"name":"approve","outputs":[{"name":"success","type":"bool"}],"payable":false,"stateMutability":"nonpayable","type":"function"},{"constant":true,"inputs":[],"name":"totalSupply","outputs":[{"name":"","type":"uint256"}],"payable":false,"stateMutability":"view","type":"function"},{"constant":false,"inputs":[{"name":"_from","type":"address"},{"name":"_to","type":"address"},{"name":"_value","type":"uint256"}],"name":"transferFrom","outputs":[{"name":"success","type":"bool"}],"payable":false,"stateMutability":"nonpayable","type":"function"},{"constant":true,"inputs":[],"name":"standard","outputs":[{"name":"","type":"string"}],"payable":false,"stateMutability":"view","type":"function"},{"constant":true,"inputs":[{"name":"","type":"address"}],"name":"balanceOf","outputs":[{"name":"","type":"uint256"}],"payable":false,"stateMutability":"view","type":"function"},{"constant":true,"inputs":[],"name":"symbol","outputs":[{"name":"","type":"string"}],"payable":false,"stateMutability":"view","type":"function"},{"constant":false,"inputs":[{"name":"_to","type":"address"},{"name":"_value","type":"uint256"}],"name":"transfer","outputs":[{"name":"success","type":"bool"}],"payable":false,"stateMutability":"nonpayable","type":"function"},{"constant":true,"inputs":[{"name":"","type":"address"},{"name":"","type":"address"}],"name":"allowance","outputs":[{"name":"","type":"uint256"}],"payable":false,"stateMutability":"view","type":"function"},{"inputs":[],"payable":false,"stateMutability":"nonpayable","type":"constructor"},{"anonymous":false,"inputs":[{"indexed":true,"name":"_from","type":"address"},{"indexed":true,"name":"_to","type":"address"},{"indexed":false,"name":"_value","type":"uint256"}],"name":"Transfer","type":"event"},{"anonymous":false,"inputs":[{"indexed":true,"name":"_owner","type":"address"},{"indexed":true,"name":"_spender","type":"address"},{"indexed":false,"name":"_value","type":"uint256"}],"name":"Approval","type":"event"}]

const contract = new web3.eth.Contract(abi, contractAddress)

// Transfer some tokens
web3.eth.getTransactionCount(account1, (err, txCount) => {

  const txObject = {
    nonce:    web3.utils.toHex(txCount),
    gasLimit: web3.utils.toHex(800000), // Raise the gas limit to a much higher amount
    gasPrice: web3.utils.toHex(web3.utils.toWei('10', 'gwei')),
    to: contractAddress,
    data: contract.methods.transfer(account2, 1000).encodeABI()
  }

  const tx = new Tx(txObject)
  tx.sign(privateKey1)

  const serializedTx = tx.serialize()
  const raw = '0x' + serializedTx.toString('hex')

  web3.eth.sendSignedTransaction(raw, (err, txHash) => {
    console.log('err:', err, 'txHash:', txHash)
    // Use this txHash to find the contract on Etherscan!
  })
})

// Check Token balance for account1
contract.methods.balanceOf(account1).call((err, balance) => {
  console.log({ err, balance })
})

// Check Token balance for account2
contract.methods.balanceOf(account2).call((err, balance) => {
  console.log({ err, balance })
})
Now you can run the app.js file from your terminal with NodeJS like this:
$ node app.jsOr simply:
$ node appFeel free to reference the video above if you get stuck! You can also download all the code examples in this tutorial series from github.
#6 · Smart Contract Events with Web3.js
This is the sixth video in the 8-part tutorial series. This video will show you how to examine smart contract events on The Ethereum Blockchain with Web3.js.
Ethereum smart contracts have the ability to emit events that indicate that something happened within the smart contract code execution. Consumers have the ability to subscribe to these events, and Web3.js will provide us with this functionality. That's exactly what we'll cover in this lesson.
We're going to continue using an ERC-20 smart contract as the reference point for this tutorial because this standard specifies that the smart contract must emit a Transfer event anytime an ERC-20 token is transferred. We'll actually connect to the Ethereum main net to subscribe to the Transfer event for the OmiseGo ERC-20 token.
Let's go ahead and set up the app.js file much like we did in the previous lessons. This time, we'll connect to the Ethereum main net. I'll go ahead and paste in the OmiseGo smart contract ABI and address, which can be obtained from Etherscan (watch the above video for instructions). Once we have both of these things, we can create a JavaScript representation of the smart contract with Web3.js and assign it to a variable. All of that setup looks like this:
const Web3 = require('web3')
const web3 = new Web3('https://mainnet.infura.io/YOUR_INFURA_API_KEY')

// OMG Token Contract
const abi = [{"constant":true,"inputs":[],"name":"mintingFinished","outputs":[{"name":"","type":"bool"}],"payable":false,"type":"function"},{"constant":true,"inputs":[],"name":"name","outputs":[{"name":"","type":"string"}],"payable":false,"type":"function"},{"constant":false,"inputs":[{"name":"_spender","type":"address"},{"name":"_value","type":"uint256"}],"name":"approve","outputs":[],"payable":false,"type":"function"},{"constant":true,"inputs":[],"name":"totalSupply","outputs":[{"name":"","type":"uint256"}],"payable":false,"type":"function"},{"constant":false,"inputs":[{"name":"_from","type":"address"},{"name":"_to","type":"address"},{"name":"_value","type":"uint256"}],"name":"transferFrom","outputs":[],"payable":false,"type":"function"},{"constant":true,"inputs":[],"name":"decimals","outputs":[{"name":"","type":"uint256"}],"payable":false,"type":"function"},{"constant":false,"inputs":[],"name":"unpause","outputs":[{"name":"","type":"bool"}],"payable":false,"type":"function"},{"constant":false,"inputs":[{"name":"_to","type":"address"},{"name":"_amount","type":"uint256"}],"name":"mint","outputs":[{"name":"","type":"bool"}],"payable":false,"type":"function"},{"constant":true,"inputs":[],"name":"paused","outputs":[{"name":"","type":"bool"}],"payable":false,"type":"function"},{"constant":true,"inputs":[{"name":"_owner","type":"address"}],"name":"balanceOf","outputs":[{"name":"balance","type":"uint256"}],"payable":false,"type":"function"},{"constant":false,"inputs":[],"name":"finishMinting","outputs":[{"name":"","type":"bool"}],"payable":false,"type":"function"},{"constant":false,"inputs":[],"name":"pause","outputs":[{"name":"","type":"bool"}],"payable":false,"type":"function"},{"constant":true,"inputs":[],"name":"owner","outputs":[{"name":"","type":"address"}],"payable":false,"type":"function"},{"constant":true,"inputs":[],"name":"symbol","outputs":[{"name":"","type":"string"}],"payable":false,"type":"function"},{"constant":false,"inputs":[{"name":"_to","type":"address"},{"name":"_value","type":"uint256"}],"name":"transfer","outputs":[],"payable":false,"type":"function"},{"constant":false,"inputs":[{"name":"_to","type":"address"},{"name":"_amount","type":"uint256"},{"name":"_releaseTime","type":"uint256"}],"name":"mintTimelocked","outputs":[{"name":"","type":"address"}],"payable":false,"type":"function"},{"constant":true,"inputs":[{"name":"_owner","type":"address"},{"name":"_spender","type":"address"}],"name":"allowance","outputs":[{"name":"remaining","type":"uint256"}],"payable":false,"type":"function"},{"constant":false,"inputs":[{"name":"newOwner","type":"address"}],"name":"transferOwnership","outputs":[],"payable":false,"type":"function"},{"anonymous":false,"inputs":[{"indexed":true,"name":"to","type":"address"},{"indexed":false,"name":"value","type":"uint256"}],"name":"Mint","type":"event"},{"anonymous":false,"inputs":[],"name":"MintFinished","type":"event"},{"anonymous":false,"inputs":[],"name":"Pause","type":"event"},{"anonymous":false,"inputs":[],"name":"Unpause","type":"event"},{"anonymous":false,"inputs":[{"indexed":true,"name":"owner","type":"address"},{"indexed":true,"name":"spender","type":"address"},{"indexed":false,"name":"value","type":"uint256"}],"name":"Approval","type":"event"},{"anonymous":false,"inputs":[{"indexed":true,"name":"from","type":"address"},{"indexed":true,"name":"to","type":"address"},{"indexed":false,"name":"value","type":"uint256"}],"name":"Transfer","type":"event"}]
const address = '0xd26114cd6EE289AccF82350c8d8487fedB8A0C07'

const contract = new web3.eth.Contract(abi, address)
Now we can look at the past events for this smart contract with the getPastEvents() function available on our contract object. First, let's get all of the events emitted by the contract, for its entire lifetime:
contract.getPastEvents(
  'AllEvents',
  {
    fromBlock: 0,
    toBlock: 'latest'
  },
  (err, events) => { console.log(events) }
)
Here, this function takes two arguments: the event name, and a set of filtering parameters. We specify that we want to listen to all events by passing 'AllEvents'. We'll specify a specific event momentarily. Then, we pass some filtering parameters that specify that we want to get events for the entire lifetime of this contract by passing from: 0, or the first block in the chain, to toBlock: 'latest', or the latest block in the chain. Just a note, if you run this code, it will probably fail execution because the event stream is so large for this particular contract on the Ethereum main net!
Let's aim for a successful execution by limiting the number of blocks we want to stream from. We can pass in a more recent fromBlock like this:
contract.getPastEvents(
  'AllEvents',
  {
    fromBlock: 5854000,
    toBlock: 'latest'
  },
  (err, events) => { console.log(events) }
)
Ah, that's much better. Now, we can also specify that we just want to listen to the Transfer event like this:
contract.getPastEvents(
  'Transfer',
  {
    fromBlock: 5854000,
    toBlock: 'latest'
  },
  (err, events) => { console.log(events) }
)
And that's it! That's all the code you need to see all of the recent transfer events for the OmiseGo ERC-20 token. With this code, you could easily build something like a transaction history for the OMG token in a crypto wallet. That's the power of Web3.js. At this point, the completed tutorial code should look like this:
const Web3 = require('web3')
const web3 = new Web3('https://mainnet.infura.io/YOUR_INFURA_API_KEY')

// OMG Token Contract
const abi = [{"constant":true,"inputs":[],"name":"mintingFinished","outputs":[{"name":"","type":"bool"}],"payable":false,"type":"function"},{"constant":true,"inputs":[],"name":"name","outputs":[{"name":"","type":"string"}],"payable":false,"type":"function"},{"constant":false,"inputs":[{"name":"_spender","type":"address"},{"name":"_value","type":"uint256"}],"name":"approve","outputs":[],"payable":false,"type":"function"},{"constant":true,"inputs":[],"name":"totalSupply","outputs":[{"name":"","type":"uint256"}],"payable":false,"type":"function"},{"constant":false,"inputs":[{"name":"_from","type":"address"},{"name":"_to","type":"address"},{"name":"_value","type":"uint256"}],"name":"transferFrom","outputs":[],"payable":false,"type":"function"},{"constant":true,"inputs":[],"name":"decimals","outputs":[{"name":"","type":"uint256"}],"payable":false,"type":"function"},{"constant":false,"inputs":[],"name":"unpause","outputs":[{"name":"","type":"bool"}],"payable":false,"type":"function"},{"constant":false,"inputs":[{"name":"_to","type":"address"},{"name":"_amount","type":"uint256"}],"name":"mint","outputs":[{"name":"","type":"bool"}],"payable":false,"type":"function"},{"constant":true,"inputs":[],"name":"paused","outputs":[{"name":"","type":"bool"}],"payable":false,"type":"function"},{"constant":true,"inputs":[{"name":"_owner","type":"address"}],"name":"balanceOf","outputs":[{"name":"balance","type":"uint256"}],"payable":false,"type":"function"},{"constant":false,"inputs":[],"name":"finishMinting","outputs":[{"name":"","type":"bool"}],"payable":false,"type":"function"},{"constant":false,"inputs":[],"name":"pause","outputs":[{"name":"","type":"bool"}],"payable":false,"type":"function"},{"constant":true,"inputs":[],"name":"owner","outputs":[{"name":"","type":"address"}],"payable":false,"type":"function"},{"constant":true,"inputs":[],"name":"symbol","outputs":[{"name":"","type":"string"}],"payable":false,"type":"function"},{"constant":false,"inputs":[{"name":"_to","type":"address"},{"name":"_value","type":"uint256"}],"name":"transfer","outputs":[],"payable":false,"type":"function"},{"constant":false,"inputs":[{"name":"_to","type":"address"},{"name":"_amount","type":"uint256"},{"name":"_releaseTime","type":"uint256"}],"name":"mintTimelocked","outputs":[{"name":"","type":"address"}],"payable":false,"type":"function"},{"constant":true,"inputs":[{"name":"_owner","type":"address"},{"name":"_spender","type":"address"}],"name":"allowance","outputs":[{"name":"remaining","type":"uint256"}],"payable":false,"type":"function"},{"constant":false,"inputs":[{"name":"newOwner","type":"address"}],"name":"transferOwnership","outputs":[],"payable":false,"type":"function"},{"anonymous":false,"inputs":[{"indexed":true,"name":"to","type":"address"},{"indexed":false,"name":"value","type":"uint256"}],"name":"Mint","type":"event"},{"anonymous":false,"inputs":[],"name":"MintFinished","type":"event"},{"anonymous":false,"inputs":[],"name":"Pause","type":"event"},{"anonymous":false,"inputs":[],"name":"Unpause","type":"event"},{"anonymous":false,"inputs":[{"indexed":true,"name":"owner","type":"address"},{"indexed":true,"name":"spender","type":"address"},{"indexed":false,"name":"value","type":"uint256"}],"name":"Approval","type":"event"},{"anonymous":false,"inputs":[{"indexed":true,"name":"from","type":"address"},{"indexed":true,"name":"to","type":"address"},{"indexed":false,"name":"value","type":"uint256"}],"name":"Transfer","type":"event"}]
const address = '0xd26114cd6EE289AccF82350c8d8487fedB8A0C07'

const contract = new web3.eth.Contract(abi, address)

// Get Contract Event Stream
contract.getPastEvents(
  'AllEvents',
  {
    fromBlock: 5854000,
    toBlock: 'latest'
  },
  (err, events) => { console.log(events) }
)
Now you can run the app.js file from your terminal with NodeJS like this:
$ node app.jsOr simply:
$ node appFeel free to reference the video above if you get stuck! You can also download all the code examples in this tutorial series from github.
#7 · Inspecting Blocks with Web3.js
This is the seventh video in the 8-part tutorial series. This video will show you how to inspect blocks The Ethereum Blockchain with Web3.js.
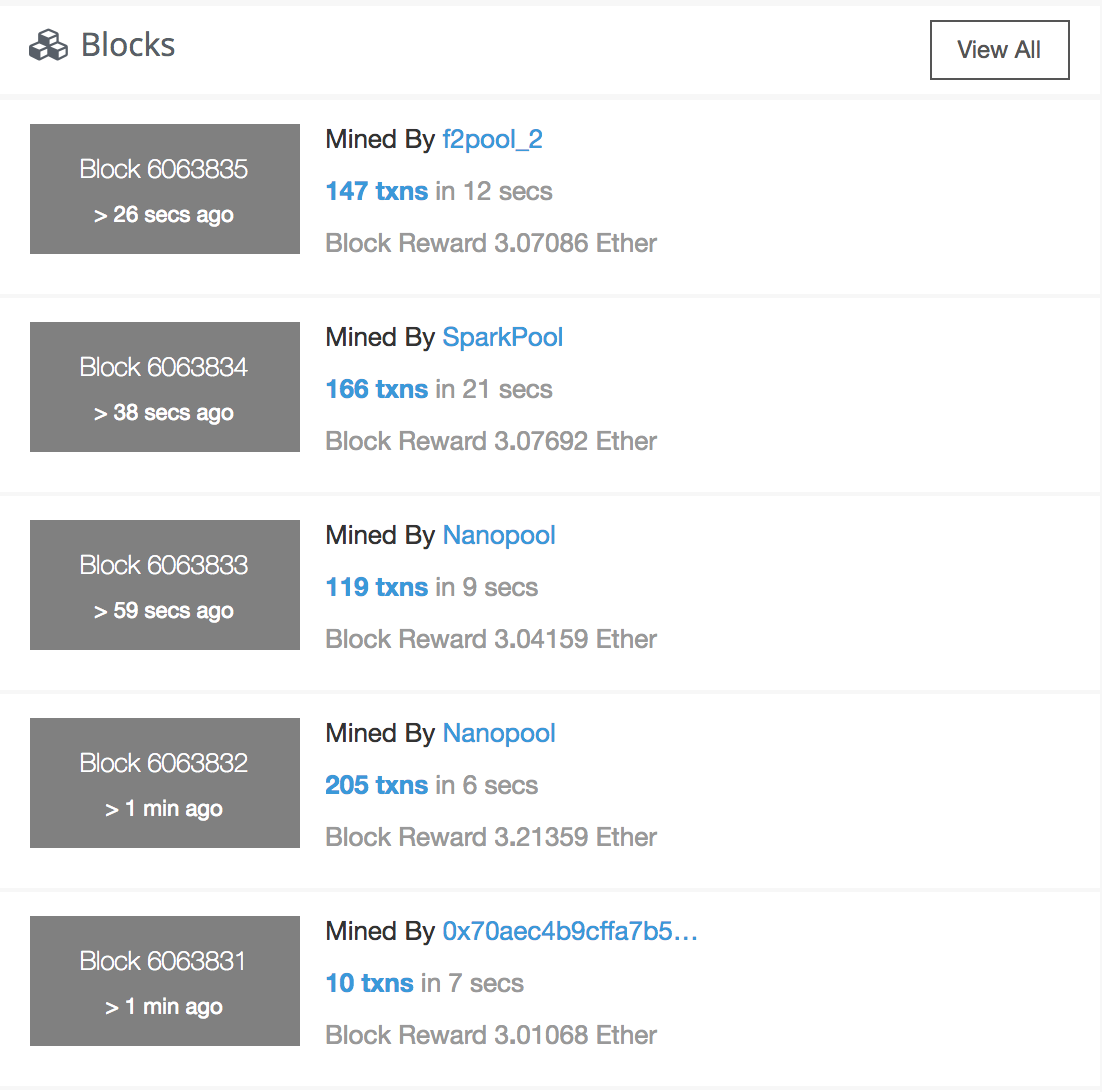
Inspecting blocks is often useful when analyzing history on The Ethereum Blockchain. Web3.js has lots of functionality that helps us to do just that. For example, we could build something that looks like this block history feature on Etherscan:
Let's set up an app.js file to start using some of this functionality provided by Web3.js. This setup will be much simpler than the previous lessons. We'll connect to the main net to inspect blocks there:
const Web3 = require('web3')
const web3 = new Web3('https://mainnet.infura.io/YOUR_INFURA_API_KEY')
First, we can get the latest block number like this:
web3.eth.getBlockNumber().then(console.log)We can also get all the data for the latest block like this:
web3.eth.getBlock('latest').then(console.log)You can watch the video above as I explain all the data that gets logged by this function.
If we were going to build a block history feature like the one on Etherscan pictured above, we would need to get a list of the most recent blocks in the chain. We can do this by fetching the most recent block and counting backwards until we have the last 10 blocks in the chain. We can do that with a for loop like this:
web3.eth.getBlockNumber().then((latest) => {
  for (let i = 0; i < 10; i++) {
    web3.eth.getBlock(latest - i).then(console.log)
  }
})
Web3.js has another nice feature that allows you to inspect transactions contained within a specific block. We can do that like this:
const hash = '0x66b3fd79a49dafe44507763e9b6739aa0810de2c15590ac22b5e2f0a3f502073'
web3.eth.getTransactionFromBlock(hash, 2).then(console.log)
That's it! That's how easy it is to inspect blocks with Web3.js. Check out the video above for more in depth explanation of the data returned by the blocks. At this point, all of the tutorial code should look like this:
const Web3 = require('web3')
const web3 = new Web3('https://mainnet.infura.io/YOUR_INFURA_API_KEY')

// get latest block number
web3.eth.getBlockNumber().then(console.log)

// // get latest block
web3.eth.getBlock('latest').then(console.log)

// get latest 10 blocks
web3.eth.getBlockNumber().then((latest) => {
  for (let i = 0; i < 10; i++) {
    web3.eth.getBlock(latest - i).then(console.log)
  }
})

// get transaction from specific block
const hash = '0x66b3fd79a49dafe44507763e9b6739aa0810de2c15590ac22b5e2f0a3f502073'
web3.eth.getTransactionFromBlock(hash, 2).then(console.log)
Now you can run the app.js file from your terminal with NodeJS like this:
$ node app.jsOr simply:
$ node appFeel free to reference the video above if you get stuck! You can also download all the code examples in this tutorial series from github.
#8 · Web3.js Utilities
This is the eighth and final video in the 8-part tutorial series. This video will show you how to use utilities included with Web3.js and several cool bonus tips and tricks.
This lesson is designed to show you some cool tips and tricks that you might not know about Web3.js! Let's go ahead and set up the app.js and jump into examining these tips. Let's connect to the Ethereum main net like this:
const Web3 = require('web3')
const web3 = new Web3('https://mainnet.infura.io/YOUR_INFURA_API_KEY')
First, you can actually get the average gas price currently for the network like this:
web3.eth.getGasPrice().then((result) => {
  console.log(web3.utils.fromWei(result, 'ether')
})
If you've developed on the blockchain before, you have probably dealt with hashing functions. Web3.js has a lot of built in helpers for using hashing functions. You have direct access to the sha3 function like this:
console.log(web3.utils.sha3('Dapp University'))Or as keccack256:
console.log(web3.utils.keccak256('Dapp University'))You can also handle (pseudo) randomness by generating a 32 byte random hex like this:
console.log(web3.utils.randomHex(32))Have you ever found yourself trying to perform an action on a JavaScript array or object, and needed the help of an external library? Thankfully, Web3.js ships with the underscoreJS library:
const _ = web3.utils._
_.each({ key1: 'value1', key2: 'value2' }, (value, key) => {
  console.log(key)
})
And that's it! Those are some fancy tips and tricks you can use with Web3.js. Here is the complete tutorial code for this lesson:
const Web3 = require('web3')
const web3 = new Web3('https://mainnet.infura.io/YOUR_INFURA_API_KEY')

// Get average gas price in wei from last few blocks median gas price
web3.eth.getGasPrice().then((result) => {
  console.log(web3.utils.fromWei(result, 'ether')
})

// Use sha256 Hashing function
console.log(web3.utils.sha3('Dapp University'))

// Use keccak256 Hashing function (alias)
console.log(web3.utils.keccak256('Dapp University'))

// Get a Random Hex
console.log(web3.utils.randomHex(32))

// Get access to the underscore JS library
const _ = web3.utils._

_.each({ key1: 'value1', key2: 'value2' }, (value, key) => {
  console.log(key)
})
Now you can run the app.js file from your terminal with NodeJS like this:
$ node app.jsOr simply:
$ node appFeel free to reference the video above if you get stuck! You can also download all the code examples in this tutorial series from github.
Happy with this tutorial? Then you NEED to join my free training here where I'll show you how to build a real world blockchain app so that you can become a highly paid blockchain developer!