The Ultimate Ethereum Dapp Tutorial (How to Build a Full Stack Decentralized Application Step-By-Step)
By Gregory McCubbin ·
Hey everybody, it’s Gregory from Dapp University!
Today I'm going to show you how to build your first decentralized application, or dApp, on the Ethereum blockchain. I'll show you how to write your first Ethereum smart contract, where we'll hold an election between two candidates. We'll write tests against the smart contract, deploy it to the Ethereum blockchain, and develop a client-side application that allows accounts to cast votes. We'll also examine key concepts like "what is a blockchain?", "what is a smart contract?", and "how does a dApp work?".
You can watch me build the full decentralized application in the 2-hour video above. I'll also guide you through the step-by-step instructions in this tutorial. Before we start building our dApp, let's examine some key concepts. If you are eager to start coding, feel free to skip ahead to the next part of the tutorial. 😀
You can also download all the video content to the full 2-hour video tutorial here for free 🎉.
What is a Blockchain?
Let’s use an analogy to understand what a blockchain is and how it works. Let’s look at a web application.

Normally when you interact with a web application, you use a web browser to connect to a central server over a network. All the code of this web application lives on this central server, and all the data lives in a central database. Anytime you transact with your application, must communicate with this central server on the web.
If we were to build our voting application on the web, we’d run into a few problems:
- The data on the database could be changed: it could be counted more than once, or removed entirely.
- The source code on the web server could also be changed at any time.
We don’t want to build our app on the web. We want to build it on the blockchain where anyone connected to the network can participate in the election. We want to ensure that their votes are counted, and that they are only counted once. So let’s take a look at how that works.
Instead of having a network, a central server, and a database, the blockchain is a network and a database all in one. A blockchain is a peer-to-peer network of computers, called nodes, that share all the data and the code in the network. So, if you’re a device connected to the blockchain, you are a node in the network, and you talk to all the other computer nodes in the network. You now have a copy of all the data and the code on the blockchain. There are no more central servers. Just a bunch of computers that talk to one another on the same network.

Instead of a centralized database, all the transaction data that is shared across the nodes in the blockchain is contained in bundles of records called blocks, which are chained together to create the public ledger. This public ledger represents all the data in the blockchain. All the data in the public ledger is secured by cryptographic hashing, and validated by a consensus algorithm. Nodes on the network participate to ensure that all copies of the data distributed across the network are the same. That’s one very important reason why we’re building our voting application on the blockchain, because we want to ensure that our vote was counted, and that it did not change.
What would it look like for a user of our application to vote on the blockchain? Well, for starters, the user needs an account with a wallet address with some Ether, Ethereum's cryptocurrency. Once they connect to the network, they cast their vote and pay a small transaction fee to write this transaction to the blockchain. This transaction fee is called “gas”. Whenever the vote is cast, some of the nodes on the network, called miners, compete to complete this transaction. The miner who completes this transaction is awarded the Ether that we paid to vote.
As a recap, when I vote, I pay a gas price to vote, and when my vote gets recorded, one of the computers on the network gets paid the my Ether fee. I in turn am confident my vote was recorded accurately forever.
So it’s also important to note that voting on the blockchain costs Ether, but just seeing a list of candidates does not. That’s because reading data from the blockchain is free, but writing to it is not.
What is a Smart Contract?
That’s how the voting process works, but how do we actually code our app? Well, the Ethereum blockchain allows us to execute code with the Ethereum Virtual Machine (EVM) on the blockchain with something called a smart contract.
Smart contracts are where all the business logic of our application lives. This is where we’ll actually code the decentralized portion our app. Smart contracts are in charge of reading and writing data to the blockchain, as well as executing business logic. Smart contacts are written in a programming language called Solidity, which looks a lot like Javascript. It is a full blown programming language that will allow us to do many of the same types of things Javascript is capable of, but it behaves a bit differently because of its use case, as we’ll see in this tutorial.
The function of smart contracts on the blockchain is very similar to a microservice on the web. If the public ledger represents the database layer of the blockchain, then smart contracts are where all the business logic that transacts with that data lives.
Also, they're called smart contracts because they represent a covenant or agreement. In the case of our voting dApp, it is an agreement that my vote will count, that other votes are only counted once, and that the candidate with the most votes will actually win the election.
Now let’s take a quick look at the structure of the dApp we’re building.

We’ll have a traditional front-end client that is written in HTML, CSS, and Javascript. Instead of talking to a back-end server, this client will connect to a local Ethereum blockchain that we’ll install. We’ll code all the business logic about our dApp in an Election smart contract with the Solidity programming language. We’ll deploy this smart contract to our local Etherum blockchain, and allow accounts to start voting.
Now we’ve seen what a blockchain is and how it works. We’ve seen why we want to build our voting dApp on the blockchain instead of the current web. And we’ve seen that we want to code our dApp by writing a smart contract that will be deployed to the Ethereum blockchain. Now let's jump in and start programming!
What We'll Be Building
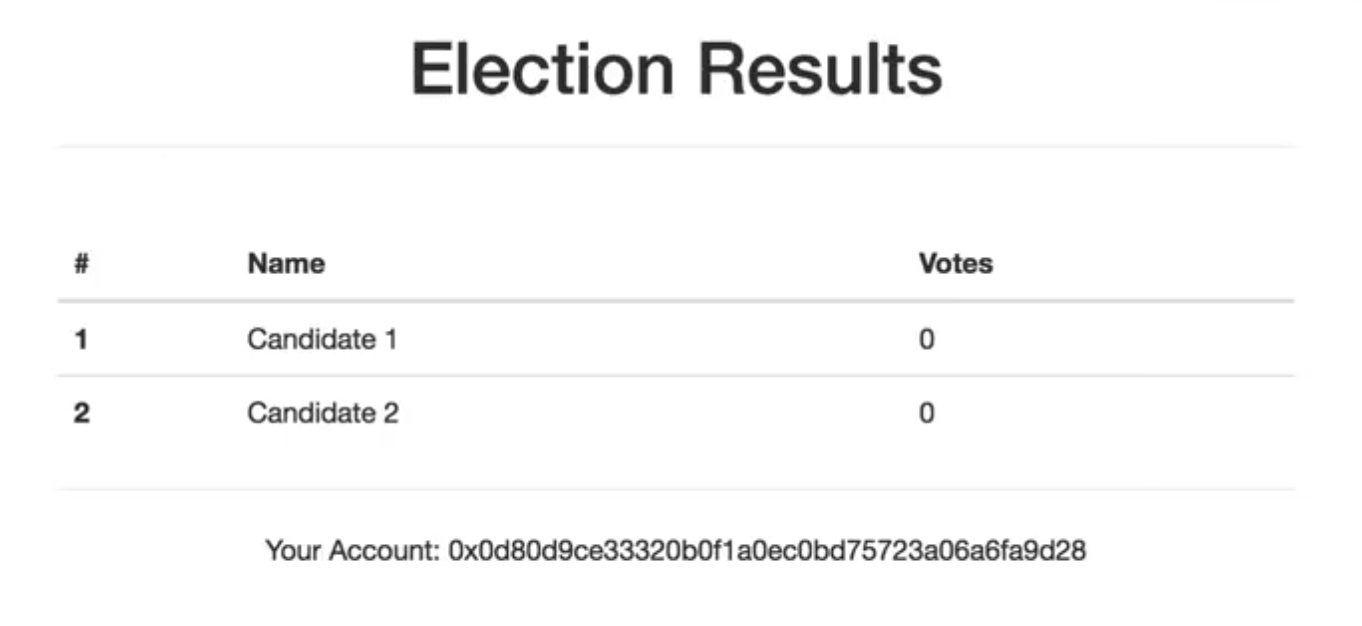
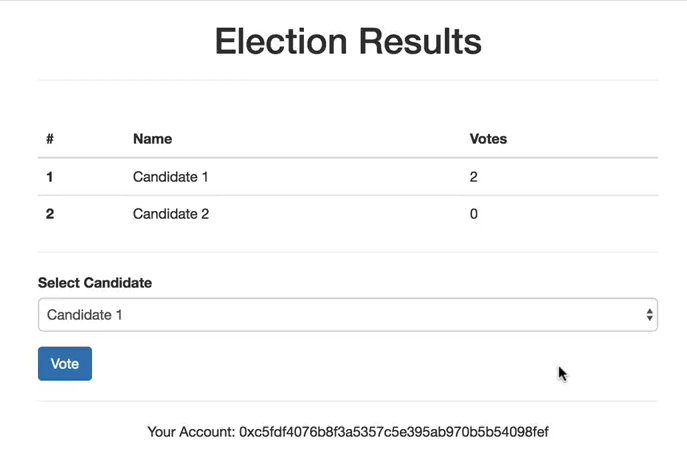
Here is a demonstration of the voting dApp that we'll be building.
We'll build a client-side application that will talk to our smart contract on the blockchain. This client-side application will have a table of candidates that lists each candidate's id, name, and vote count. It will have a form where we can cast a vote for our desired candidate. It also shows the account we're connected to the blockchain with under "your account".
Installing Dependencies
The accompanying video footage for this portion of the tutorial begins at 8:53.
In order to build our dApp, we need a few dependencies first.
Node Package Manager (NPM)
The first dependency we need is Node Package Manager, or NPM, which comes with Node.js. You can see if you have node already installed by going to your terminal and typing:
$ node -vTruffle Framework
The next dependency is the Truffle Framework, which allows us to build decentralized applications on the Ethereum blockchain. It provides a suite of tools that allow us to write smart contacts with the Solidity programming language. It also enables us to test our smart contracts and deploy them to the blockchain. It also gives us a place to develop our client-side application.
You can install Truffle with NPM in your command line like this:
$ npm install -g truffleGanache
The next dependency is Ganache, a local in-memory blockchain. You can install Ganache by downloading it from the Truffle Framework website. It will give us 10 external accounts with addresses on our local Ethereum blockchain. Each account is preloaded with 100 fake ether.
Metamask
The next dependency is the Metamask extension for Google Chrome. In order to use the blockchain, we must connect to it (remember, I said the block chain is a network). We’ll have to install a special browser extension in order to use the Ethereum block chain. That’s where metamask comes in. We’ll be able to connect to our local Ethereum blockchain with our personal account, and interact with our smart contract.
We’re going to be using the Metamask chrome extension for this tutorial, so you’ll also need to install the google chrome browser if you don’t have it already. To install Metamask, search for the Metamask Chrome plugin in the Google Chrome web store. Once you’ve installed it, be sure that it is checked in your list of extensions. You’ll see the fox icon in the top right hand side of your Chrome browser when it’s installed. Reference the video walk through if you get stuck!
Syntax Highlighting
The dependency is optional, but recommended. I recommend installing syntax highlighting for the Solidity programming language. Most text editors and IDEs don’t have syntax highlighting for Solidity out of the box, so you’ll have to install a package to support this. I’m using Sublime Text, and I’ve downloaded the "Ethereum" package that provides nice syntax highlighting for Solidity.
Smoke Test - Step 1
The accompanying video footage for this portion of the tutorial begins at 11:40. You can download the code for this portion of the tutorial here. Feel free to use these as a reference point if you get stuck!
Now that we have our dependencies installed, let’s start building our dApp!
First, find where you downloaded Ganache, and open it. Now that Ganache has booted, you have a local blockchain running.
Ganache gave us 10 accounts preloaded with 100 fake Ether (this isn't worth anything on the main Ethereum network). Each account has a unique address and a private key. Each account address will serve as a unique identifier for each voter in our election.
Now let's create a project directory for our dApp in the command line like this:
$ mkdir election
$ cd election
Now that we're inside our project, we can get up and running fast with a Truffle box. We'll be using the Pet Shop box for this tutorial. From within your project directory, install the pet shop box from the command line like this:
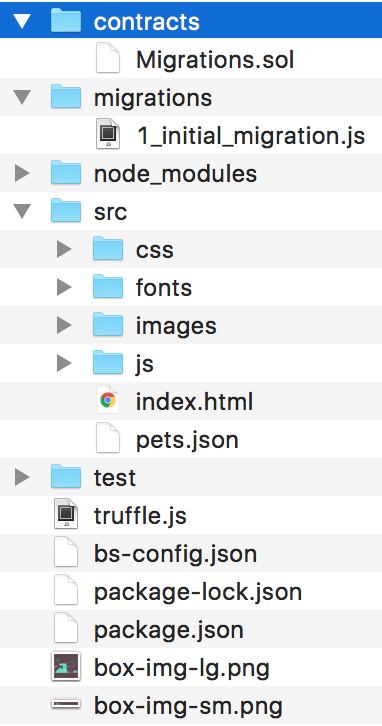
$ truffle unbox pet-shopLet's see what the pet shop box gave us:
Now let's start writing our smart contract! This smart contract will contain all the business logic of our dApp. It will be in charge reading from and write to the Ethereum blockchain. It will allow us to list the candidates that will run in the election, and keep track of all the votes and voters. It will also govern all of the rules of the election, like enforcing accounts to only vote once. From the root of your project, go ahead and create a new contract file in the contracts directory like this:
$ touch contracts/Election.solLet's start by creating a "smoke test" that will ensure that we've set up our project properly, and that we can deploy the contract to the blockchain successfully. Open the file and start with the following code:
pragma solidity 0.4.2;

contract Election {
    // Read/write candidate
    string public candidate;

    // Constructor
    function Election () public {
        candidate = "Candidate 1";
    }
}
Let me explain this code. We start by declaring the solidity version with the pragma solidity statement. Next, we declare the smart contract with the "contract" keyword, followed by the contract name. Next, we declare a state variable that will store the value of the candidate name. State variables allow us to write data to the blockchain. We have declared that this variable will be a string, and we have set its visibility to public. Because it is public, solidity will give us a getter function for free that will allow us to access this value outside of our contract. We'll see that in action later in the console!
Then, we create a constructor function that will get called whenever we deploy the smart contract to the blockchain. This is where we'll set the value of the candidate state variable that will get stored to the blockchain upon migration. Notice that the constructor function has the same name as the smart contract. This is how Solidity knows that the function is a constructor.
Now that we've created the foundation for the smart contract, let's see if we can deploy it to the blockchain. In order to do this, we'll need to create a new file in the migrations directory. From your project root, create a new file from the command line like this:
$ touch migrations/2_deploy_contracts.jsNotice that we number all of our files inside the migrations directory with numbers so that Truffle knows which order to execute them in. Let's create a new migration to deploy the contract like this:
var Election = artifacts.require("./Election.sol");

module.exports = function(deployer) {
  deployer.deploy(Election);
};
First, we require the contract we've created, and assign it to a variable called "Election". Next, we add it to the manifest of deployed contracts to ensure that it gets deployed when we run the migrations. Now let's run our migrations from the command line like this:
$ truffle migrateNow that we have successfully migrated our smart contract to the local Ethereum blockchain, let's open the console to interact with the smart contract. You can open the truffle console from the command line like this:
$ truffle consoleNow that we're inside the console, let's get an instance of our deployed smart contract and see if we can read the candidate's name from the contract. From the console, run this code:
Election.deployed().then(function(instance) { app = instance })Here Election is the name of the variable that we created in the migration file. We retrieved a deployed instance of the contract with the deployed() function, and assigned it to an app variable inside the promise's callback function. This might look a little confusing at first, but you can reference the console demonstration in the video at 21:50 for further explanation.
Now we can read the value of the candidate variable like this:
app.candidate()
// => 'Candidate 1'
Congratulations! You've just written your first smart contract, deployed to the blockchain, and retrieved some of its data.
List Candidates - Step 2
The accompanying video footage for this portion of the tutorial begins at 27:11. You can download the code for this portion of the tutorial here. Feel free to use these as a reference point if you get stuck!
Now that everything is set up properly, let's continue building out the smart contact by listing out the candidates that will run in the election. We need a way to store multiple candidates, and store multiple attributes about each candidate. We want to keep track of a candidate's id, name, and vote count. Here is how we will model the candidate:
contract Election {
    // Model a Candidate
    struct Candidate {
        uint id;
        string name;
        uint voteCount;
    }

    // ...
}
We have modeled the candidate with a Solidity Struct. Solidity allows us to create our own structure types as we've done for our candidate here. We specified that this struct has an id of unsigned integer type, name of string type, and voteCount of unsigned integer type. Simply declaring this struct won't actually give us a candidate. We need to instantiate it and assign it to a variable before we can write it to storage.
The next thing we need is a place to store the candidates. We need a place to store one of the structure types that we've just created. We can do this with a Solidity mapping. A mapping in Solidity is like an associative array or a hash, that associates key-value pairs. We can create this mapping like this:
contract Election {
    // Model a Candidate
    struct Candidate {
        uint id;
        string name;
        uint voteCount;
    }

    // Read/write Candidates
    mapping(uint => Candidate) public candidates;

    // ...
}
In this case, the key to the mapping is an unsigned integer, and the value is a Candidate structure type that we just defined. This essentially gives us an id-based look up for each candidate. Since this mapping is assigned to a state variable, we will write data to the blockchain anytime we assign new key-value pairs to it. Next, we set this mapping's visibility to public in order to get a getter function, just like we did with the candidate name in the smoke test.
Next, we keep track of how many candidates exist in the election with a counter cache state variable like this:
contract Election {
    // Model a Candidate
    struct Candidate {
        uint id;
        string name;
        uint voteCount;
    }

    // Read/write Candidates
    mapping(uint => Candidate) public candidates;

    // Store Candidates Count
    uint public candidatesCount;

    // ...
}
In Solidity, there is no way to determine the size of a mapping, and no way to iterate over it, either. That's because any key in a mapping that hasn't been assigned a value yet will return a default value (an empty candidate in this case). For example, if we only had 2 candidates in this election, and we try to look up candidate #99, then the mapping will return an empty Candidate structure. This behavior makes it impossible to know how many candidates exist, and therefore we must use a counter cache.
Next, let's create a function to add candidates to the mapping we've created like this:
contract Election {
    // ...

    function addCandidate (string _name) private {
        candidatesCount ++;
        candidates[candidatesCount] = Candidate(candidatesCount, _name, 0);
    }
}
We've declared the function addCandidate that takes one argument of string type that represents the candidate's name. Inside the function, we increment the candidate counter cache to denote that a new candidate has been added. Then we update the mapping with a new Candidate struct, using the current candidate count as the key. This Candidate struct is initialized with the candidate id from the current candidate count, the name from the function argument, and the initial vote count to 0. Note that this function's visibility is private because we only want to call it inside the contract.
Now we can add two candidates to our election by calling the "addCandidate" function twice inside the constructor function like this:
contract Election {
    // ...

    function Election () public {
        addCandidate("Candidate 1");
        addCandidate("Candidate 2");
    }

    // ...
}
This migration will execute when we deploy the contract to the blockchain, and populate our election with two candidates. At this point, your complete contract code should look like this:
pragma solidity ^0.4.2;

contract Election {
    // Model a Candidate
    struct Candidate {
        uint id;
        string name;
        uint voteCount;
    }

    // Read/write candidates
    mapping(uint => Candidate) public candidates;

    // Store Candidates Count
    uint public candidatesCount;

    function Election () public {
        addCandidate("Candidate 1");
        addCandidate("Candidate 2");
    }

    function addCandidate (string _name) private {
        candidatesCount ++;
        candidates[candidatesCount] = Candidate(candidatesCount, _name, 0);
    }

}
Now let's migrate our contract like this:
$ truffle migrate --resetNow try to interact with the candidates inside the console. You can follow along with me as I demonstrate this in the video at 37:31. I'll leave that to you as an exercise. 😀
Now let's write some tests to ensure that our smart contract is initialized correctly. First, let me explain why testing is so important when you're developing smart contracts. We want to ensure that the contracts are bug free for a few reasons:
1. All of the code on the Ethereum blockchain is immutable; it cannot change. If the contract contains any bugs, we must disable it and deploy a new copy. This new copy will not have the same state as the old contract, and it will have a different address.
2. Deploying contracts costs gas because it creates a transaction and writes data to the blockchain. This costs Ether, and we want to minimize the amount of Ether we ever have to pay.
3. If any of our contract functions that write to the blockchain contain bugs, the account who is calling this function could potentially waste Ether, and it might not behave the way they expect.
Testing
Now let's write some tests. Make sure you have Ganache running first. Then, create a new test file in the command line from the root of your project like this:
$ touch test/election.jsWe'll write all our tests in Javascript inside this file with the Mocha testing framework and the Chai assertion library. These come bundled with the Truffle framework. We'll write all these tests in Javascript to simulate client-side interaction with our smart contract, much like we did in the console. Here is all the code for the tests:
var Election = artifacts.require("./Election.sol");

contract("Election", function(accounts) {
  var electionInstance;

  it("initializes with two candidates", function() {
    return Election.deployed().then(function(instance) {
      return instance.candidatesCount();
    }).then(function(count) {
      assert.equal(count, 2);
    });
  });

  it("it initializes the candidates with the correct values", function() {
    return Election.deployed().then(function(instance) {
      electionInstance = instance;
      return electionInstance.candidates(1);
    }).then(function(candidate) {
      assert.equal(candidate[0], 1, "contains the correct id");
      assert.equal(candidate[1], "Candidate 1", "contains the correct name");
      assert.equal(candidate[2], 0, "contains the correct votes count");
      return electionInstance.candidates(2);
    }).then(function(candidate) {
      assert.equal(candidate[0], 2, "contains the correct id");
      assert.equal(candidate[1], "Candidate 2", "contains the correct name");
      assert.equal(candidate[2], 0, "contains the correct votes count");
    });
  });
});
Let me explain this code. First, we require the require the contract and assign it to a variable, like we did in the migration file. Next, we call the "contract" function, and write all our tests within the callback function. This callback function provides an "accounts" variable that represents all the accounts on our blockchain, provided by Ganache.
The first test checks that the contract was initialized with the correct number of candidates by checking the candidates count is equal to 2.
The next test inspects the values of each candidate in the election, ensuring that each candidate has the correct id, name, and vote count.
Now let's run the tests from the command line like this:
$ truffle testYay, they pass! 🎉 If you got stuck you can follow along with me as I write these tests in the video for further explanation.
Client-Side Application
Now let's start building out the client-side application that will talk to our smart contract. We'll do this by modifying the HTML and Javascript files that came with the Truffle Pet Shop box that we installed in the previous section. We'll use this existing code to get started. Let's also take note of a few other things that came with the Truffle Pet Shop box like the Bootstrap framework that will keep us from having to write any CSS in this tutorial. We also got lite-server, which will serve our assets for development purposes.
You do not have to be a front-end expert to follow along with this part of the tutorial. I have intentionally kept the HTML and Javascript code very simple, and we will not spend much time focusing on it. I want to stay focused on developing the smart contract portion of our dApp!
Go ahead and replace all of the content of your "index.html" file with this code:
<!DOCTYPE html>
<html lang="en">
  <head>
    <meta charset="utf-8">
    <meta http-equiv="X-UA-Compatible" content="IE=edge">
    <meta name="viewport" content="width=device-width, initial-scale=1">
    <title>Election Results</title>

    <!-- Bootstrap -->
    <link href="css/bootstrap.min.css" rel="stylesheet">
  </head>
  <body>
    <div class="container" style="width: 650px;">
      <div class="row">
        <div class="col-lg-12">
          <h1 class="text-center">Election Results</h1>
          <hr/>
          <br/>
          <div id="loader">
            <p class="text-center">Loading...</p>
          </div>
          <div id="content" style="display: none;">
            <table class="table">
              <thead>
                <tr>
                  <th scope="col">#</th>
                  <th scope="col">Name</th>
                  <th scope="col">Votes</th>
                </tr>
              </thead>
              <tbody id="candidatesResults">
              </tbody>
            </table>
            <hr/>
            <p id="accountAddress" class="text-center"></p>
          </div>
        </div>
      </div>
    </div>

    <!-- jQuery (necessary for Bootstrap's JavaScript plugins) -->
    <script src="https://ajax.googleapis.com/ajax/libs/jquery/1.12.4/jquery.min.js"></script>
    <!-- Include all compiled plugins (below), or include individual files as needed -->
    <script src="js/bootstrap.min.js"></script>
    <script src="js/web3.min.js"></script>
    <script src="js/truffle-contract.js"></script>
    <script src="js/app.js"></script>
  </body>
</html>
Next, replace all of the content of your "app.js" file with this code:
App = {
  web3Provider: null,
  contracts: {},
  account: '0x0',

  init: function() {
    return App.initWeb3();
  },

  initWeb3: function() {
    if (typeof web3 !== 'undefined') {
      // If a web3 instance is already provided by Meta Mask.
      App.web3Provider = web3.currentProvider;
      web3 = new Web3(web3.currentProvider);
    } else {
      // Specify default instance if no web3 instance provided
      App.web3Provider = new Web3.providers.HttpProvider('http://localhost:7545');
      web3 = new Web3(App.web3Provider);
    }
    return App.initContract();
  },

  initContract: function() {
    $.getJSON("Election.json", function(election) {
      // Instantiate a new truffle contract from the artifact
      App.contracts.Election = TruffleContract(election);
      // Connect provider to interact with contract
      App.contracts.Election.setProvider(App.web3Provider);

      return App.render();
    });
  },

  render: function() {
    var electionInstance;
    var loader = $("#loader");
    var content = $("#content");

    loader.show();
    content.hide();

    // Load account data
    web3.eth.getCoinbase(function(err, account) {
      if (err === null) {
        App.account = account;
        $("#accountAddress").html("Your Account: " + account);
      }
    });

    // Load contract data
    App.contracts.Election.deployed().then(function(instance) {
      electionInstance = instance;
      return electionInstance.candidatesCount();
    }).then(function(candidatesCount) {
      var candidatesResults = $("#candidatesResults");
      candidatesResults.empty();

      for (var i = 1; i <= candidatesCount; i++) {
        electionInstance.candidates(i).then(function(candidate) {
          var id = candidate[0];
          var name = candidate[1];
          var voteCount = candidate[2];

          // Render candidate Result
          var candidateTemplate = "<tr><th>" + id + "</th><td>" + name + "</td><td>" + voteCount + "</td></tr>"
          candidatesResults.append(candidateTemplate);
        });
      }

      loader.hide();
      content.show();
    }).catch(function(error) {
      console.warn(error);
    });
  }
};

$(function() {
  $(window).load(function() {
    App.init();
  });
});
Let's take note of a few things that this code does:
- Set up web3: web3.js is a javascript library that allows our client-side application to talk to the blockchain. We configure web3 inside the "initWeb3" function.
- Initialize contracts: We fetch the deployed instance of the smart contract inside this function and assign some values that will allow us to interact with it.
- Render function: The render function lays out all the content on the page with data from the smart contract. For now, we list the candidates we created inside the smart contract. We do this by looping through each candidate in the mapping, and rendering it to the table. We also fetch the current account that is connected to the blockchain inside this function and display it on the page.
You can watch me explain this code more in depth in the video at 57:21.
Now let's view the client-side application in the browser. First, make sure that you've migrated your contracts like this:
$ truffle migrate --resetNext, start your development server from the command line like this:
$ npm run devThis should automatically open a new browser window with your client-side application.

Notice that your application says "Loading...". That's because we're not logged in to the blockchain yet! In order to connect to the blockchain, we need to import one of the accounts from Ganache into Metamask. You can watch me set up Metamask in the video at 1:09:05.
Once you're connected with Metamask, you should see all of the contract and account data loaded.
Cast Votes - Step 3
The accompanying video footage for this portion of the tutorial begins at 1:13:39. You can download the code for this portion of the tutorial here. Feel free to use these as a reference point if you get stuck!
Now let's add the ability to cast votes in the election. Let's define a "voters" mapping to the smart contract to keep track of the accounts that have voted in the election like this:
contract Election {
    // ...

    // Store accounts that have voted
    mapping(address => bool) public voters;

    // ...
}
Now let's add a "vote" function:
contract Election {
    // ...

    // Store accounts that have voted
    mapping(address => bool) public voters;

    // ...

    function vote (uint _candidateId) public {
        // require that they haven't voted before
        require(!voters[msg.sender]);

        // require a valid candidate
        require(_candidateId > 0 && _candidateId <= candidatesCount);

        // record that voter has voted
        voters[msg.sender] = true;

        // update candidate vote Count
        candidates[_candidateId].voteCount ++;
    }
}
The core functionality of this function is to increase the candidate's vote count by reading the Candidate struct out of the "candidates" mapping and increasing the "voteCount" by 1 with the increment operator (++). Let's look at a few other things that it does:
- It accepts one argument. This is an unsigned integer with the candidate's id.
- Its visibility is public because we want an external account to call it.
- It adds the account that voted to the voters mapping that we just created. This will allow us to keep track that the voter has voted in the election. We access the account that's calling this function with the global variable "msg.sender" provided by Solidity.
- It implements require statements that will stop execution if the conditions are not met. First require that the voter hasn't voted before. We do this by reading the account address with "msg.sender" from the mapping. If it's there, the account has already voted. Next, it requires that the candidate id is valid. The candidate id must be greater than zero and less than or equal to the total candidate count.
Now your complete contract code should look like this:
pragma solidity ^0.4.2;

contract Election {
    // Model a Candidate
    struct Candidate {
        uint id;
        string name;
        uint voteCount;
    }

    // Store accounts that have voted
    mapping(address => bool) public voters;
    // Read/write candidates
    mapping(uint => Candidate) public candidates;
    // Store Candidates Count
    uint public candidatesCount;

    function Election () public {
        addCandidate("Candidate 1");
        addCandidate("Candidate 2");
    }

    function addCandidate (string _name) private {
        candidatesCount ++;
        candidates[candidatesCount] = Candidate(candidatesCount, _name, 0);
    }

    function vote (uint _candidateId) public {
        // require that they haven't voted before
        require(!voters[msg.sender]);

        // require a valid candidate
        require(_candidateId > 0 && _candidateId <= candidatesCount);

        // record that voter has voted
        voters[msg.sender] = true;

        // update candidate vote Count
        candidates[_candidateId].voteCount ++;
    }
}
Watch me explain voting in depth at 1:13:58. You can also watch me demonstrate voting in the console at 1:20:38.
Test Voting Function
Now let's add a test to our "election.js" test file:
it("allows a voter to cast a vote", function() {
    return Election.deployed().then(function(instance) {
      electionInstance = instance;
      candidateId = 1;
      return electionInstance.vote(candidateId, { from: accounts[0] });
    }).then(function(receipt) {
      return electionInstance.voters(accounts[0]);
    }).then(function(voted) {
      assert(voted, "the voter was marked as voted");
      return electionInstance.candidates(candidateId);
    }).then(function(candidate) {
      var voteCount = candidate[2];
      assert.equal(voteCount, 1, "increments the candidate's vote count");
    })
  });
We want to test two things here:
- Test that the function increments the vote count for the candidate.
- Test that the voter is added to the mapping whenever they vote.
Next we can write a few test for our function's requirements. Let's write a test to ensure that our vote function throws an exception for double voting:
it("throws an exception for invalid candidates", function() {
    return Election.deployed().then(function(instance) {
      electionInstance = instance;
      return electionInstance.vote(99, { from: accounts[1] })
    }).then(assert.fail).catch(function(error) {
      assert(error.message.indexOf('revert') >= 0, "error message must contain revert");
      return electionInstance.candidates(1);
    }).then(function(candidate1) {
      var voteCount = candidate1[2];
      assert.equal(voteCount, 1, "candidate 1 did not receive any votes");
      return electionInstance.candidates(2);
    }).then(function(candidate2) {
      var voteCount = candidate2[2];
      assert.equal(voteCount, 0, "candidate 2 did not receive any votes");
    });
  });
We can assert that the transaction failed and that an error message is returned. We can dig into this error message to ensure that the error message contains the "revert" substring. Then we can ensure that our contract's state was unaltered by ensuring that the candidates did not receive any votes.
Now let's write a test to ensure that we prevent double voting:
it("throws an exception for double voting", function() {
    return Election.deployed().then(function(instance) {
      electionInstance = instance;
      candidateId = 2;
      electionInstance.vote(candidateId, { from: accounts[1] });
      return electionInstance.candidates(candidateId);
    }).then(function(candidate) {
      var voteCount = candidate[2];
      assert.equal(voteCount, 1, "accepts first vote");
      // Try to vote again
      return electionInstance.vote(candidateId, { from: accounts[1] });
    }).then(assert.fail).catch(function(error) {
      assert(error.message.indexOf('revert') >= 0, "error message must contain revert");
      return electionInstance.candidates(1);
    }).then(function(candidate1) {
      var voteCount = candidate1[2];
      assert.equal(voteCount, 1, "candidate 1 did not receive any votes");
      return electionInstance.candidates(2);
    }).then(function(candidate2) {
      var voteCount = candidate2[2];
      assert.equal(voteCount, 1, "candidate 2 did not receive any votes");
    });
  });
First, we'll set up a test scenario with a fresh account that hasn't voted yet. Then we'll cast a vote on their behalf. Then we'll try to vote again. We'll assert that an error has occurred here. We can inspect the error message, and ensure that no candidates received votes, just like the previous test.
Now let's run our tests:
$ truffle testYay, they pass! 🎉
Client-Side Voting
Let's add a form that allows accounts to vote below the table in our "index.html" file:
<form onSubmit="App.castVote(); return false;">
  <div class="form-group">
    <label for="candidatesSelect">Select Candidate</label>
    <select class="form-control" id="candidatesSelect">
    </select>
  </div>
  <button type="submit" class="btn btn-primary">Vote</button>
  <hr />
</form>
Let's examine a few things about this form:
- We create the form with an empty select element. We will populate the select options with the candidates provided by our smart contract in our "app.js" file.
- The form has an "onSubmit" handler that will call the "castVote" function. We will define this in our "app.js" file.
Now let's update our app.js file to handle both of those things. First we list all the candidates from the smart contract inside the form's select element. Then we'll hide the form on the page once the account has voted. We'll update the render function to look like this:
render: function() {
  var electionInstance;
  var loader = $("#loader");
  var content = $("#content");

  loader.show();
  content.hide();

  // Load account data
  web3.eth.getCoinbase(function(err, account) {
    if (err === null) {
      App.account = account;
      $("#accountAddress").html("Your Account: " + account);
    }
  });

  // Load contract data
  App.contracts.Election.deployed().then(function(instance) {
    electionInstance = instance;
    return electionInstance.candidatesCount();
  }).then(function(candidatesCount) {
    var candidatesResults = $("#candidatesResults");
    candidatesResults.empty();

    var candidatesSelect = $('#candidatesSelect');
    candidatesSelect.empty();

    for (var i = 1; i <= candidatesCount; i++) {
      electionInstance.candidates(i).then(function(candidate) {
        var id = candidate[0];
        var name = candidate[1];
        var voteCount = candidate[2];

        // Render candidate Result
        var candidateTemplate = "<tr><th>" + id + "</th><td>" + name + "</td><td>" + voteCount + "</td></tr>"
        candidatesResults.append(candidateTemplate);

        // Render candidate ballot option
        var candidateOption = "<option value='" + id + "' >" + name + "</ option>"
        candidatesSelect.append(candidateOption);
      });
    }
    return electionInstance.voters(App.account);
  }).then(function(hasVoted) {
    // Do not allow a user to vote
    if(hasVoted) {
      $('form').hide();
    }
    loader.hide();
    content.show();
  }).catch(function(error) {
    console.warn(error);
  });
}
Next, we want to write a function that's called whenever the form is submitted:
castVote: function() {
    var candidateId = $('#candidatesSelect').val();
    App.contracts.Election.deployed().then(function(instance) {
      return instance.vote(candidateId, { from: App.account });
    }).then(function(result) {
      // Wait for votes to update
      $("#content").hide();
      $("#loader").show();
    }).catch(function(err) {
      console.error(err);
    });
  }
First, we query for the candidateId in the form. When we call the vote function from our smart contract, we pass in this id, and we provide the current account with the function's "from" metadata. This will be an asynchronous call. When it is finished, we'll show the loader and hide the page content. Whenever the vote is recorded, we'll do the opposite, showing the content to the user again.
Now your front-end application should look like this:
Go ahead and try the voting function. Once you do, you should see a Metamask confirmation pop up like this:
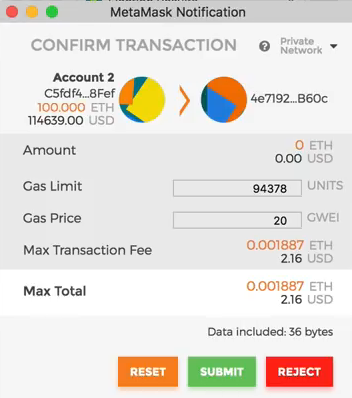
Once you click submit, you've successfully casted a vote! You'll still see a loading screen. For now, you'll have to refresh the page to see the votes recorded. We'll implement the functionality update the loader automatically in the next section. If you got stuck, you can reference the full client-side code at this point in the tutorial here.
Watch Events - Step 4
The accompanying video footage for this portion of the tutorial begins at 1:48:05. You can download the code for this portion of the tutorial here. Feel free to use these as a reference point if you get stuck!
The very last step in this tutorial is to trigger an event whenever a vote is cast. This will allow us to update our client-side application when an account has voted. Fortunately, this is quite easy. Let's start by declaring an event in our contract like this:
contract Election {
    // ...
    event votedEvent (
        uint indexed _candidateId
    );
    // ...
}
Now we can trigger this "voted" event inside our "vote" function like this:
function vote (uint _candidateId) public {
    // require that they haven't voted before
    require(!voters[msg.sender]);

    // require a valid candidate
    require(_candidateId > 0 && _candidateId <= candidatesCount);

    // record that voter has voted
    voters[msg.sender] = true;

    // update candidate vote Count
    candidates[_candidateId].voteCount ++;

    // trigger voted event
    votedEvent(_candidateId);
}
Now that we've updated our contract, we must run our migrations:
$ truffle migrate --resetWe can also update our tests to check for this voting event like this:
it("allows a voter to cast a vote", function() {
  return Election.deployed().then(function(instance) {
    electionInstance = instance;
    candidateId = 1;
    return electionInstance.vote(candidateId, { from: accounts[0] });
  }).then(function(receipt) {
    assert.equal(receipt.logs.length, 1, "an event was triggered");
    assert.equal(receipt.logs[0].event, "votedEvent", "the event type is correct");
    assert.equal(receipt.logs[0].args._candidateId.toNumber(), candidateId, "the candidate id is correct");
    return electionInstance.voters(accounts[0]);
  }).then(function(voted) {
    assert(voted, "the voter was marked as voted");
    return electionInstance.candidates(candidateId);
  }).then(function(candidate) {
    var voteCount = candidate[2];
    assert.equal(voteCount, 1, "increments the candidate's vote count");
  })
});
This test inspects the transaction receipt returned by the "vote" function to ensure that it has logs. These logs contain the event that was triggered. We check that the event is the correct type, and that it has the correct candidate id.
Now let's update the client-side application to listen for the voted event and fire a page refresh any time that it is triggered. We can do that with a "listenForEvents" function like this:
listenForEvents: function() {
  App.contracts.Election.deployed().then(function(instance) {
    instance.votedEvent({}, {
      fromBlock: 0,
      toBlock: 'latest'
    }).watch(function(error, event) {
      console.log("event triggered", event)
      // Reload when a new vote is recorded
      App.render();
    });
  });
}
This function does a few things. First, we subscribe to the voted event by calling the "votedEvent" function. We pass in some metadata that tells us to listen to all events on the blockchain. Then we "watch" this event. Inside here, we log to the console anytime a "votedEvent" is triggered. We also re-render all the content on the page. This will get rid of the loader after the vote has been recorded, and show the updated vote count on the table.
Finally, we can call this function whenever we initialize the contract:
initContract: function() {
  $.getJSON("Election.json", function(election) {
    // Instantiate a new truffle contract from the artifact
    App.contracts.Election = TruffleContract(election);
    // Connect provider to interact with contract
    App.contracts.Election.setProvider(App.web3Provider);

    App.listenForEvents();

    return App.render();
  });
}
Now, you can vote on your client-side application, and watch the votes recorded in real time! Be patient, it might take a few seconds for the event to trigger. If you don't see an event, try restarting Chrome. There is a known issue with Metamask surrounding events. Restarting Chrome always fixes it for me.
Congratulations! 🎉 You have successfully built a full stack decentralized application on the Ethereum blockchain! You can download the full source code to this tutorial here, and watch the full video here.
Happy with this tutorial? Then you NEED to join my free training here where I'll show you how to build a real world blockchain app so that you can become a highly paid blockchain developer!