Master Solidity for Blockchain: Step-by-Step Guide
By Gregory McCubbin ·
Blockchain is one of the most disruptive forces to enter the technology landscape in years. Developers now possess the power to create the next wave of decentralized applications that will power the future of Web 3.0.
In order to harness this power, you MUST master the Solidity programming language for creating Ethereum smart contracts. This guide will show you how to do that step-by-step.
Don't worry, you don't have to be a programmer already or know anything about blockchain to get started now. I'll show you everything from scratch.
By following each module in this guide, you'll gain high value smart contract development with Solidity, as well as a strong understanding of how blockchain works. Each module contains code examples as well as step-by-step video instruction.
Best of all, you'll be able to start coding Solidity straight inside your web browser, without needing to install anything on our computer. You won't have to worry about creating UIs, writing tests, or anything like that.
Ready to get started? Let's begin.
Table of Contents
Part 1: Your First Solidity Smart Contract
There's no better way to learn Solidity than by writing it. In this section, you'll get an introduction to how blockchain works by creating your first Ethereum smart contract with the Solidity programming language.
Before we begin, let me say a few words about Solidity in general. It is a very beginner friendly language that looks a lot like other common programming languages like C++, JavaScript, and Python. If you know any of these langauges already, you'll have a huge advantage. No worries if not, it's very easy to pick up.
Solidity is a statically typed language, supports inheritance, and external libraries. It's a full blown programming language capable of writing sophisticated applications.
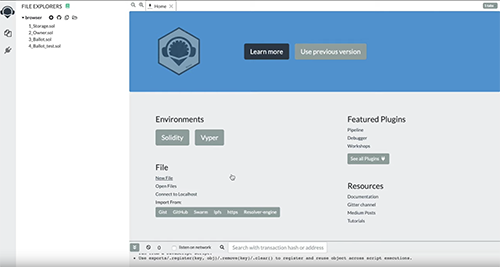
As promised, we're going to code everything inside our web browser for this tutorial with the Remix IDE. Head on over to remix.ethereum.org to get started.
Inside of Remix, we'll be able to develop smart contracts, compile them, and deploy them to a blockchain directly from our browser. We won't need to use a text editor or a terminal on our computer. It's very nice!
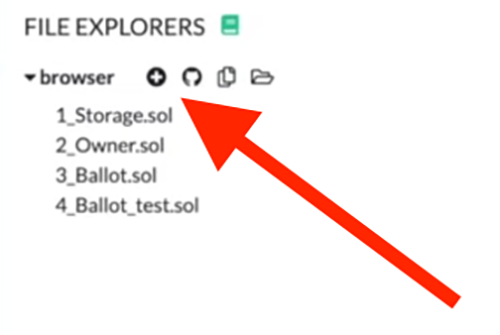
Let's begin creating a file for our first smart contract by clicking the plus (+) button from the file explorer like this:
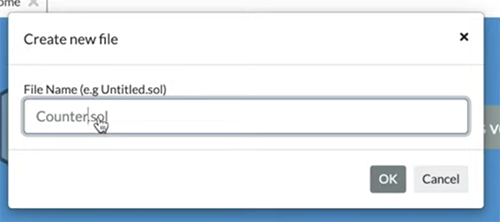
Now let's enter the name of our smart contract file. We'll call it Counter.sol.
Great! Now we have a place to write all of the source code for our first smart contract.
Before we continue, let's make sure that Remix is set up properly. If you're using Remix for the first time, you might need to do 2 things:
- Add the compiler plugin so that you can compile the smart contract.
- Add the deployment plugin so that you can deploy the smart contract to a virtual blockchain.
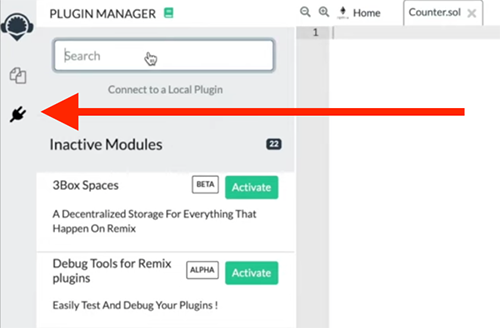
To add the compiler plugin, click the plugin manager icon on the left hand sidebar. Then search for "Solidity compiler". Once it comes up in the search results, click "Activate". You should see the newly installed plugin in the left hand sidebar.
Next, repeat this step for the deployment plugin. Search for "Deploy", and activate the "Deploy & run transactions" plugin.
Once you have these installed, you'll be able to compile and deploy your smart contracts to a virtual blockchain inside your browser!
Now let's get back to programming. Inside the Counter.sol file we created earlier, let's create the basic structure for our smart contract like this:
pragma solidity ^0.6.0;
contract Counter {

}
Here, we declare the version of Solidity we're using, in this case, 0.6.0.
Next, we create the basic smart contract with the contract keyword, followed by its name Counter. We'll write all of the remaining code inside the curly braces { }.
As the name suggests, we'll create a smart contract that counts numbers. For example, we could use this smart contract to keep score in a game. It will allow us to store the current score, or count, on the blockchain, and increase it whenever we we want.
In order to do this, we'll create a new variable called count like this:
pragma solidity ^0.6.0;
contract Counter {
    uint count;
}
Let me explain what this line does:
- It creates a new variable called
count. - The count is a
uint, which stands for "Unsigned Integer". Basically, it's a non-negative number. For example,1, 2, 3are uints, but-1, -2, -3are not because they are "signed" with a "minus sign" in front of them (because they're negative).
This variable's value will get stored on the blockchain because it is a special type of variable called a "state variable", as opposed to a "local variable".
Next, let's create a way to fetch the current count. We'll create a function to do that:
pragma solidity ^0.6.0;
contract Counter {
    uint count;

    function getCount() public view returns(uint) {
        return count;
    }
}
This is a basic function named getCount() that simply returns the value from the count variable (note: this value is accessible inside this function because it's a state variable). Let me note a few other key points about this function:
- Notice that we have added the
publicvisibility to this function, which will allow us to call it the Remix interface soon (we would not be able to if we had not). - We have added the
viewkeyword, which tells Solidity that this is a read-only function. - Finally, we specify that the function returns a
uint, withreturns(uint).
Great! Now we have a function that reads the current count. Next, we'll create a function that updates the count like this:
contract Counter {
    // ...

    function incrementCount() public {
        count = count + 1;
    }
}
This function simply reads the value from the count state variable, adds 1 to it, and updates the count variable on the blockchain.
Finally, let's create an initial value for the count:
contract Counter {
    // ...

    constructor() public {
        count = 0;
    }
}
Here we set the initial count value to 0 inside of the smart contract's constructor() function. This is a special function that is run once and only once, whenever the smart contract is created, i.e., deployed to the blockchain.
Great, that's it! Now your completed Counter smart contract should look like this:
pragma solidity ^0.6.0;
contract Counter {
    uint count;

    constructor() public {
        count = 0;
    }

    function getCount() public view returns(uint) {
        return count;
    }

    function incrementCount() public {
        count = count + 1;
    }
}
Now let's compile the smart contract so that we can use it. Click on the compiler plugin we installed earlier, and click "Compile Contract" (if you have trouble, you can watch me do this step inside the video above).
Next, find the "Deploy & Run Transaction" plugin we installed earlier and click the orange "Deploy" button.
🎉 YAY! You've successfully added your smart contract to Remix's virtual blockchain.
Now let's interact with our newly created Counter contract. Find the "Deployed Contracts" section that just appeared, click the down arrow next to the Counter contract to find 2 functions:
incrementCountgetCount
Try clicking these buttons to observe each function's behavior. Whenever you click incrementCount it should add 1 to the count, and when you click getCount it should return the current count!
Before we wrap up this section, I want to quickly demonstrate that we can rewrite the Counter smart contract in a much simpler way like this:
pragma solidity ^0.6.0;
contract Counter {
    uint public count = 0;

    function incrementCount() public {
        count ++;
    }
}
Let me explain this:
- First, we remove the
constructor()function because we can store the initial value withcount = 0. - Next, we remove the
getCount()in favor of adding thepublicvisibility to thecountstate variable, i.e.,uint public count = 0;. When we do this, Solidity automatically generates a public function calledcount()that we can use read this value outside the smart contract. - Finally, we rewrite the
incrementCount()function to use the increment operator++, which simply adds 1 to the current variable value.
🎉 Congratulations! You've just created your first Ethereum smart contract with the Solidity programming language. You're well on your way to becoming a blockchain Master. Let's move onto the next section where we'll cover more basics of the Solidity programming language.
Part 2: Solidity Basics
Now let's continue learning Solidity. In this section, we'll cover more of the basics of the programming language, focusing on:
- variables
- data types
- custom data structures
Let's create a new smart contract to demonstrate all of these things. We'll call it MyContract like this:
pragma solidity ^0.6.0;
contract MyContract {

}
First, let's talk about variables. There are two main types of variables in Solidity: local variables and state variables.
contract MyContract {

    function getValue() public pure returns(uint) {
        uint value = 1;
        return value;
    }
}
Here, I've created a function called getValue() that contains a local variable called value. This variable allows us to store a number and do things with it inside the getValue() function, say math for example.
Because value is a local variable, it has a few unique characteristics:
- It can only be accessed inside the
getValue() function. You cannot directly read its value outside of the smart contract, or inside any other function. - It is not stored on the blockchain. It is stored in memory.
Next, let's create a state variable called myUint like this:
contract MyContract {
    uint public myUint = 1;

    // ...
}
It behaves differently from the value local variable from the previous step. Let's see how:
- It can be accessed outside from other functions, say
myFunction()for example. - Its value can be read outside the smart contract because it's declared
public. - Its value is permanently written to the blockchain, not in memory like the local variable.
Next, let's look at some common variable types in Solidity:
contract MyContract {
    string public myString = "Hello, world!";
    bytes32 public myBytes32 = "Hello, world!";
    int public myInt = 1;
    uint public myUint = 1;
    uint256 public myUint256 = 1;
    uint8 public myUint8 = 1;
    address public myAddress = 0x5A0b54D5dc17e0AadC383d2db43B0a0D3E029c4c;
}
I'll explain what each of these are:
- First we have a String called
myString, which is used for storing arbitrary text. - Next we have bytes32 called
myBytes32, which is somewhat like a string but more performant. - Next,
myIntis an integer, which can be positive or negative. - Next,
myUintis an unsigned integer, which means it CANNOT be negative (it cannot have a sign, i.e., minus sign). - Next,
myUint256is an unsigned integer of 256 bytes. This is used for very large numbers. Note, thatuintis shorthand foruint256. - Next,
myUint8is an unsigned integer of 8 bytes. This is used for very small numbers. - Finally,
myAddressis used to store a particular Ethereum address for an external user or smart contract.
Finally, let's see how Solidity allows us to create our own custom data types:
contract MyContract {
    // ...

    struct MyStruct {
        uint myUint;
        string myString;
    }
}
Here we've created a Struct called MyStruct that allows us to special data we've defined. In this case, we specify that this struct can hold 2 values: a uint called myUint, and a string called myString.
This is a powerful feature of the Solidity programming language because it means that we can model any arbitrary data that we want to. For example we could create a Person struct with a name and address. More on that later in the series.
The code that we just wrote simply defines a new MyStruct struct. To create a new one, we'll do that like this:
contract MyContract {
    // ...

    struct MyStruct {
        uint myUint;
        string myString;
    }

    MyStruct public myStruct = MyStruct(1, "Hello, World!");
}
Now your completed smart contract should look like this:
pragma solidity ^0.6.0;

contract MyContract {
    string public myString = "Hello, world!";
    bytes32 public myBytes32 = "Hello, world!";
    int public myInt = 1;
    uint public myUint = 1;
    uint256 public myUint256 = 1;
    uint8 public myUint8 = 1;
    address public myAddress = 0x5A0b54D5dc17e0AadC383d2db43B0a0D3E029c4c;

    struct MyStruct {
        uint myUint;
        string myString;
    }

    MyStruct public myStruct = MyStruct(1, "Hello, World!");

    function getValue() public pure returns(uint) {
        uint value = 1;
        return value;
    }
}
Now it's time to test out all the features of this smart contract. It's your turn to compile the contract and deploy it to Remix's virtual blockchain so that you can interact with it. Feel free to revisit the instructions from the previous section or follow along with me in the video above.
🎉 Congratulations! You've just covered all the basic data types of the Solidity programming language. In the next section, we'll continue on in depth with more essential features you must know.
Part 3: Solidity Arrays
Now let's talk about an essential data structure you MUST know to master Solidity: Arrays.
Arrays allow us to store sorted lists of information that can be accessed later. For example, you could store a list of numbers like 1, 2, 3 or a list of names like "Adam", "Bryan", and "Carl".
Let's create our first Array like this:
pragma solidity ^0.6.0;

contract MyContract {
    // Arrays
    uint[] public uintArray = [1,2,3];
}
This is an array of unsigned integers called uintArray. Let me explain:
- First, we declare the array and the data type that will be contained inside the array with
uint[]. In this case, specify that this array will storeuints. We will not be able to store any other data type inside of here, like strings for example. - Next, we name the array and declare it public with
public uintArray. - Finally, we assign the values to the variable with
[1,2,3].
Next, we can create an array of strings like this:
contract MyContract {
    // ...
    string[] public stringArray = ['apple', 'banana', 'carrot'];
}
Note, that we use string[] to declare that this array contains elements of string type.
Next, let's see how we can use arrays inside of functions:
contract MyContract {
    // ...
   function addValue(string memory _value) public {
        values.push(_value);
   }
}
This function adds a new item to the values array with the push() function. Whenever we call this function, we can pass in any arbitrary number, and it will be added to the array.
Next, let's create a function that determines the size of the array:
contract MyContract {
    // ...
    function valueCount() public view returns(uint) {
        return values.length;
    }
}
This function calls .length on the values array, which returns the number if items in the array.
Finally, let's look at a VERY interesting property of arrays. Did you know you can create an array inside of another array? That's exactly what 2-dimensional arrays are. We can create one like this:
contract MyContract {
    // ...
    uint[][] public array2D = [ [1,2,3], [4,5,6] ];
}
These 2-dimensional arrays can be very useful for storing complex data sets.
That's it! Now your completed smart contract should look like this:
pragma solidity ^0.6.0;

contract MyContract {
    // Arrays
    uint[] public uintArray = [1,2,3];
    string[] public stringArray = ['apple', 'banana', 'carrot'];
    string[] public values;
    uint[][] public array2D = [ [1,2,3], [4,5,6] ];


   function addValue(string memory _value) public {
        values.push(_value);
   }

    function valueCount() public view returns(uint) {
        return values.length;
    }
}
Now it's time to test out all the features of this smart contract. It's your turn to compile the contract and deploy it to Remix's virtual blockchain so that you can interact with it. Feel free to revisit the instructions from the previous section or follow along with me in the video above.
🎉 Hooray! Now you've learned all about Solidity arrays. Let's move onto the next section to learn about another essential data structure: Mappings.
Part 4: Solidity Mappings
Now let's talk about another data structure called "Mappings", which let you store key-value pairs. Let me illustrate how this works:
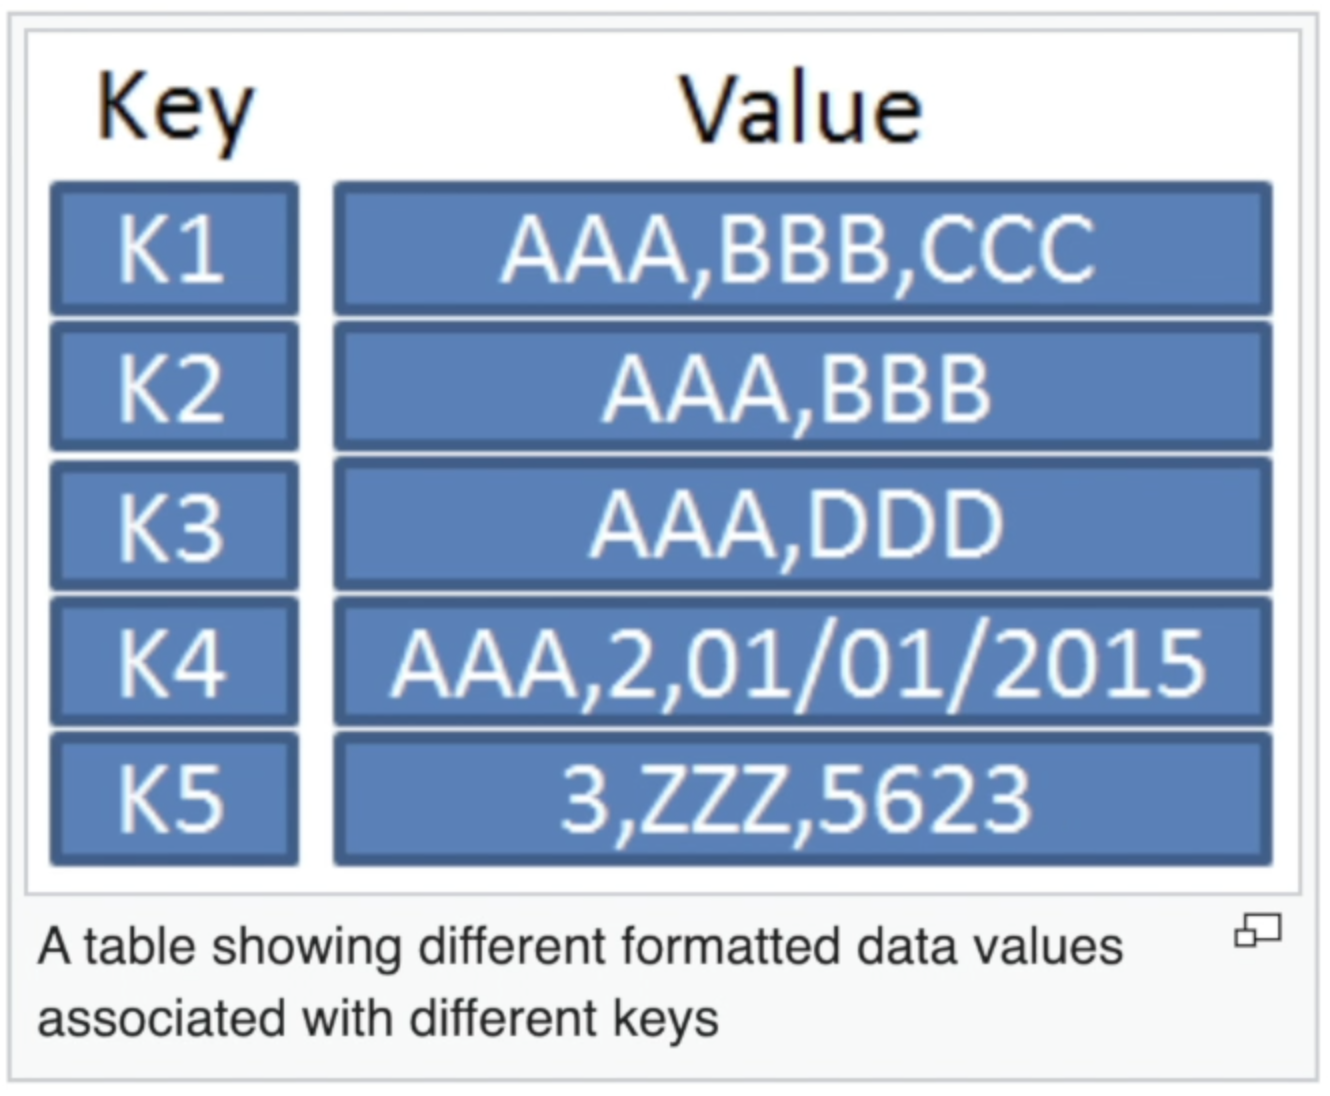
This table above shows a key-value pair relationship. There are unique set of "keys" that correspond to unique values. Any information in the table can be looked up by its key. For example, if we ask for the value of "k1", then it will return "AAA,BBB,CCC". Likewise, new information can be stored under a new key. For example, we can add the value "ABCDEFG" to a new key called "k6".
This is exactly how mappings work inside Solidity, and they let you implement data-base like behavior in your smart contracts. For example, you can create mappings where they keys are
ids, and the values are any arbitrary data.
Let's see how to create a mapping inside our smart contract like this:
pragma solidity ^0.6.0;

contract MyContract {
    // Mappings
    mapping(uint => string) public names;
}
We declare it with the mapping keyword, and we specify the data type for the key and the value. In this case, each key in the mapping will be a uint, and each corresponding value will be a string.
We'll treat this mapping like a database of names, where each key is an id (1, 2, 3...), and each value is a name ("Adam", "Bryan", "Carl"...).
Now let's see see how this mapping works in action. Fortunately, we already have a way to read information from this mapping since it has been declared public. Solidity will provide us with a function called names() where we can pass in a key, and it will return the value.
In order to read data from the mapping, we must first add some names to it. We'll do that in the constructor function like this:
pragma solidity ^0.6.0;

contract MyContract {
    // Mappings
    mapping(uint => string) public names;
}
contract MyContract {
    // ...
    constructor() public {
        names[1] = "Adam";
        names[2] = "Bruce";
        names[3] = "Carl";
    }
}
Note, that we simply pass in the key within the [] brackets, and then assign the new string value after the = sign.
Yay, now try compiling and running your smart contract in Remix to observe this behavior. Simply call the names() function, and pass in an id (1, 2, or 3). For example, names(1). If you get stuck, you can watch me do this in the video above. 😃
Now let's see how mappings can be used model more complex database-like behavior with smart contracts. Let's create a database of books with mappings.
First, we'll create a new Book struct to store specific data about a book like this:
contract MyContract {
    // ...
    struct Book {
        string title;
        string author;
    }
}
Note, this book struct tracks the title and the author of the book.
Next, we'll create a mapping where we can store books based upon a unique id like this:
contract MyContract {
    // ...
    mapping(uint => Book) public books;
See, here we can specify that key is a uint id, and the value is a Book.
Now we'll create a function to add a new book like this:
contract MyContract {
    // ...
    function addBook(uint _id, string memory _title, string memory _author) public {
        books[_id] = Book(_title, _author);
    }
This function accepts 3 arguments: id of the new book, title, and author. Inside the function, we build a new Book struct from these arguments, and add it too the books mapping with th new id.
At this point, our complete books code should look like this:
contract MyContract {
    // Mappings
    mapping(uint => string) public names;
    mapping(uint => Book) public books;

    struct Book {
        string title;
        string author;
    }

    constructor() public {
        names[1] = "Adam";
        names[2] = "Bruce";
        names[3] = "Carl";
    }

    function addBook(uint _id, string memory _title, string memory _author) public {
        books[_id] = Book(_title, _author);
    }
}
Great! Now you can test this behavior out in the Remix interface after you compile the contract and run it. You can follow along with me in the video to see how.
Now let's take this a step further and create a more complex database of books. Currently, all the books are stored in a database without a concept of individual ownership, i.e., a book has an "author", but not an "owner". We an create a way for individual users to own books by assigning ownership to an individual Ethereum address.
To do this, we'll use a nested mappin like this:
pragma solidity ^0.6.0;

contract MyContract {
    // ...
    mapping(address => mapping(uint => Book)) public myBooks;
}
This myBooks mapping is a nested mapping, which means that it's a mapping INSIDE another mapping. In this case, the myBooks mapping uses an Ethereum address as the key, to represent the owner of the books, and this returns a new mapping as its value: a mapping ids to books (much like the books mapping from the previous example).
We an add new books to this mapping like this:
contract MyContract {
    // ...
    function addMyBook(uint _id, string memory _title, string memory _author) public {
        myBooks[msg.sender][_id] = Book(_title, _author);
    }
}
Here we assign the new book to the myBooks mapping, using the sender's address as the key (msg.sender)
Great! Now try to compile this code and test it in the Remix interface. At this point, your final smart contract should look like this:
pragma solidity ^0.6.0;

contract MyContract {
    // Mappings
    mapping(uint => string) public names;
    mapping(uint => Book) public books;
    mapping(address => mapping(uint => Book)) public myBooks;

    struct Book {
        string title;
        string author;
    }

    constructor() public {
        names[1] = "Adam";
        names[2] = "Bruce";
        names[3] = "Carl";
    }

    function addBook(uint _id, string memory _title, string memory _author) public {
        books[_id] = Book(_title, _author);
    }

    function addMyBook(uint _id, string memory _title, string memory _author) public {
        myBooks[msg.sender][_id] = Book(_title, _author);
    }
}
Part 5: Solidity Conditionals & Loops
Now let's talk about conditionals in Solidity. These allow you to execute code based upon a set of pre-defined criteria.
For example, we can write code that looks somewhat like this:
// If condition met, then do something
// If not, then do something else
Let's see how this works inside of solidity. Let's create a function that checks whether a number is Even or not:
contract MyContract {
    function isEvenNumber(uint _number) public view returns(bool) {
        if(_number % 2 == 0) {
            return true;
        } else {
            return false;
        }
    }

}
Inside this function, we use a if/else statement that checks whether a number is even or not. If it's even, then it returns true. If not, then it returns false.
Here we use the modulo operator (<%), which checks for the remainder after division. If it's equal to 0, then it's even. If not, it's odd. For example, 4 divided by 2 has no remainder, therefore the modulo is 0 (it's even). However 5 divided by 2 has a remainder of 1, which is NOT 0 (it's odd).
So that's the basic idea behind conditionals. Pretty simple, right?
Let's see conditionals in action AND explore another new concept inside Solidiy: Loops. To illustrate this, let's create a function that counts a set of even numbers:
contract MyContract {
    uint[] public numbers = [1, 2, 3, 4, 5, 6, 7, 8, 9, 10];

    function countEvenNumbers() public view returns (uint) {
        uint count = 0;

        for(uint i = 0; i < numbers.length; i++) {
            if(isEvenNumber(numbers[i])) {
                count ++;
            }
        }

        return count;
    }

    function isEvenNumber(uint _number) public view returns(bool) {
        if(_number % 2 == 0) {
            return true;
        } else {
            return false;
        }
    }

}
Let me explain what this countEvenNumbers() function does.
First, we store a list of numbers 1-10 in an array called numbers at the top of the contract.
Next, inside the countEvenNumbers() function we use a loop to iterate over each item in the numbers array. For each number, it checks if the number is even with our previously-created isEvenNumber() function inside the if statement.
If the number is even, then we increment the count variable value by 1 (that's what the ++ operator does). If not, then we do nothing and skip this number.
Finally, once this loop has checked every number in the array, it will return the value of the count variable, which will be total number of even numbers in the array.
Part 6: A Complete Solidity Smart Contract
Now let's create a complete smart contract that will demonstrate several new concepts. This will be different from previous lessons where we focused on individual topics.
We'll create a Hotel Room contract that lets users book rooms and pay for them with cryptocurrency. We'll start of by creating the contract like this:
contract HotelRoom {
    // ...
}
Let's keep track of the owner of the Hotel Room. This is the person that will get paid whenever the room is booked:
contract HotelRoom {
    address payable public owner;
}
We'll assign the ownership to the account that deploys the smart contract inside the constructor() function like this:
constructor() public {
    owner = msg.sender;
}
Next, we'll create a function that will book the hotel room. This function will handle several responsibilities, but at first we'll make pay the hotel owner whenever the room is booked.
function book() payable {
    owner.transfer(msg.value);
}
Note, that we send ether to the owner with the transfer() function. Here msg.value refers to the amount of Ether sent in when the function is called. Also, this function has been declared payable in order to receive Ether with the transaction.
Next, let's keep track of the hotel room's occupancy status. For example, we'll determine whether the hotel room is "vacant" or "occupied". We can do that with an enum like this:
contract HotelRoom {
    enum Statuses { Vacant, Occupied }
    Statuses currentStatus;
}
Here we have created an enum called Statuses with the options Vacant or Occupied.
Then, we create a state variable called currentStatus that tracks an instance of the Statuses enum, and its current value. For example, if the current status is Occupied, then the currentStatus variable will reflect that.
Now let's set the default status inside the constructor function like this:
constructor() public {
    owner = msg.sender;
    currentStatus = Statuses.Vacant;
}
Now let's change the status of the hotel room once it's booked:
function book() external payable {
    currentStatus = Statuses.Occupied;
    owner.transfer(msg.value);
}
Now let's require that the hotel room is actually vacant when it's booked:
function book() external payable {
    require(currentStatus == Statuses.Vacant, "Currently occupied.");
    currentStatus = Statuses.Occupied;
    owner.transfer(msg.value);
}
This uses Solidity's built in require() function to check the current status. Here's how it works: if the value passed into the require() function is true, then the function will resume execution. If it's false, then it will halt execution and throw an error. In this case, if the current status is "Vacant", then the function will continue. If not, it will throw the error "Currently occupied.".
Next, we can refactor this with a modifier. This is a special piece of reusable code that we can add to our function:
modifier onlyWhileVacant {
    require(currentStatus == Statuses.Vacant, "Currently occupied.");
    _;
}
Now we can remove that line from our function and add the modifier like this:
function book() external payable onlyWhileVacant {
    currentStatus = Statuses.Occupied;
    owner.transfer(msg.value);
}
Next, we can add a price to the hotel room. We'll specify that it costs 2 Ether. We'll do that with a new modifier like this:
modifier costs(uint _amount) {
    require(msg.value >= _amount, "Not enough Ether provided.");
    _;
}
We can add that to our function like this:
function book() external payable onlyWhileVacant costs(2 ether) {
    currentStatus = Statuses.Occupied;
    owner.transfer(msg.value);
}
Next, let's create a notification that the hotel room was booked. Anyone will be able to subscribe to this notification to find out as soon as it has been booked. We can accomplish this with an event like this:
contract HotelRoom {
    // ...
    event Occupy(address _occupant, uint _value);
}
Then, we can emit the event inside the function like this:
function book() external payable onlyWhileVacant costs(2 ether) {
    currentStatus = Statuses.Occupied;
    owner.transfer(msg.value);
    emit Occupy(msg.sender, msg.value);
}
Finally, we want to rename this function to simplify the behavior of our smart contract. We'll use the special receive() function like this:
receive() external payable onlyWhileVacant costs(2 ether) {
    currentStatus = Statuses.Occupied;
    owner.transfer(msg.value);
    emit Occupy(msg.sender, msg.value);
}
This will allow the smart contract to receive Ethereum payments. Whenever this happens, it will run the code inside the function and book the hotel room. This greatly simplifies the smart contract interface. Instead of having to call the function by a specific name, and pass in arguments, you simply pay the smart contract from your wallet, and it books the hotel room for you!
FAQs
What Is Solidity?
How to learn Solidity
How to code in Solidity
Happy with this tutorial? Then you NEED to join my free training here where I'll show you how to build a real world blockchain app so that you can become a highly paid blockchain developer!