Code Your Own Cryptocurrency on Ethereum (How to Build an ERC-20 Token and Crowd Sale website)
By Gregory McCubbin ·
Hey everybody, it’s Gregory from Dapp University!
Today I'm going to show you how to code your own cryptocurrency on the Ethereum blockchain and sell it! I'll show you how to create your own ERC-20 token and crowd sale step-by-step with Ethereum smart contracts, how to test the smart contracts, how to deploy the smart contracts to the Ethereum blockchain, and how to build an ICO website deployed to the web. I'll also explain what an ERC-20 token is, how an Ethereum token works, how an initial coin offering (ICO) works.
You can watch me build the ERC-20 token and crowd sale in the 8-hour tutorial video above. I'll also guide you through the step-by-step instructions in this tutorial. You can download the full source code to this tutorial from github here. Before we start building the ERC-20 token and crowd sale, I'll answer a few questions first.
You can also download all the video content to the full 8-hour video series here for free 🎉.
What is an ERC-20 Token?
The Ethereum blockchain allows you to create your own cryptocurrency, or token, that can be purchased with Ether, the native cryptocurrency of the Ethereum blockchain. ERC-20 is simply a standard that specifies how these tokens behave, so that they are compatible with other platforms like cryptocurrency exchanges.
You can watch this video below for more information on how ERC-20 tokens work in addition to following along with this article.
So how does that work? Well, let’s first look at how the Ethereum blockchain works.
Ethereum is a blockchain like Bitcoin. Like Bitcoin, Ethereum keeps track of account balances for people who own Ether, Ethereum’s native cryptocurrency. Unlike Bitcoin, Ethereum is also a platform that allows you to create your own token without creating a new blockchain.
You can create an Ethereum token with a smart contract. ERC-20 is a standard that specifies how this token smart contract should work.
Let’s use an example to understand how an ERC-20 token smart contract works. Let’s say that we want to create a token called “My Token” with the symbol “MTK” and that there will be 100,000,000 of these tokens in existence.
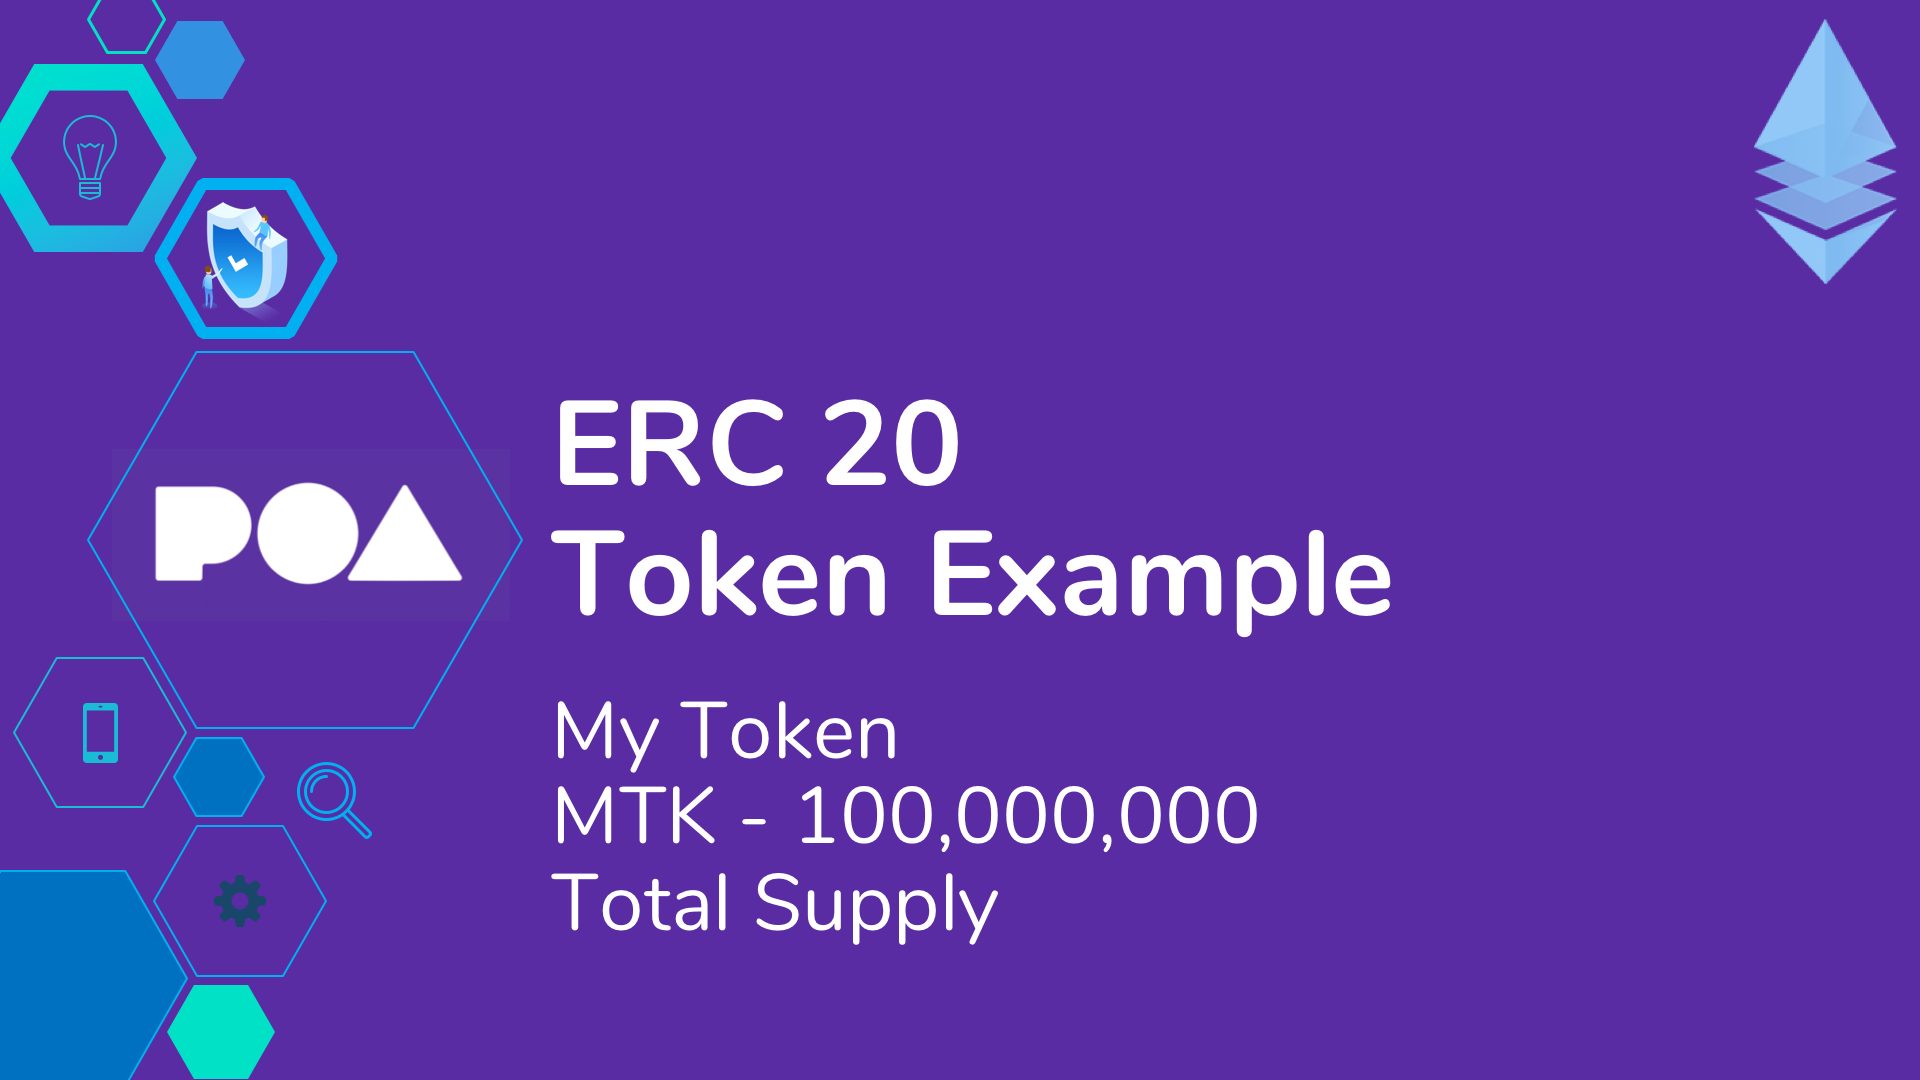
First, the token smart contract keeps track of some basic token attributes. For example it records the name “My Token", the symbol that you see on a cryptocurrency exchange, and how many total tokens exist.
It also keeps track of who owns “My Token” and how much.
ERC-20 tokens can be transferred from one account to another as payment, just like any other cryptocurrency.
They can also be purchased in a crowd sale, like an ICO, which we will examine in the next section.
They can also be bought and sold on a cryptocurrency exchange.

ICO Success Checklist
Are you trying to figure out what you need in order to launch your ICO? Click the link below to get my checklist for ICO Success!
Get ChecklistHow a Crowd Sale (ICO) Works
ERC-20 tokens can be distributed in a variety of ways. One popular method is holding a crowd sale, or an initial coin offering (ICO). Crowd sales are a way for a company to raise capital for their business by creating their own ERC-20 token that can be purchased by investors with Ether.
You can watch this video below for more information on how crowd sales work in addition to following along with this article.
Whenever a crowd sale takes place, the company gets liquid capital in the form of Ether that was paid by the investors, as well as holding onto a reserved amount of the ERC-20 tokens that were sold in the crowd sale.
In order to participate in a crowd sale, an investor must connect to the Etherum Blockchain with an account. This account has a wallet address that can store Ether, as well as the ERC-20 tokens that are purchased in the crowd sale.
The investor must visit a crowd sale website that talks to a smart contract. The smart contract governs all of the rules for how the crowd sale works.
Whenever an investor purchases tokens on the crowd sale website, they send Ether from their wallet to the smart contract, and the smart contract instantly dispenses the purchased tokens to their wallet.
The smart contract sets the price of the token in the crowd sale and governs how the crowd sale behaves.
Crowd sales can take on all kinds of shapes and sizes. They can have multiple tiers or phases, like Pre ICO, ICO, and ICO Bonus phase. Each of these tiers can happen at different points of time and can behave differently.
They can also have white lists to restrict which investors can purchase tokens.
They can also have a reserved amount of tokens that are not sold in the crowd sale. These reserves are usually set aside for specific members of each company like founders and advisors. These reserves can be a fixed amount of tokens or a percentage.
Whenever a crowd sale ends, it can be finalized by an administrator. Whenever this happens, all of the reserved tokens will be distributed to the appropriate accounts and the crowd sale will officially be over.
How ERC-20 Tokens Work
As I explained earlier, ERC-20 tokens are created with Ethereum smart contracts. So what is a smart contract?
Ethereum allows developers to write applications that run on the blockchain with smart contracts, which encapsulate all of the business logic of these applications. They enable us to read and write data to the blockchain, as well as execute code. Smart contacts are written in a programming language called Solidity, which looks a lot like Javascript. It is a full blown programming language that will allow us to do many of the same types of things Javascript is capable of, but it behaves a bit differently because of its use case, as we’ll see in this tutorial.
In the case of an ERC-20 token, the smart contract governs all of the behavior about how the token works, and keeps track of token ownership and account balances.
ERC-20 is an API specification for how Ethereum tokens should be built. It is a community adopted standard that allows tokens to be supported in a variety of use cases. We want to build a token that is compliant with this standard so that it can be widely accepted. If we did not have a standard like this, we could have endless ways to create tokens, and they might not be compatible with one another!
Using the ERC-20 standard ensures that a token is compliant for the following use cases (and more):
- Wallet transfers - sending tokens from one account to another
- Buying and selling on cryptocurrency exchanges
- Purchasing tokens in an crowd sale (ICO) like we'll demonstrate in this tutorial
The ERC-20 specification essentially dictates the interface that the smart contract must respond to. It specifies the structure of the smart contract and types of functions that the smart contract must have. It also provides some suggested functions that are nice to have, but ultimately optional. It dictates certain events that our token must have, like a transfer event. See, smart contracts can emit events that consumers can subscribe to, and with this standard, we can subscribe to events that tell us when tokens are sold.
Here is an example implementation of the transfer function specified by the ERC-20 standard. It is required by the smart contract, and governs how someone can send an ERC-20 token from their wallet to another.
contract ERC20Token {
    // ...

    function transfer(address _to, uint256 _value) public returns (bool success) {
        require(balanceOf[msg.sender] >= _value);

        balanceOf[msg.sender] -= _value;
        balanceOf[_to] += _value;

        Transfer(msg.sender, _to, _value);

        return true;
    }

    // ...
}
This function implements the ERC-20 standard the following ways:
- The function exists.
- It accepts the correct arguments.
- It fails if the user doesn't have enough tokens to transfer, i.e., an insufficient balance.
- It transfers the balance from the sender's account to the receiver's account.
- It triggers a
sellevent. - It returns the correct value, e.g.,
true.
Don't worry if all this doesn't perfectly make sense just yet. I'll explain all these parts in detail as we build out the ERC-20 token during the step-by-step video tutorial.
You can read more about the ERC-20 token standard directly on The Ethereum Improvement Proposal github repository. This is where all of the community discussion around Ethereum standards takes place. I highly recommend bookmarking that repository and reading through the submissions, as this is where you can watch the Ethereum technology grow and change in real time!
I also recommend this Wikipedia article.
Here is What We'll Build
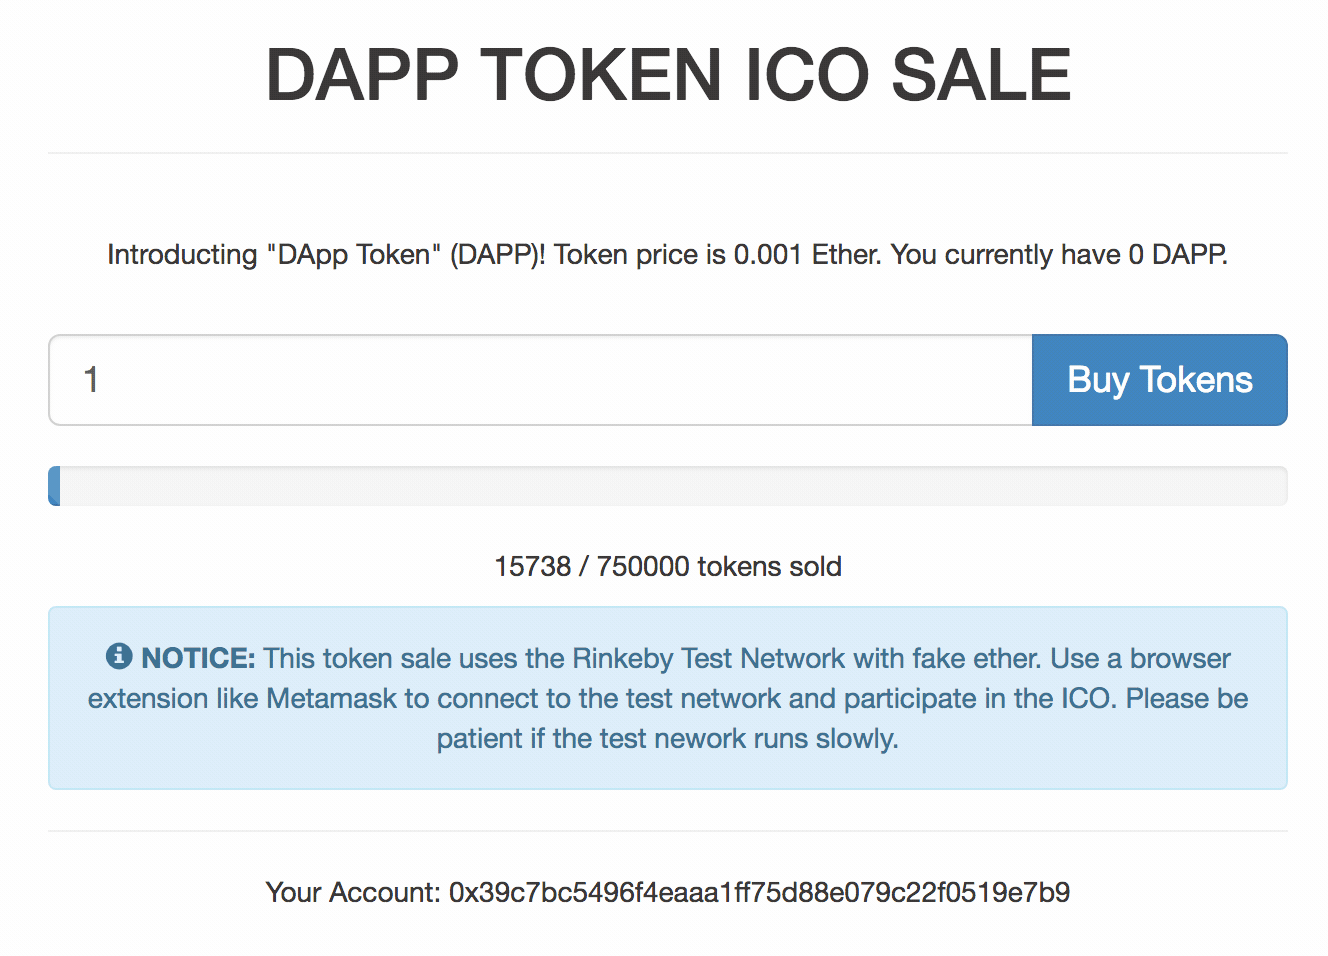
We'll build an ICO website that will talk to a crowd sale smart contract on the blockchain. This client-side website will have a form where users can purchase tokens in the crowd sale. It will show the progress for the crowd sale, like how many tokens the user has purchased, how many tokens have been purchased by all users, and the total number of tokens available in the crowd sale. It will also show the account we're connected to the blockchain with under "your account".
Installing Dependencies
In order to build our ERC-20 token and crowd sale, we need a few dependencies first.
Node Package Manager (NPM)
The first dependency we need is Node Package Manager, or NPM, which comes with Node.js. You can see if you have node already installed by going to your termial and typing:
$ node -vTruffle Framework
The next dependency is the Truffle Framework, which allows us to build decentralized applications on the Ethereum blockchain. It provides a suite of tools that allow us to write smart contacts with the Solidity programming language. It also enables us to test our smart contracts and deploy them to the blockchain. It also gives us a place to develop our client-side application.
You can install Truffle with NPM by in your command line like this:
$ npm install -g truffleGanache
The next dependency is Ganache, a local in-memory blockchain. You can install Ganache by downloading it from the Truffle Framework website. It will give us 10 external accounts with addresses on our local Ethereum blockchain. Each account is preloaded with 100 fake ether.
Metamask
The next dependency is the Metamask extension for Google Chrome. In order to use the blockchain, we must connect to it (remember, I said the block chain is a network). We’ll have to install a special browser extension in order to use the Ethereum block chain. That’s where metamask comes in. We’ll be able to connect to our local Ethereum blockchain with our personal account, and interact with our smart contract.
We’re going to be using the Metamask chrome extension for this tutorial, so you’ll also need to install the google chrome browser if you don’t have it already. To install Metamask, search for the Metamask Chrome plugin in the Google Chrome web store. Once you’ve installed it, be sure that it is checked in your list of extensions. You’ll see the fox icon in the top right hand side of your Chrome browser when it’s installed. Reference the video walk through if you get stuck!
Syntax Highlighting
The dependency is optional, but recommended. I recommend installing syntax highlighting for the Solidity programming language. Most text editors and IDEs don’t have syntax highlighting for Solidity out of the box, so you’ll have to install a package to support this. I’m using Sublime Text, and I’ve downloaded the "Ethereum" package that provides nice syntax highlighting for Solidity.
ERC-20 Token Smart Contract
The accompanying video footage for this portion of the tutorial begins with this video. You can download the code for this smart contract from from github here.
Now that we have our dependencies installed, let’s start building our ERC-20 token! Here is the complete ERC-20 token smart contract Solidity code:
pragma solidity ^0.4.2;

contract DappToken {
    string  public name = "DApp Token";
    string  public symbol = "DAPP";
    string  public standard = "DApp Token v1.0";
    uint256 public totalSupply;

    event Transfer(
        address indexed _from,
        address indexed _to,
        uint256 _value
    );

    event Approval(
        address indexed _owner,
        address indexed _spender,
        uint256 _value
    );

    mapping(address => uint256) public balanceOf;
    mapping(address => mapping(address => uint256)) public allowance;

    function DappToken (uint256 _initialSupply) public {
        balanceOf[msg.sender] = _initialSupply;
        totalSupply = _initialSupply;
    }

    function transfer(address _to, uint256 _value) public returns (bool success) {
        require(balanceOf[msg.sender] >= _value);

        balanceOf[msg.sender] -= _value;
        balanceOf[_to] += _value;

        Transfer(msg.sender, _to, _value);

        return true;
    }

    function approve(address _spender, uint256 _value) public returns (bool success) {
        allowance[msg.sender][_spender] = _value;

        Approval(msg.sender, _spender, _value);

        return true;
    }

    function transferFrom(address _from, address _to, uint256 _value) public returns (bool success) {
        require(_value <= balanceOf[_from]);
        require(_value <= allowance[_from][msg.sender]);

        balanceOf[_from] -= _value;
        balanceOf[_to] += _value;

        allowance[_from][msg.sender] -= _value;

        Transfer(_from, _to, _value);

        return true;
    }
}
Let's take a look at what this smart contract does, and how it implements the ERC-20 standard:
- It stores the token name
string public name = "DApp Token". - It stores the token symbol for cryptocurrency exchanges
string public symbol = "DAPP". - It stores the total supply of tokens in existence
uint256 public totalSupply. - It uses a Solidity mapping to store the balance of each account that owns tokens
mapping(address => uint256) public balanceOf. - It implements a
transferfunction to allow users to send tokens to another account. - It implements an
approvefunction that allows another account to spend tokens, like on a cryptocurrency exchange. This updates theallowancemapping to see how much the account is allowed to spend. - It implements a
transferFromthat allows another account to transfer tokens.
Watch me build out this smart contract step-by-step with this video.
You can also read through the tests for this smart contract to discover more about how it works. These tests ensure that this smart contract behaves the way we expect. Here is a complete test suite that checks all the behavior for the smart contract:
var DappToken = artifacts.require("./DappToken.sol");

contract('DappToken', function(accounts) {
  var tokenInstance;

  it('initializes the contract with the correct values', function() {
    return DappToken.deployed().then(function(instance) {
      tokenInstance = instance;
      return tokenInstance.name();
    }).then(function(name) {
      assert.equal(name, 'DApp Token', 'has the correct name');
      return tokenInstance.symbol();
    }).then(function(symbol) {
      assert.equal(symbol, 'DAPP', 'has the correct symbol');
      return tokenInstance.standard();
    }).then(function(standard) {
      assert.equal(standard, 'DApp Token v1.0', 'has the correct standard');
    });
  })

  it('allocates the initial supply upon deployment', function() {
    return DappToken.deployed().then(function(instance) {
      tokenInstance = instance;
      return tokenInstance.totalSupply();
    }).then(function(totalSupply) {
      assert.equal(totalSupply.toNumber(), 1000000, 'sets the total supply to 1,000,000');
      return tokenInstance.balanceOf(accounts[0]);
    }).then(function(adminBalance) {
      assert.equal(adminBalance.toNumber(), 1000000, 'it allocates the initial supply to the admin account');
    });
  });

  it('transfers token ownership', function() {
    return DappToken.deployed().then(function(instance) {
      tokenInstance = instance;
      // Test `require` statement first by transferring something larger than the sender's balance
      return tokenInstance.transfer.call(accounts[1], 99999999999999999999999);
    }).then(assert.fail).catch(function(error) {
      assert(error.message.indexOf('revert') >= 0, 'error message must contain revert');
      return tokenInstance.transfer.call(accounts[1], 250000, { from: accounts[0] });
    }).then(function(success) {
      assert.equal(success, true, 'it returns true');
      return tokenInstance.transfer(accounts[1], 250000, { from: accounts[0] });
    }).then(function(receipt) {
      assert.equal(receipt.logs.length, 1, 'triggers one event');
      assert.equal(receipt.logs[0].event, 'Transfer', 'should be the "Transfer" event');
      assert.equal(receipt.logs[0].args._from, accounts[0], 'logs the account the tokens are transferred from');
      assert.equal(receipt.logs[0].args._to, accounts[1], 'logs the account the tokens are transferred to');
      assert.equal(receipt.logs[0].args._value, 250000, 'logs the transfer amount');
      return tokenInstance.balanceOf(accounts[1]);
    }).then(function(balance) {
      assert.equal(balance.toNumber(), 250000, 'adds the amount to the receiving account');
      return tokenInstance.balanceOf(accounts[0]);
    }).then(function(balance) {
      assert.equal(balance.toNumber(), 750000, 'deducts the amount from the sending account');
    });
  });

  it('approves tokens for delegated transfer', function() {
    return DappToken.deployed().then(function(instance) {
      tokenInstance = instance;
      return tokenInstance.approve.call(accounts[1], 100);
    }).then(function(success) {
      assert.equal(success, true, 'it returns true');
      return tokenInstance.approve(accounts[1], 100, { from: accounts[0] });
    }).then(function(receipt) {
      assert.equal(receipt.logs.length, 1, 'triggers one event');
      assert.equal(receipt.logs[0].event, 'Approval', 'should be the "Approval" event');
      assert.equal(receipt.logs[0].args._owner, accounts[0], 'logs the account the tokens are authorized by');
      assert.equal(receipt.logs[0].args._spender, accounts[1], 'logs the account the tokens are authorized to');
      assert.equal(receipt.logs[0].args._value, 100, 'logs the transfer amount');
      return tokenInstance.allowance(accounts[0], accounts[1]);
    }).then(function(allowance) {
      assert.equal(allowance.toNumber(), 100, 'stores the allowance for delegated trasnfer');
    });
  });

  it('handles delegated token transfers', function() {
    return DappToken.deployed().then(function(instance) {
      tokenInstance = instance;
      fromAccount = accounts[2];
      toAccount = accounts[3];
      spendingAccount = accounts[4];
      // Transfer some tokens to fromAccount
      return tokenInstance.transfer(fromAccount, 100, { from: accounts[0] });
    }).then(function(receipt) {
      // Approve spendingAccount to spend 10 tokens form fromAccount
      return tokenInstance.approve(spendingAccount, 10, { from: fromAccount });
    }).then(function(receipt) {
      // Try transferring something larger than the sender's balance
      return tokenInstance.transferFrom(fromAccount, toAccount, 9999, { from: spendingAccount });
    }).then(assert.fail).catch(function(error) {
      assert(error.message.indexOf('revert') >= 0, 'cannot transfer value larger than balance');
      // Try transferring something larger than the approved amount
      return tokenInstance.transferFrom(fromAccount, toAccount, 20, { from: spendingAccount });
    }).then(assert.fail).catch(function(error) {
      assert(error.message.indexOf('revert') >= 0, 'cannot transfer value larger than approved amount');
      return tokenInstance.transferFrom.call(fromAccount, toAccount, 10, { from: spendingAccount });
    }).then(function(success) {
      assert.equal(success, true);
      return tokenInstance.transferFrom(fromAccount, toAccount, 10, { from: spendingAccount });
    }).then(function(receipt) {
      assert.equal(receipt.logs.length, 1, 'triggers one event');
      assert.equal(receipt.logs[0].event, 'Transfer', 'should be the "Transfer" event');
      assert.equal(receipt.logs[0].args._from, fromAccount, 'logs the account the tokens are transferred from');
      assert.equal(receipt.logs[0].args._to, toAccount, 'logs the account the tokens are transferred to');
      assert.equal(receipt.logs[0].args._value, 10, 'logs the transfer amount');
      return tokenInstance.balanceOf(fromAccount);
    }).then(function(balance) {
      assert.equal(balance.toNumber(), 90, 'deducts the amount from the sending account');
      return tokenInstance.balanceOf(toAccount);
    }).then(function(balance) {
      assert.equal(balance.toNumber(), 10, 'adds the amount from the receiving account');
      return tokenInstance.allowance(fromAccount, spendingAccount);
    }).then(function(allowance) {
      assert.equal(allowance.toNumber(), 0, 'deducts the amount from the allowance');
    });
  });
});
You can run the test from the command line with truffle like this:
$ truffle test
Crowd Sale Smart Contract
The accompanying video footage for this portion of the tutorial begins with this video. You can download the code for this smart contract from from github here.
Now we can build a crowd sale smart contract that will allow investors to purchase tokens in an initial coin offering (ICO). Here is the complete crowd sale smart contract Solidity code:
pragma solidity ^0.4.2;

import "./DappToken.sol";

contract DappTokenSale {
    address admin;
    DappToken public tokenContract;
    uint256 public tokenPrice;
    uint256 public tokensSold;

    event Sell(address _buyer, uint256 _amount);

    function DappTokenSale(DappToken _tokenContract, uint256 _tokenPrice) public {
        admin = msg.sender;
        tokenContract = _tokenContract;
        tokenPrice = _tokenPrice;
    }

    function multiply(uint x, uint y) internal pure returns (uint z) {
        require(y == 0 || (z = x * y) / y == x);
    }

    function buyTokens(uint256 _numberOfTokens) public payable {
        require(msg.value == multiply(_numberOfTokens, tokenPrice));
        require(tokenContract.balanceOf(this) >= _numberOfTokens);
        require(tokenContract.transfer(msg.sender, _numberOfTokens));

        tokensSold += _numberOfTokens;

        Sell(msg.sender, _numberOfTokens);
    }

    function endSale() public {
        require(msg.sender == admin);
        require(tokenContract.transfer(admin, tokenContract.balanceOf(this)));

        // Just transfer the balance to the admin
        admin.transfer(address(this).balance);
    }
}
Let's take a look at what this smart contract does, and how it functions as a crowd sale:
- It stores an admin account for the crowd sale
address admin. - It references the ERC-20 token smart contract
DappToken public tokenContract. - It stores the token price
uint256 public tokenPrice. - It stores the number of tokens sold
uint256 public tokensSold. - It implements a
sellevent so that consumers can get notifications whenever a token has been sold. - It implements a
buyTokensfunction that allows users to purchase tokens in the crowd sale. - It implements an
endSalefunction that allows an admin to end the crowd sale and collect the Ether funds that was raised during the sale.
Watch me build out this smart contract step-by-step with this video.
You can also read through the tests for this smart contract to discover more about how it works. These tests ensure that this smart contract behaves the way we expect. Here is a complete test suite that checks all the behavior for the smart contract:
var DappToken = artifacts.require('./DappToken.sol');
  var DappTokenSale = artifacts.require('./DappTokenSale.sol');

  contract('DappTokenSale', function(accounts) {
    var tokenInstance;
    var tokenSaleInstance;
    var admin = accounts[0];
    var buyer = accounts[1];
    var tokenPrice = 1000000000000000; // in wei
    var tokensAvailable = 750000;
    var numberOfTokens;

    it('initializes the contract with the correct values', function() {
      return DappTokenSale.deployed().then(function(instance) {
        tokenSaleInstance = instance;
        return tokenSaleInstance.address
      }).then(function(address) {
        assert.notEqual(address, 0x0, 'has contract address');
        return tokenSaleInstance.tokenContract();
      }).then(function(address) {
        assert.notEqual(address, 0x0, 'has token contract address');
        return tokenSaleInstance.tokenPrice();
      }).then(function(price) {
        assert.equal(price, tokenPrice, 'token price is correct');
      });
    });

    it('facilitates token buying', function() {
      return DappToken.deployed().then(function(instance) {
        // Grab token instance first
        tokenInstance = instance;
        return DappTokenSale.deployed();
      }).then(function(instance) {
        // Then grab token sale instance
        tokenSaleInstance = instance;
        // Provision 75% of all tokens to the token sale
        return tokenInstance.transfer(tokenSaleInstance.address, tokensAvailable, { from: admin })
      }).then(function(receipt) {
        numberOfTokens = 10;
        return tokenSaleInstance.buyTokens(numberOfTokens, { from: buyer, value: numberOfTokens * tokenPrice })
      }).then(function(receipt) {
        assert.equal(receipt.logs.length, 1, 'triggers one event');
        assert.equal(receipt.logs[0].event, 'Sell', 'should be the "Sell" event');
        assert.equal(receipt.logs[0].args._buyer, buyer, 'logs the account that purchased the tokens');
        assert.equal(receipt.logs[0].args._amount, numberOfTokens, 'logs the number of tokens purchased');
        return tokenSaleInstance.tokensSold();
      }).then(function(amount) {
        assert.equal(amount.toNumber(), numberOfTokens, 'increments the number of tokens sold');
        return tokenInstance.balanceOf(buyer);
      }).then(function(balance) {
        assert.equal(balance.toNumber(), numberOfTokens);
        return tokenInstance.balanceOf(tokenSaleInstance.address);
      }).then(function(balance) {
        assert.equal(balance.toNumber(), tokensAvailable - numberOfTokens);
        // Try to buy tokens different from the ether value
        return tokenSaleInstance.buyTokens(numberOfTokens, { from: buyer, value: 1 });
      }).then(assert.fail).catch(function(error) {
        assert(error.message.indexOf('revert') >= 0, 'msg.value must equal number of tokens in wei');
        return tokenSaleInstance.buyTokens(800000, { from: buyer, value: numberOfTokens * tokenPrice })
      }).then(assert.fail).catch(function(error) {
        assert(error.message.indexOf('revert') >= 0, 'cannot purchase more tokens than available');
      });
    });

    it('ends token sale', function() {
      return DappToken.deployed().then(function(instance) {
        // Grab token instance first
        tokenInstance = instance;
        return DappTokenSale.deployed();
      }).then(function(instance) {
        // Then grab token sale instance
        tokenSaleInstance = instance;
        // Try to end sale from account other than the admin
        return tokenSaleInstance.endSale({ from: buyer });
      }).then(assert.fail).catch(function(error) {
        assert(error.message.indexOf('revert' >= 0, 'must be admin to end sale'));
        // End sale as admin
        return tokenSaleInstance.endSale({ from: admin });
      }).then(function(receipt) {
        return tokenInstance.balanceOf(admin);
      }).then(function(balance) {
        assert.equal(balance.toNumber(), 999990, 'returns all unsold dapp tokens to admin');
        // Check that the contract has no balance
        balance = web3.eth.getBalance(tokenSaleInstance.address)
        assert.equal(balance.toNumber(), 0);
      });
    });
  });
Congratulations! 🎉 You have successfully built an ERC-20 token and crowd sale smart contract on Ethereum! You can check out the full 8-hour video tutorial here to learn how to build an ICO website that talks to the smart contract and facilitates token buying. It also includes in depth step-by-step instructions for building the smart contracts themselves. You can also download the full source code to this tutorial from github here.

Want to Hire an Expert?
If you're interested in hiring an ICO expert, I can lead your project step-by-step from "zero to ICO" with my battle tested ICO solution!
Learn MoreHappy with this tutorial? Then you NEED to join my free training here where I'll show you how to build a real world blockchain app so that you can become a highly paid blockchain developer!