Intro to Web3.py · Ethereum For Python Developers
By Gregory McCubbin ·
Hey everybody, it’s Gregory from Dapp University!
Today I'm going to you how to get started using the Web3.py library. If you're a Python developer, Web3.py is your go-to library for interacting with The Ethereum Blockchain. Today I'll show you step-by-step how to use Web3.py is to talk to the Ethereum blockchain in this 6-part tutorial series.
Table of Contents
#1 · What is Web3.py?
This video is the first in this 6-part tutorial series. In this section, I'll give you an overview of the Web3.py library, and then I'll show you how to check the balance of an Ethereum account.
There are a few different aspects to developing blockchain applications with Ethereum:
- Developing smart contracts - writing programs that run on the blockchain with the Solidity programming language.
- Developing clients that talk to the blockchain - crafting code that reads and writes data from the blockchain (this includes smart contract interaction).
Web3.py enables you to fulfill the second responsibility: developing clients that interact with The Etherem Blockchain. And not necessarily "clients" like user-facing applications (web applications for example), but "clients" that transact with the blockchain by reading information from it, writing new transaction data to it, or executing business logic with smart contracts. Since you're writing python this "client" might be a script that scrapes blockchain data, or a server process that executes a smart contract function for example. Web3.py is collection of libraries that enable you to do these kinds of things: create Ethereum transactions, read and write data from smart contracts, create smart contracts, and so much more!
Let's look at how you can use Web3.py to talk to Ethereum with this diagram:
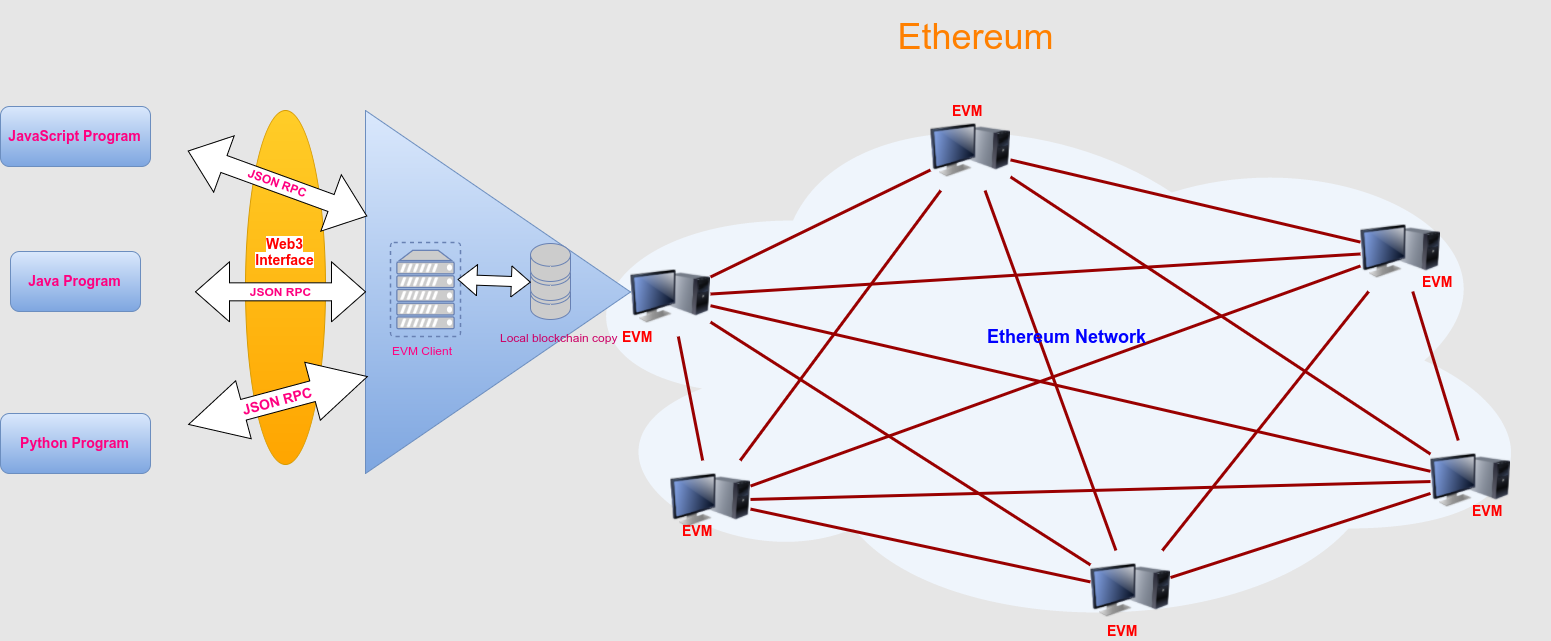
Image credit: iotbl.
Web3.py talks to The Ethereum Blockchain with JSON RPC, which stands for "Remote Procedure Call" protocol. Ethereum is a peer-to-peer network of nodes that distributes all its data across each node in the network. In other words, each node on the network gets a copy of all the code and the data on the network. Web3.py allows us to make requests to an individual Ethereum node on behalf of the entire network with JSON RPC. This will allow us to read and write data to the network through a single node. It's kind of like making HTTP requests to a JSON API on a web server.
Dependencies
Let's install developing with Web3.py.
Python
First, you'll want to ensure that you have some version of Python installed. I'm using version 3.6.7 in this series. Next, you'll want to use some kind of environment manager like venv, which ships with Python or pyenv, which you can download here.
You can see if you have Python already installed on your machine by going to your terminal and typing:
$ python --versionOR:
$ python3 --versionMake sure you have some version of Python 3 installed before continuuing. If you have multiple Python versions installed, and you're forced to use python3 to access Python version 3, then please use python3 instead of python for all Python specific terminal commands in this series.
Next, you'll want to create a virtual envrionment with venv or pyenv to install Python dependencies.
Web3.py Library
You can install the Web3.py library with pip in your terminal like this:
$ pip install web3Infura RPC URL
In order to connect to an Ethereum node with JSON RPC on the Main Net, we need access to an Ethereum node. There are a few ways you could do this. For one, you could run your own Ethereum node with Geth or Parity. But this requires you to download a lot of data from the blockchain and keep it in sync. This is a huge headache if you've ever tried to do this before.
Mostly for convenience, you can use Infura to access an Ethereum node without having to run one yourself. Infura is a service that provides a remote Ethereum node for free. All you need to do is sign up and obtain an API key and the RPC URL for the network you want to connect to.
Once you've signed up, your Infura RPC URL should look like this:
https://mainnet.infura.io/v3/YOUR_INFURA_API_KEY_GOES_HEREChecking Account Balances
Now that all of your dependencies are installed, you can start developing with Web3.py! First, you should fire up the Python shell in your terminal like this:
$ pythonNow you've got the Pthon shell open! Inside the Pthon shell, you can import Web3.py like this:
from web3 import Web3Now you have access to a variable where you can create a new Web3 connection! Before we generate a Web3 connection, we must first assign the Infura URL to a variable like this:
infura_url = "https://mainnet.infura.io/v3/YOUR_INFURA_API_KEY_GOES_HERE"Make sure that you replace YOUR_INFURA_API_KEY with your actual Infura API key that you obtained earlier. Now you can instantiate a Web3 connection like this:
web3 = Web3(Web3.HTTPProvider(infura_url))Now you have a live Web3 connection that will allow you to talk to the Ethereum main net! We can ensure that we're connected like this:
print(web3.isConnected())This will return true if the connection is live. Next we can check the latest block number like this:
print(web3.eth.blockNumber)There's the latest block number! Now let's check the account balance for this account: 0x90e63c3d53E0Ea496845b7a03ec7548B70014A91. We can see how much Ether this account holds by checking its balance with web3.eth.getBalance().
First, let's assign the address to a variable:
account = "0x90e63c3d53E0Ea496845b7a03ec7548B70014A91"Now, let's check the account balance like this:
balance = web3.eth.getBalance("0x90e63c3d53E0Ea496845b7a03ec7548B70014A91")There's the account balance! However, I should note that this account balance is expressed in wei, which is a subdivision of Ether, kind of like a penny. You must convert this to Ether by dividing the value by 10 ** 18.
And that's it! That's the conclusion to the first part of this tutorial. Now you've seen what the Web3.py library is and you can get started using it to check Ethereum account balances. Here is a summary of the code we wrote in this tutorial:
from web3 import Web3

# Fill in your infura API key here
infura_url = "https://mainnet.infura.io/v3/YOUR_INFURA_API_KEY_GOES_HERE"
web3 = Web3(Web3.HTTPProvider(infura_url))

print(web3.isConnected())

print(web3.eth.blockNumber)

# Fill in your account here
balance = web3.eth.getBalance("YOUR_ACCOUNT_GOES_HERE")
print(web3.fromWei(balance, "ether"))
})
You can also download all the code examples in this tutorial series from github.
I will also mention that reading through the Web3.py documentation will give you a thorough overview of what you can do with the library. I highly recommend browsing through it, even if you don't understand every aspect of its functionality. You can find the full documentation for Web3.py here:
https://web3py.readthedocs.io/en/stable/
Additionally, note that Web3.py is under active development. You can visit the Web3.py github repository to follow along with its progress, and also read through the code to gain a better understanding of the library itself. You can find the github repository here:
https://github.com/ethereum/Web3.py/
#2 · Read Data from Smart Contracts with Web3.py
This is the second video in the 6-part tutorial series. In this video, I will show you how to read smart contract data from The Ethereum Blockchain.
From this point forward, let's write all of the tutorial code inside a script file called app.py. You can get create a project with the this file like this example on github.
Let's go ahead and import some libraries at the top of the app.py file. We'll go ahead and set up our web3 connection also:
import json
from web3 import Web3

# Fill in your infura API key here
infura_url = "https://mainnet.infura.io/v3/YOUR_INFURA_API_KEY_GOES_HERE"
web3 = Web3(Web3.HTTPProvider(infura_url))
In order to read data from smart contracts with Web3.py, we need two things:
- A Python representation of the smart contract we want to interact with
- A way to call the functions on the smart contract when reading the data
We can get a Python representation of an Ethereum smart contract with the web3.eth.Contract() function. This function expects two arguments: one for the smart contract ABI and one for the smart contract address.
A smart contract ABI stands for "Abstract Binary Interface", and is a JSON array that describes how a specific smart contract works. Here is an example an ABI:
abi = [{"constant":true,"inputs":[],"name":"mintingFinished","outputs":[{"name":"","type":"bool"}],"payable":false,"type":"function"},{"constant":true,"inputs":[],"name":"name","outputs":[{"name":"","type":"string"}],"payable":false,"type":"function"},{"constant":false,"inputs":[{"name":"_spender","type":"address"},{"name":"_value","type":"uint256"}],"name":"approve","outputs":[],"payable":false,"type":"function"},{"constant":true,"inputs":[],"name":"totalSupply","outputs":[{"name":"","type":"uint256"}],"payable":false,"type":"function"},{"constant":false,"inputs":[{"name":"_from","type":"address"},{"name":"_to","type":"address"},{"name":"_value","type":"uint256"}],"name":"transferFrom","outputs":[],"payable":false,"type":"function"},{"constant":true,"inputs":[],"name":"decimals","outputs":[{"name":"","type":"uint256"}],"payable":false,"type":"function"},{"constant":false,"inputs":[],"name":"unpause","outputs":[{"name":"","type":"bool"}],"payable":false,"type":"function"},{"constant":false,"inputs":[{"name":"_to","type":"address"},{"name":"_amount","type":"uint256"}],"name":"mint","outputs":[{"name":"","type":"bool"}],"payable":false,"type":"function"},{"constant":true,"inputs":[],"name":"paused","outputs":[{"name":"","type":"bool"}],"payable":false,"type":"function"},{"constant":true,"inputs":[{"name":"_owner","type":"address"}],"name":"balanceOf","outputs":[{"name":"balance","type":"uint256"}],"payable":false,"type":"function"},{"constant":false,"inputs":[],"name":"finishMinting","outputs":[{"name":"","type":"bool"}],"payable":false,"type":"function"},{"constant":false,"inputs":[],"name":"pause","outputs":[{"name":"","type":"bool"}],"payable":false,"type":"function"},{"constant":true,"inputs":[],"name":"owner","outputs":[{"name":"","type":"address"}],"payable":false,"type":"function"},{"constant":true,"inputs":[],"name":"symbol","outputs":[{"name":"","type":"string"}],"payable":false,"type":"function"},{"constant":false,"inputs":[{"name":"_to","type":"address"},{"name":"_value","type":"uint256"}],"name":"transfer","outputs":[],"payable":false,"type":"function"},{"constant":false,"inputs":[{"name":"_to","type":"address"},{"name":"_amount","type":"uint256"},{"name":"_releaseTime","type":"uint256"}],"name":"mintTimelocked","outputs":[{"name":"","type":"address"}],"payable":false,"type":"function"},{"constant":true,"inputs":[{"name":"_owner","type":"address"},{"name":"_spender","type":"address"}],"name":"allowance","outputs":[{"name":"remaining","type":"uint256"}],"payable":false,"type":"function"},{"constant":false,"inputs":[{"name":"newOwner","type":"address"}],"name":"transferOwnership","outputs":[],"payable":false,"type":"function"},{"anonymous":false,"inputs":[{"indexed":true,"name":"to","type":"address"},{"indexed":false,"name":"value","type":"uint256"}],"name":"Mint","type":"event"},{"anonymous":false,"inputs":[],"name":"MintFinished","type":"event"},{"anonymous":false,"inputs":[],"name":"Pause","type":"event"},{"anonymous":false,"inputs":[],"name":"Unpause","type":"event"},{"anonymous":false,"inputs":[{"indexed":true,"name":"owner","type":"address"},{"indexed":true,"name":"spender","type":"address"},{"indexed":false,"name":"value","type":"uint256"}],"name":"Approval","type":"event"},{"anonymous":false,"inputs":[{"indexed":true,"name":"from","type":"address"},{"indexed":true,"name":"to","type":"address"},{"indexed":false,"name":"value","type":"uint256"}],"name":"Transfer","type":"event"}]That's a really long unbroken array, I know! Don't worry if it looks overwhelming. :) This example is the ABI for the OmiseGo token, which implements the ERC-20 token standard (if you're unfamiliar with this standard, you can watch this video). You can find more details about this token, including its abi and address on Etherscan. We'll use this smart contract ABI for the rest of the example.
While we're here, I'll go ahead and store the address to the OMG token from the Ethereum main net:
address = "0xd26114cd6EE289AccF82350c8d8487fedB8A0C07"Now that we have both of these values assigned, we can create a complete Python representation of the OMG token smart contract like this:
contract = web3.eth.contract(address=address, abi=abi)Now that the first part of this lesson is complete, we need to fulfill the second part: reading data from the smart contract by calling its functions. All of the smart contract functions are listed under the contract.functions namespace within the assigned Web3 contract. For example, we can call contract.functions.myFunction() if the contract implements myFunction().
Great! So we can theoretically call any function that the smart contract implements. But how do we know which functions it implements? For one, we could log contract.functions to the console, and see what's returned (you can watch me do this in the video above). However, since this smart contract implements the ERC-20 standard, we know that it implements several functions like totalSupply(), name(), symbol(), and balanceOf(). We can read each of those values individually, like this:
First, the total supply of all OMG tokens in existence:
totalSupply = contract.functions.totalSupply().call()
print(web3.fromWei(totalSupply, 'ether'))
# > 140245398
Second, the name of the OMG token:
print(contract.functions.name().call())
# > OMG Token
Third, the symbol of the OMG token:
print(contract.functions.symbol().call())
# > OMG
Last, we can check the balance for a given account. I looked for a rich OMG holder on Etherscan, and found this address 0xd26114cd6EE289AccF82350c8d8487fedB8A0C07. We can check the balance for this account like this:
balance = contract.functions.balanceOf('0xd26114cd6EE289AccF82350c8d8487fedB8A0C07').call()
print(web3.fromWei(balance, 'ether'))
// > A very large number...
And that's it! That's how easy it is to read data from smart contracts with Web3.py. Here is a summary of all the code from this lesson:
import json
from web3 import Web3

# Fill in your infura API key here
infura_url = "https://mainnet.infura.io/v3/YOUR_INFURA_API_KEY_GOES_HERE"
web3 = Web3(Web3.HTTPProvider(infura_url))

# OMG Address
abi = json.loads('[{"constant":true,"inputs":[],"name":"mintingFinished","outputs":[{"name":"","type":"bool"}],"payable":false,"type":"function"},{"constant":true,"inputs":[],"name":"name","outputs":[{"name":"","type":"string"}],"payable":false,"type":"function"},{"constant":false,"inputs":[{"name":"_spender","type":"address"},{"name":"_value","type":"uint256"}],"name":"approve","outputs":[],"payable":false,"type":"function"},{"constant":true,"inputs":[],"name":"totalSupply","outputs":[{"name":"","type":"uint256"}],"payable":false,"type":"function"},{"constant":false,"inputs":[{"name":"_from","type":"address"},{"name":"_to","type":"address"},{"name":"_value","type":"uint256"}],"name":"transferFrom","outputs":[],"payable":false,"type":"function"},{"constant":true,"inputs":[],"name":"decimals","outputs":[{"name":"","type":"uint256"}],"payable":false,"type":"function"},{"constant":false,"inputs":[],"name":"unpause","outputs":[{"name":"","type":"bool"}],"payable":false,"type":"function"},{"constant":false,"inputs":[{"name":"_to","type":"address"},{"name":"_amount","type":"uint256"}],"name":"mint","outputs":[{"name":"","type":"bool"}],"payable":false,"type":"function"},{"constant":true,"inputs":[],"name":"paused","outputs":[{"name":"","type":"bool"}],"payable":false,"type":"function"},{"constant":true,"inputs":[{"name":"_owner","type":"address"}],"name":"balanceOf","outputs":[{"name":"balance","type":"uint256"}],"payable":false,"type":"function"},{"constant":false,"inputs":[],"name":"finishMinting","outputs":[{"name":"","type":"bool"}],"payable":false,"type":"function"},{"constant":false,"inputs":[],"name":"pause","outputs":[{"name":"","type":"bool"}],"payable":false,"type":"function"},{"constant":true,"inputs":[],"name":"owner","outputs":[{"name":"","type":"address"}],"payable":false,"type":"function"},{"constant":true,"inputs":[],"name":"symbol","outputs":[{"name":"","type":"string"}],"payable":false,"type":"function"},{"constant":false,"inputs":[{"name":"_to","type":"address"},{"name":"_value","type":"uint256"}],"name":"transfer","outputs":[],"payable":false,"type":"function"},{"constant":false,"inputs":[{"name":"_to","type":"address"},{"name":"_amount","type":"uint256"},{"name":"_releaseTime","type":"uint256"}],"name":"mintTimelocked","outputs":[{"name":"","type":"address"}],"payable":false,"type":"function"},{"constant":true,"inputs":[{"name":"_owner","type":"address"},{"name":"_spender","type":"address"}],"name":"allowance","outputs":[{"name":"remaining","type":"uint256"}],"payable":false,"type":"function"},{"constant":false,"inputs":[{"name":"newOwner","type":"address"}],"name":"transferOwnership","outputs":[],"payable":false,"type":"function"},{"anonymous":false,"inputs":[{"indexed":true,"name":"to","type":"address"},{"indexed":false,"name":"value","type":"uint256"}],"name":"Mint","type":"event"},{"anonymous":false,"inputs":[],"name":"MintFinished","type":"event"},{"anonymous":false,"inputs":[],"name":"Pause","type":"event"},{"anonymous":false,"inputs":[],"name":"Unpause","type":"event"},{"anonymous":false,"inputs":[{"indexed":true,"name":"owner","type":"address"},{"indexed":true,"name":"spender","type":"address"},{"indexed":false,"name":"value","type":"uint256"}],"name":"Approval","type":"event"},{"anonymous":false,"inputs":[{"indexed":true,"name":"from","type":"address"},{"indexed":true,"name":"to","type":"address"},{"indexed":false,"name":"value","type":"uint256"}],"name":"Transfer","type":"event"}]')
# OMG ABI
address = '0xd26114cd6EE289AccF82350c8d8487fedB8A0C07'

contract = web3.eth.contract(address=address, abi=abi)

totalSupply = contract.functions.totalSupply().call()
print(web3.fromWei(totalSupply, 'ether'))
print(contract.functions.name().call())
print(contract.functions.symbol().call())
balance = contract.functions.balanceOf('0xd26114cd6EE289AccF82350c8d8487fedB8A0C07').call()
print(web3.fromWei(balance, 'ether'))
You can also download all the code examples in this tutorial series from github.
#3 · Sending Ethereum Transactions
This is the third video in the 6-part tutorial series. This video will show you how to create transactions on The Ethereum Blockchain with Web3.py. This lesson will go from beginner to slightly advanced. I'll show you what happens when an Etherum transaction is created, and I'll show you how to broadcast a transaction manually to the network with Web3.py.
In addition to learning Web3.py, the purpose of this lesson is to help you understand the fundamentals about how transactions work on The Ethereum Blockchain. Whenever you create a transaction, you're writing data to the blockchain and updating its state. There are several ways to do this, like sending Ether from one account to another, calling a smart contract function that writes data, and deploying a smart contract to the blockchain. We can get a greater understanding of these concepts by performing these actions with the Web3.py library and observing how each step works.
In order to broadcast transactions to the network. There are several ways to do this. To avoid displaying private keys (very sensitive data), I am going to use a personal, development blockchain for this portion of the tutorial. I recommend using Ganache as your personal blockchain for Ethereum development. It is available on Windows, Mac, and Linux as as a desktop application and a command line tool!
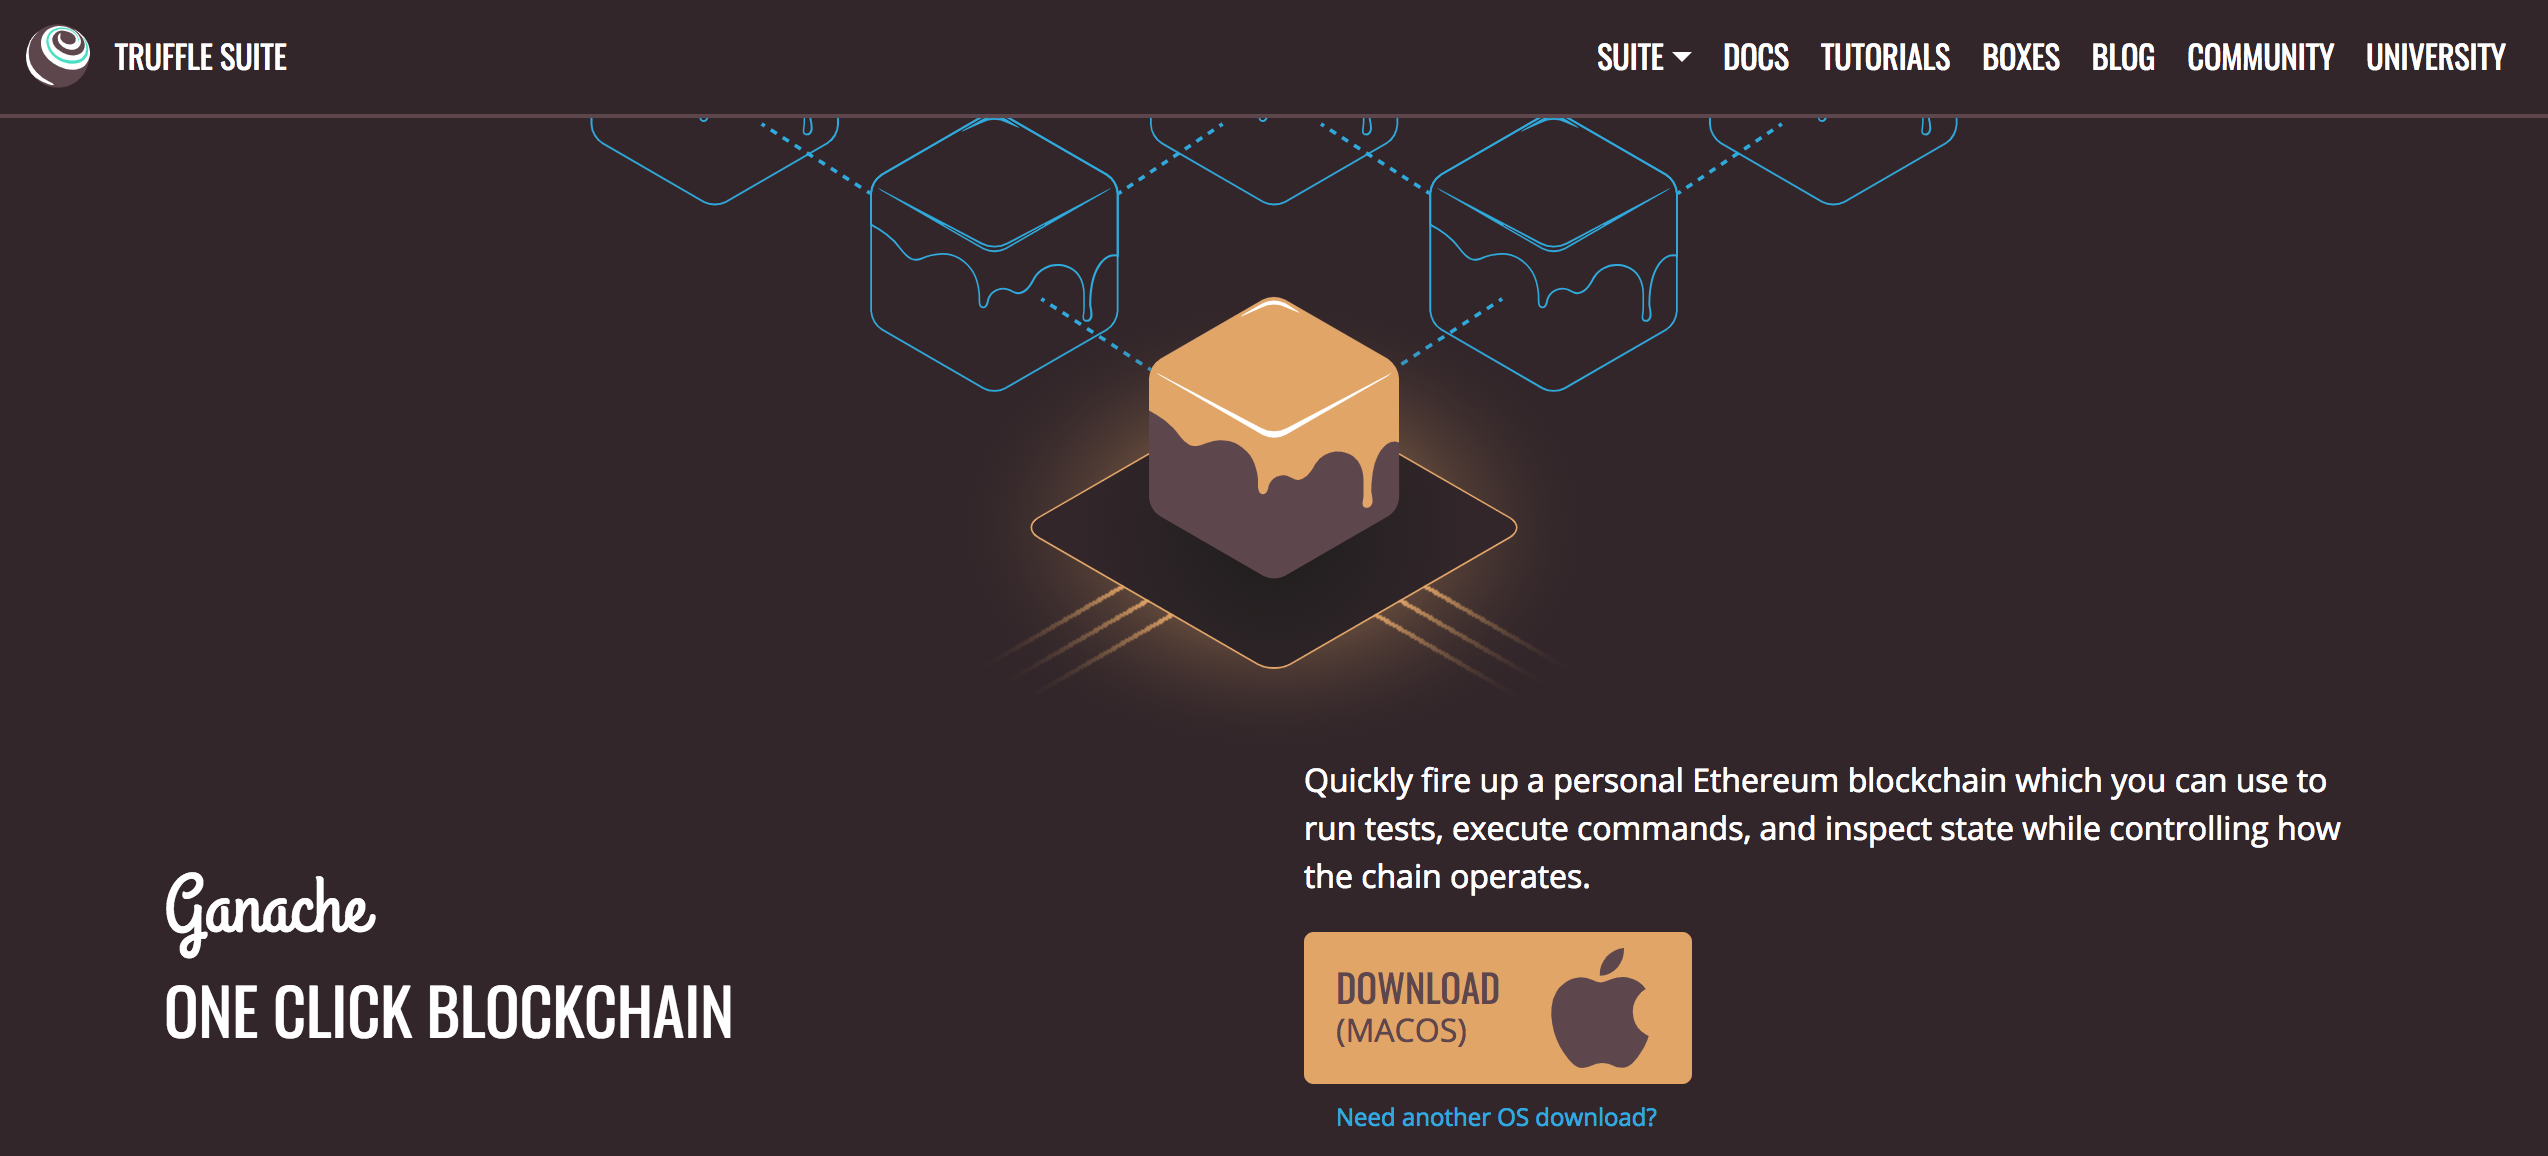
You can find the latest release for your operating system here. Once you've downloaded the archived package, extract the installer and run through the setup steps. Once you've installed it, you should see a this screen whenever you open it:

Yay! 🎉 Now you have a personal blockchain network running!
Now let's update the app.py code to connect to Ganache, instead of the Infura node:
from web3 import Web3

ganache_url = "http://127.0.0.1:7545"
web3 = Web3(Web3.HTTPProvider(ganache_url))
Now go copy the first two accounts from Ganache and assign them to variables like this:
account_1 = '' # Fill me in
account_2 = '' # Fill me in
Next, grab the private key for your frist account from the list. Go to Ganache and click the "key" icon next to the fist account. This will expose the private key. You can watch me do this in the video here. Once you've copied the private key, assign it to a variable like this:
private_key = '' # Fill me inNow let's build the Ethereum transaction that sends Ether, Etherum cryptocurrency, form account_1 to account_2. We can build the transaction dictionary that will get broadcast to the blockchain like this:
nonce = web3.eth.getTransactionCount(account_1)

tx = {
    'nonce': nonce,
    'to': account_2,
    'value': web3.toWei(1, 'ether'),
    'gas': 2000000,
    'gasPrice': web3.toWei('50', 'gwei'),
}
Let me explain this code:
- First, we get the fetch the account
nonce, or transaction count. This is a required field of the transaction because it prevents the double-spend problem. - Next we build the transaction obect, and fill in the nonce first.
- Then we specify the account we're sending Ether to
account_2 - Then we specify the
gaslimit of2000000 - Finally, we specify the gas price of
50 Gwei
Now we'll sign the transaction with our private key in order to tell the network that account_1 is sending the Ether like this:
signed_tx = web3.eth.account.signTransaction(tx, private_key)Finally, we'll send the transaction to the newtork like this:
tx_hash = web3.eth.sendRawTransaction(signed_tx.rawTransaction)
print(web3.toHex(tx_hash))
This sends the raw transaction to the network and return a transaction hash. We can convert the transaction hash to hex and print it to the terminal with print(web3.toHex(tx_hash)).
Now let's run the app.py file from your terminal with Python like this:
$ python app.pyYay! You've successfully sent Ether from one account to another with Python! Feel free to reference the video above if you get stuck! You can also download all the code examples in this tutorial series from github.
#4 · Calling Smart Contract Functions with Web3.py
This is the fourth video in the 6-part tutorial series. This video will show you to call smart contract functions with Web3.py.
In order to do this, we'll need a smart contract deployed to the network. I'm going to create a smart contrac with Remix. Remix is a browser-based IDE that allows you to write, compile, deploy smart contracts! I'll use Remix so that we don't have to download any developer tools or install anything to get started. You can watch me do this in the video here. Ensure that you've deployed the smart contract to the newtork before continuuing. Also, go ahead and grab the smart contract ABI and the address. The ABI will look like this (you can copy this for convenience):
'[{"constant":false,"inputs":[{"name":"_greeting","type":"string"}],"name":"setGreeting","outputs":[],"payable":false,"stateMutability":"nonpayable","type":"function"},{"constant":true,"inputs":[],"name":"greet","outputs":[{"name":"","type":"string"}],"payable":false,"stateMutability":"view","type":"function"},{"constant":true,"inputs":[],"name":"greeting","outputs":[{"name":"","type":"string"}],"payable":false,"stateMutability":"view","type":"function"},{"inputs":[],"payable":false,"stateMutability":"nonpayable","type":"constructor"}]'This lesson will use the same basic setup with an app.py file that will look like this:
import json
from web3 import Web3

# Set up web3 connection with Ganache
ganache_url = "http://127.0.0.1:7545"
web3 = Web3(Web3.HTTPProvider(ganache_url))

web3.eth.defaultAccount = web3.eth.accounts[0]
Notice that I've also set a "default" account that we'll use to interact with the blockchain in the example above.
Now, we need to create a Python representation of the smart contract. First we'll assign the abi to a variable like this:
abi = json.loads('[{"constant":false,"inputs":[{"name":"_greeting","type":"string"}],"name":"setGreeting","outputs":[],"payable":false,"stateMutability":"nonpayable","type":"function"},{"constant":true,"inputs":[],"name":"greet","outputs":[{"name":"","type":"string"}],"payable":false,"stateMutability":"view","type":"function"},{"constant":true,"inputs":[],"name":"greeting","outputs":[{"name":"","type":"string"}],"payable":false,"stateMutability":"view","type":"function"},{"inputs":[],"payable":false,"stateMutability":"nonpayable","type":"constructor"}]')Now store the smart contract address like this (note it must be in checksum format):
address = web3.toChecksumAddress('') # FILL IN YOUR ACTUAL ADDRESSNext, we'll initialize the contract like this:
contract = web3.eth.contract(address=address, abi=abi)Next, we can read the default greeting like this:
print(contract.functions.greet().call())Finally, we can set the new greeting by calling the set() function like this:
# Set a new greeting
tx_hash = contract.functions.setGreeting('HEELLLLOOOOOO!!!').transact()
# Wait for transaction to be mined
web3.eth.waitForTransactionReceipt(tx_hash)
# Display the new greeting value
print('Updated contract greeting: {}'.format(
    contract.functions.greet().call()
))
Now you can run the app.py file from your terminal with Python like this:
$ python app.pyYay! You've successfully called Ethereum smart contract functions with Python! Feel free to reference the video above if you get stuck! You can also download all the code examples in this tutorial series from github.
#5 · Deploying Smart Contracts with Web3.py
This is the fifth video in the 6-part tutorial series. This video will show you how to deploy smart contracts to The Ethereum Blockchain with Web3.py.
There are multiple ways you can deploy smart contracts to The Ethereum Blockchain. There are even multiple ways to deploy them within Web3.py itself. Today I'm going to show you the easiest way.
This lesson will use the same app.py file that we used in the previous lesson. We'll set it up like this:
import json
from web3 import Web3

# Set up web3 connection with Ganache
ganache_url = "http://127.0.0.1:7545"
web3 = Web3(Web3.HTTPProvider(ganache_url))
First, we need the smart contract ABI and bytecode, which we can copy from Remix. We'll store them as variables here like this:
abi = json.loads('[{"constant":false,"inputs":[{"name":"_greeting","type":"string"}],"name":"setGreeting","outputs":[],"payable":false,"stateMutability":"nonpayable","type":"function"},{"constant":true,"inputs":[],"name":"greet","outputs":[{"name":"","type":"string"}],"payable":false,"stateMutability":"view","type":"function"},{"constant":true,"inputs":[],"name":"greeting","outputs":[{"name":"","type":"string"}],"payable":false,"stateMutability":"view","type":"function"},{"inputs":[],"payable":false,"stateMutability":"nonpayable","type":"constructor"}]')

bytecode = "6060604052341561000f57600080fd5b6040805190810160405280600581526020017f48656c6c6f0000000000000000000000000000000000000000000000000000008152506000908051906020019061005a929190610060565b50610105565b828054600181600116156101000203166002900490600052602060002090601f016020900481019282601f106100a157805160ff19168380011785556100cf565b828001600101855582156100cf579182015b828111156100ce5782518255916020019190600101906100b3565b5b5090506100dc91906100e0565b5090565b61010291905b808211156100fe5760008160009055506001016100e6565b5090565b90565b61041a806101146000396000f300606060405260043610610057576000357c0100000000000000000000000000000000000000000000000000000000900463ffffffff168063a41368621461005c578063cfae3217146100b9578063ef690cc014610147575b600080fd5b341561006757600080fd5b6100b7600480803590602001908201803590602001908080601f016020809104026020016040519081016040528093929190818152602001838380828437820191505050505050919050506101d5565b005b34156100c457600080fd5b6100cc6101ef565b6040518080602001828103825283818151815260200191508051906020019080838360005b8381101561010c5780820151818401526020810190506100f1565b50505050905090810190601f1680156101395780820380516001836020036101000a031916815260200191505b509250505060405180910390f35b341561015257600080fd5b61015a610297565b6040518080602001828103825283818151815260200191508051906020019080838360005b8381101561019a57808201518184015260208101905061017f565b50505050905090810190601f1680156101c75780820380516001836020036101000a031916815260200191505b509250505060405180910390f35b80600090805190602001906101eb929190610335565b5050565b6101f76103b5565b60008054600181600116156101000203166002900480601f01602080910402602001604051908101604052809291908181526020018280546001816001161561010002031660029004801561028d5780601f106102625761010080835404028352916020019161028d565b820191906000526020600020905b81548152906001019060200180831161027057829003601f168201915b5050505050905090565b60008054600181600116156101000203166002900480601f01602080910402602001604051908101604052809291908181526020018280546001816001161561010002031660029004801561032d5780601f106103025761010080835404028352916020019161032d565b820191906000526020600020905b81548152906001019060200180831161031057829003601f168201915b505050505081565b828054600181600116156101000203166002900490600052602060002090601f016020900481019282601f1061037657805160ff19168380011785556103a4565b828001600101855582156103a4579182015b828111156103a3578251825591602001919060010190610388565b5b5090506103b191906103c9565b5090565b602060405190810160405280600081525090565b6103eb91905b808211156103e75760008160009055506001016103cf565b5090565b905600a165627a7a7230582006f39b9b9b558a328403f9c048af30519c79e6536660d7660e8002af27f240930029"
Next, we'll set the default account as the sender like this:
web3.eth.defaultAccount = web3.eth.accounts[0]In order to deploy the smart contract, we'll instantiate it in Python like this:
Greeter = web3.eth.contract(abi=abi, bytecode=bytecode)Then, we'll deploy it to the network like this, and wait for the transaction receipt like this:
tx_hash = Greeter.constructor().transact()
tx_receipt = web3.eth.waitForTransactionReceipt(tx_hash)
Now we can fetch the smart contract from the blockchain and call its functions. We'll read the default greeting first like this:
Create the contract instance with the newly-deployed address
contract = web3.eth.contract(
    address=tx_receipt.contractAddress,
    abi=abi,
)

print(tx_receipt.contractAddress)

print('Default contract greeting: {}'.format(
    contract.functions.greet().call()
))
Then we can update the greeting like this:
# update the greeting
tx_hash = contract.functions.setGreeting('HELLOOOO!!!!').transact()

# Wait for transaction to be mined...
web3.eth.waitForTransactionReceipt(tx_hash)

# Display the new greeting value
print('Updated contract greeting: {}'.format(
    contract.functions.greet().call()
))
Your final script should look like this:
import json
from web3 import Web3

# Set up web3 connection with Ganache
ganache_url = "http://127.0.0.1:7545"
web3 = Web3(Web3.HTTPProvider(ganache_url))

abi = json.loads('[{"constant":false,"inputs":[{"name":"_greeting","type":"string"}],"name":"setGreeting","outputs":[],"payable":false,"stateMutability":"nonpayable","type":"function"},{"constant":true,"inputs":[],"name":"greet","outputs":[{"name":"","type":"string"}],"payable":false,"stateMutability":"view","type":"function"},{"constant":true,"inputs":[],"name":"greeting","outputs":[{"name":"","type":"string"}],"payable":false,"stateMutability":"view","type":"function"},{"inputs":[],"payable":false,"stateMutability":"nonpayable","type":"constructor"}]')
bytecode = "6060604052341561000f57600080fd5b6040805190810160405280600581526020017f48656c6c6f0000000000000000000000000000000000000000000000000000008152506000908051906020019061005a929190610060565b50610105565b828054600181600116156101000203166002900490600052602060002090601f016020900481019282601f106100a157805160ff19168380011785556100cf565b828001600101855582156100cf579182015b828111156100ce5782518255916020019190600101906100b3565b5b5090506100dc91906100e0565b5090565b61010291905b808211156100fe5760008160009055506001016100e6565b5090565b90565b61041a806101146000396000f300606060405260043610610057576000357c0100000000000000000000000000000000000000000000000000000000900463ffffffff168063a41368621461005c578063cfae3217146100b9578063ef690cc014610147575b600080fd5b341561006757600080fd5b6100b7600480803590602001908201803590602001908080601f016020809104026020016040519081016040528093929190818152602001838380828437820191505050505050919050506101d5565b005b34156100c457600080fd5b6100cc6101ef565b6040518080602001828103825283818151815260200191508051906020019080838360005b8381101561010c5780820151818401526020810190506100f1565b50505050905090810190601f1680156101395780820380516001836020036101000a031916815260200191505b509250505060405180910390f35b341561015257600080fd5b61015a610297565b6040518080602001828103825283818151815260200191508051906020019080838360005b8381101561019a57808201518184015260208101905061017f565b50505050905090810190601f1680156101c75780820380516001836020036101000a031916815260200191505b509250505060405180910390f35b80600090805190602001906101eb929190610335565b5050565b6101f76103b5565b60008054600181600116156101000203166002900480601f01602080910402602001604051908101604052809291908181526020018280546001816001161561010002031660029004801561028d5780601f106102625761010080835404028352916020019161028d565b820191906000526020600020905b81548152906001019060200180831161027057829003601f168201915b5050505050905090565b60008054600181600116156101000203166002900480601f01602080910402602001604051908101604052809291908181526020018280546001816001161561010002031660029004801561032d5780601f106103025761010080835404028352916020019161032d565b820191906000526020600020905b81548152906001019060200180831161031057829003601f168201915b505050505081565b828054600181600116156101000203166002900490600052602060002090601f016020900481019282601f1061037657805160ff19168380011785556103a4565b828001600101855582156103a4579182015b828111156103a3578251825591602001919060010190610388565b5b5090506103b191906103c9565b5090565b602060405190810160405280600081525090565b6103eb91905b808211156103e75760008160009055506001016103cf565b5090565b905600a165627a7a7230582006f39b9b9b558a328403f9c048af30519c79e6536660d7660e8002af27f240930029"

# set pre-funded account as sender
web3.eth.defaultAccount = web3.eth.accounts[0]

# Instantiate and deploy contract
Greeter = web3.eth.contract(abi=abi, bytecode=bytecode)

# Submit the transaction that deploys the contract
tx_hash = Greeter.constructor().transact()

# Wait for the transaction to be mined, and get the transaction receipt
tx_receipt = web3.eth.waitForTransactionReceipt(tx_hash)

# Create the contract instance with the newly-deployed address
contract = web3.eth.contract(
    address=tx_receipt.contractAddress,
    abi=abi,
)

print(tx_receipt.contractAddress)

# Display the default greeting from the contract
print('Default contract greeting: {}'.format(
    contract.functions.greet().call()
))

# update the greeting
tx_hash = contract.functions.setGreeting('HELLOOOO!!!!').transact()

# # Wait for transaction to be mined...
web3.eth.waitForTransactionReceipt(tx_hash)

# Display the new greeting value
print('Updated contract greeting: {}'.format(
    contract.functions.greet().call()
))
Now you can run the app.py script from your terminal with Python like this:
$ python app.pyYay! You've just deployed an Ethereum smart contract to the blockchain with Python! Feel free to reference the video above if you get stuck! You can also download all the code examples in this tutorial series from github.
#6 · Inspecting Blocks with Web3.py
This is the sixth video in the 6-part tutorial series. This video will show you how to inspect blocks The Ethereum Blockchain with Web3.py.
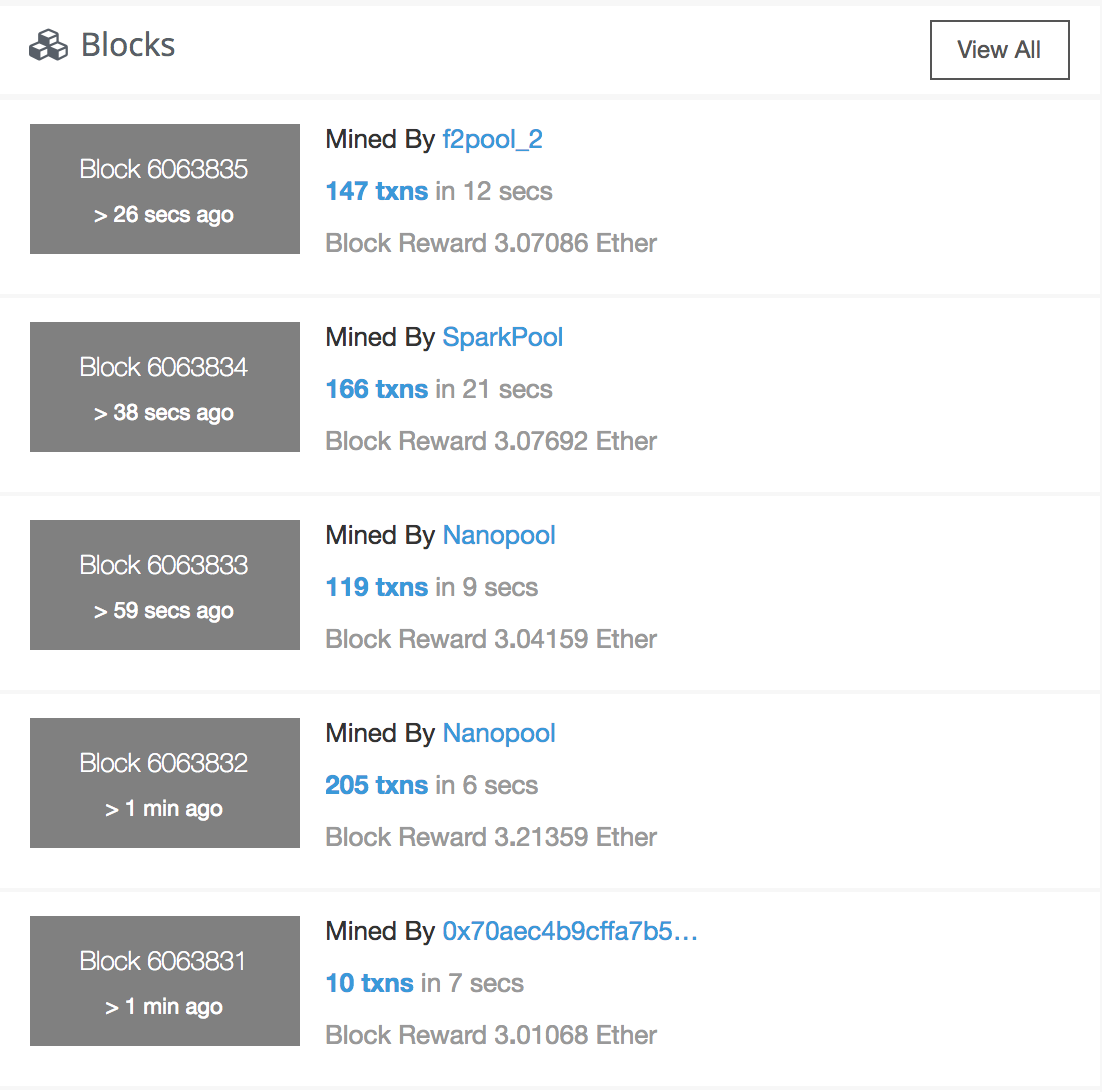
Inspecting blocks is often useful when analyzing history on The Ethereum Blockchain. Web3.py has lots of functionality that helps us to do just that. For example, we could build something that looks like this block history feature on Etherscan:
Let's set up an app.py file to start using some of this functionality provided by Web3.py. This setup will be much simpler than the previous lessons. We'll connect back to the main net to inspect blocks there:
from web3 import Web3

# Fill in your infura API key here
infura_url = "https://mainnet.infura.io/v3/YOUR_INFURA_API_KEY_GOES_HERE"
web3 = Web3(Web3.HTTPProvider(infura_url))
First, we can get the latest block number like this:
print(web3.eth.blockNumber)We can also get all the data for the latest block like this:
print(web3.eth.getBlock('latest'))You can watch the video above as I explain all the data that gets logged by this function.
If we were going to build a block history feature like the one on Etherscan pictured above, we would need to get a list of the most recent blocks in the chain. We can do this by fetching the most recent block and counting backwards until we have the last 10 blocks in the chain. We can do that with a for loop like this:
latest = web3.eth.blockNumber
for i in range(0, 10):
  print(web3.eth.getBlock(latest - i))
Web3.py has another nice feature that allows you to inspect transactions contained within a specific block. We can do that like this:
hash = '0x66b3fd79a49dafe44507763e9b6739aa0810de2c15590ac22b5e2f0a3f502073'
print(web3.eth.getTransactionByBlock(hash, 2))
That's it! That's how easy it is to inspect blocks with Web3.py. Check out the video above for more in depth explanation of the data returned by the blocks. At this point, all of the tutorial code should look like this:
from web3 import Web3

# Fill in your infura API key here
infura_url = "https://mainnet.infura.io/v3/YOUR_INFURA_API_KEY_GOES_HERE"
web3 = Web3(Web3.HTTPProvider(infura_url))

# get latest block number
print(web3.eth.blockNumber)

# get latest block
print(web3.eth.getBlock('latest'))

# get latest 10 blocks
latest = web3.eth.blockNumber
for i in range(0, 10):
  print(web3.eth.getBlock(latest - i))

# get transaction from specific block
hash = '0x66b3fd79a49dafe44507763e9b6739aa0810de2c15590ac22b5e2f0a3f502073'
print(web3.eth.getTransactionByBlock(hash, 2))
Now you can run the app.py file from your terminal with Python like this:
$ python app.pyFeel free to reference the video above if you get stuck! You can also download all the code examples in this tutorial series from github.
Happy with this tutorial? Then you NEED to join my free training here where I'll show you how to build a real world blockchain app so that you can become a highly paid blockchain developer!