Learn Blockchain: The COMPLETE Beginner’s Guide
By Gregory McCubbin ·
Blockchain is one of the most cutting edge sectors of technology today, creating endless opportunities for developers.
I'm going to help you learn blockchain step-by-step so that you can take advantage of this booming tech trend while it's still early. Use this written guide along with the 3-hour video below.
I firmly believe the best way to learn blockchain is by building a full project.
That's exactly what we're going to do in this guide.
We'll create an instant cryptocurrency exchange where you can buy and sell cryptocurrencies at a fixed price, without having to wait for anyone to fill your orders.
Here's a preview of the finished application:
At this point you might be thinking, "woah, I still don’t even really understand what a blockchain is or how it works!"
That’s okay. I'll teach you everything you need to know before we start coding.
If you want to start building the app immediately, feel free to skip ahead. Otherwise, keep reading. 😃
Table of Contents
What Is Blockchain?
So what is blockchain? To answer this question, let’s look at how a web application works.

Normally, when use a web app you access it with your browser. Then that browser connects to a central server over a network. This server hosts all of the code for the web application, and all of the data is stored inside a database.
This is a great model for many things, but it has some limitations. You can’t store value this way. For example, you can’t create digital money with a traditional web application.
Why is that?
The code could be changed by the application developers at any time. The data could be manipulated by anyone with access to the database.
This means that whoever controls the money could arbitrarily change your balance and steal your funds!
For these reasons, we don’t want to build a centralized web application to handle money. Instead, we want to use the blockchain.
This will guarantee that noone can change the code of the application or manipulate the database. We can rest assured that our money works in a predictable way, and that our funds can’t be stolen.
How can we achieve this with the blockchain, you might ask? Let’s take a look at how a blockchain works.
How Blockchain Works
A blockchain is basically a giant world-wide computer.
Instead of using a single computer that stores data and runs programs, blockchains use thousands of computers to handle this. Each computer is called a “node”, and they all talk to one another.
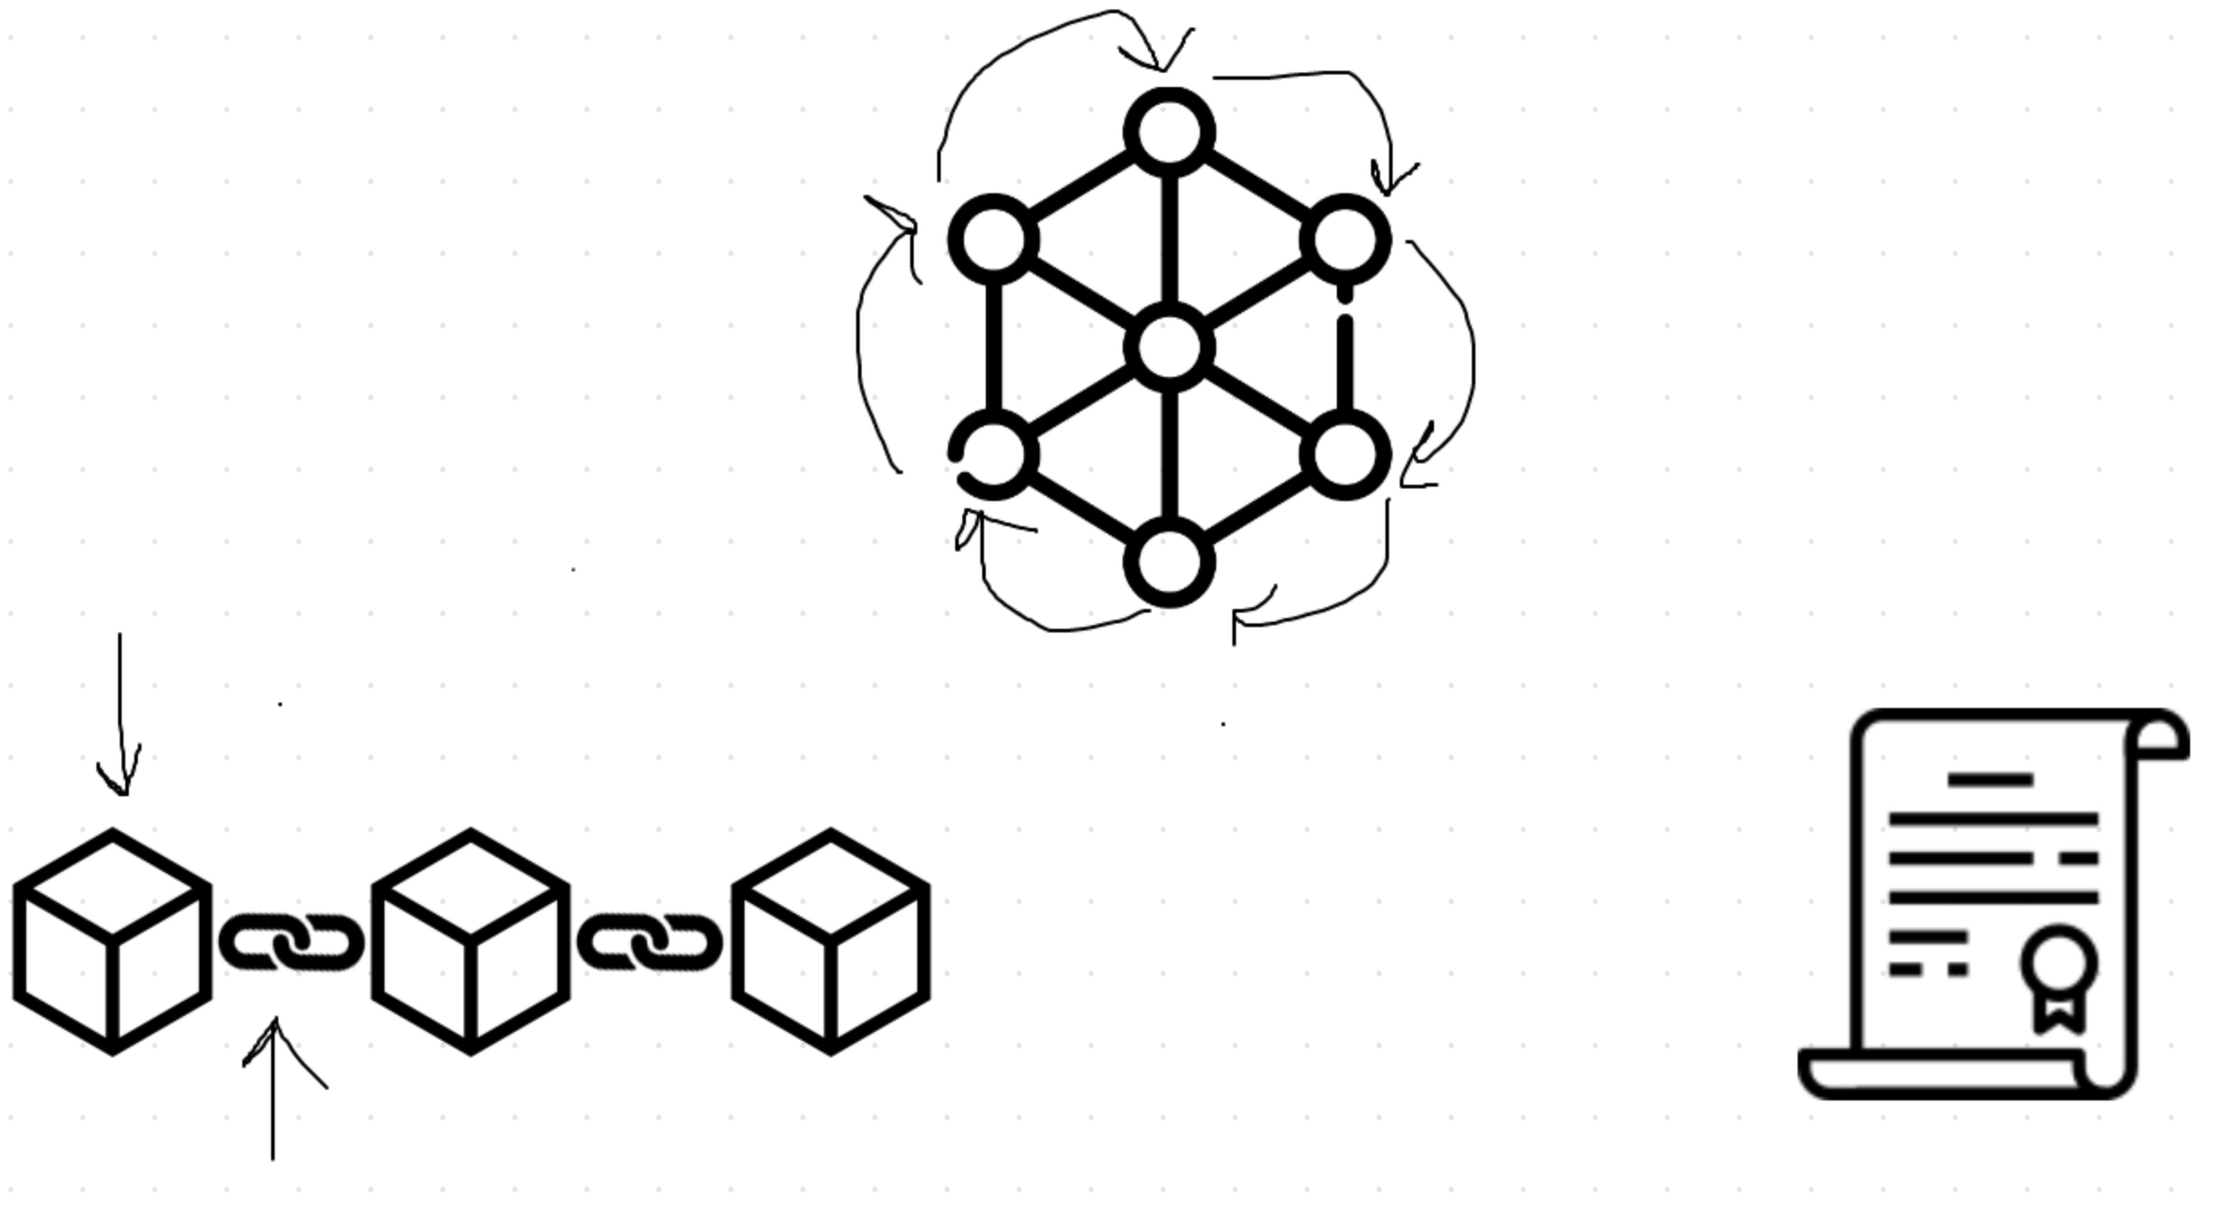
Each node gets a copy of all the code and data stored on the blockchain. This data is stored in bundles of records called “blocks” which are chained together to make up this public ledger.
All of the code is stored in “smart contracts” which are immutable programs that run on the blockchain.
This creates endless possibilities for a new generation of applications not controlled by anyone, but instead run by themselves on the blockchain.
Cryptocurrency is a great example.
You can create a cryptocurrency with a blockchain because each node in the network is responsible for processing transactions and tracking your balance.
Whenever you send cryptocurrency, the network achieves “consensus" that your transaction is valid, and your balance is updated properly on the public ledger.
How Blockchain App Works
Let’s look at how a basic blockchain application or a “dApp” works. For this tutorial, we’re going to use Ethereum.
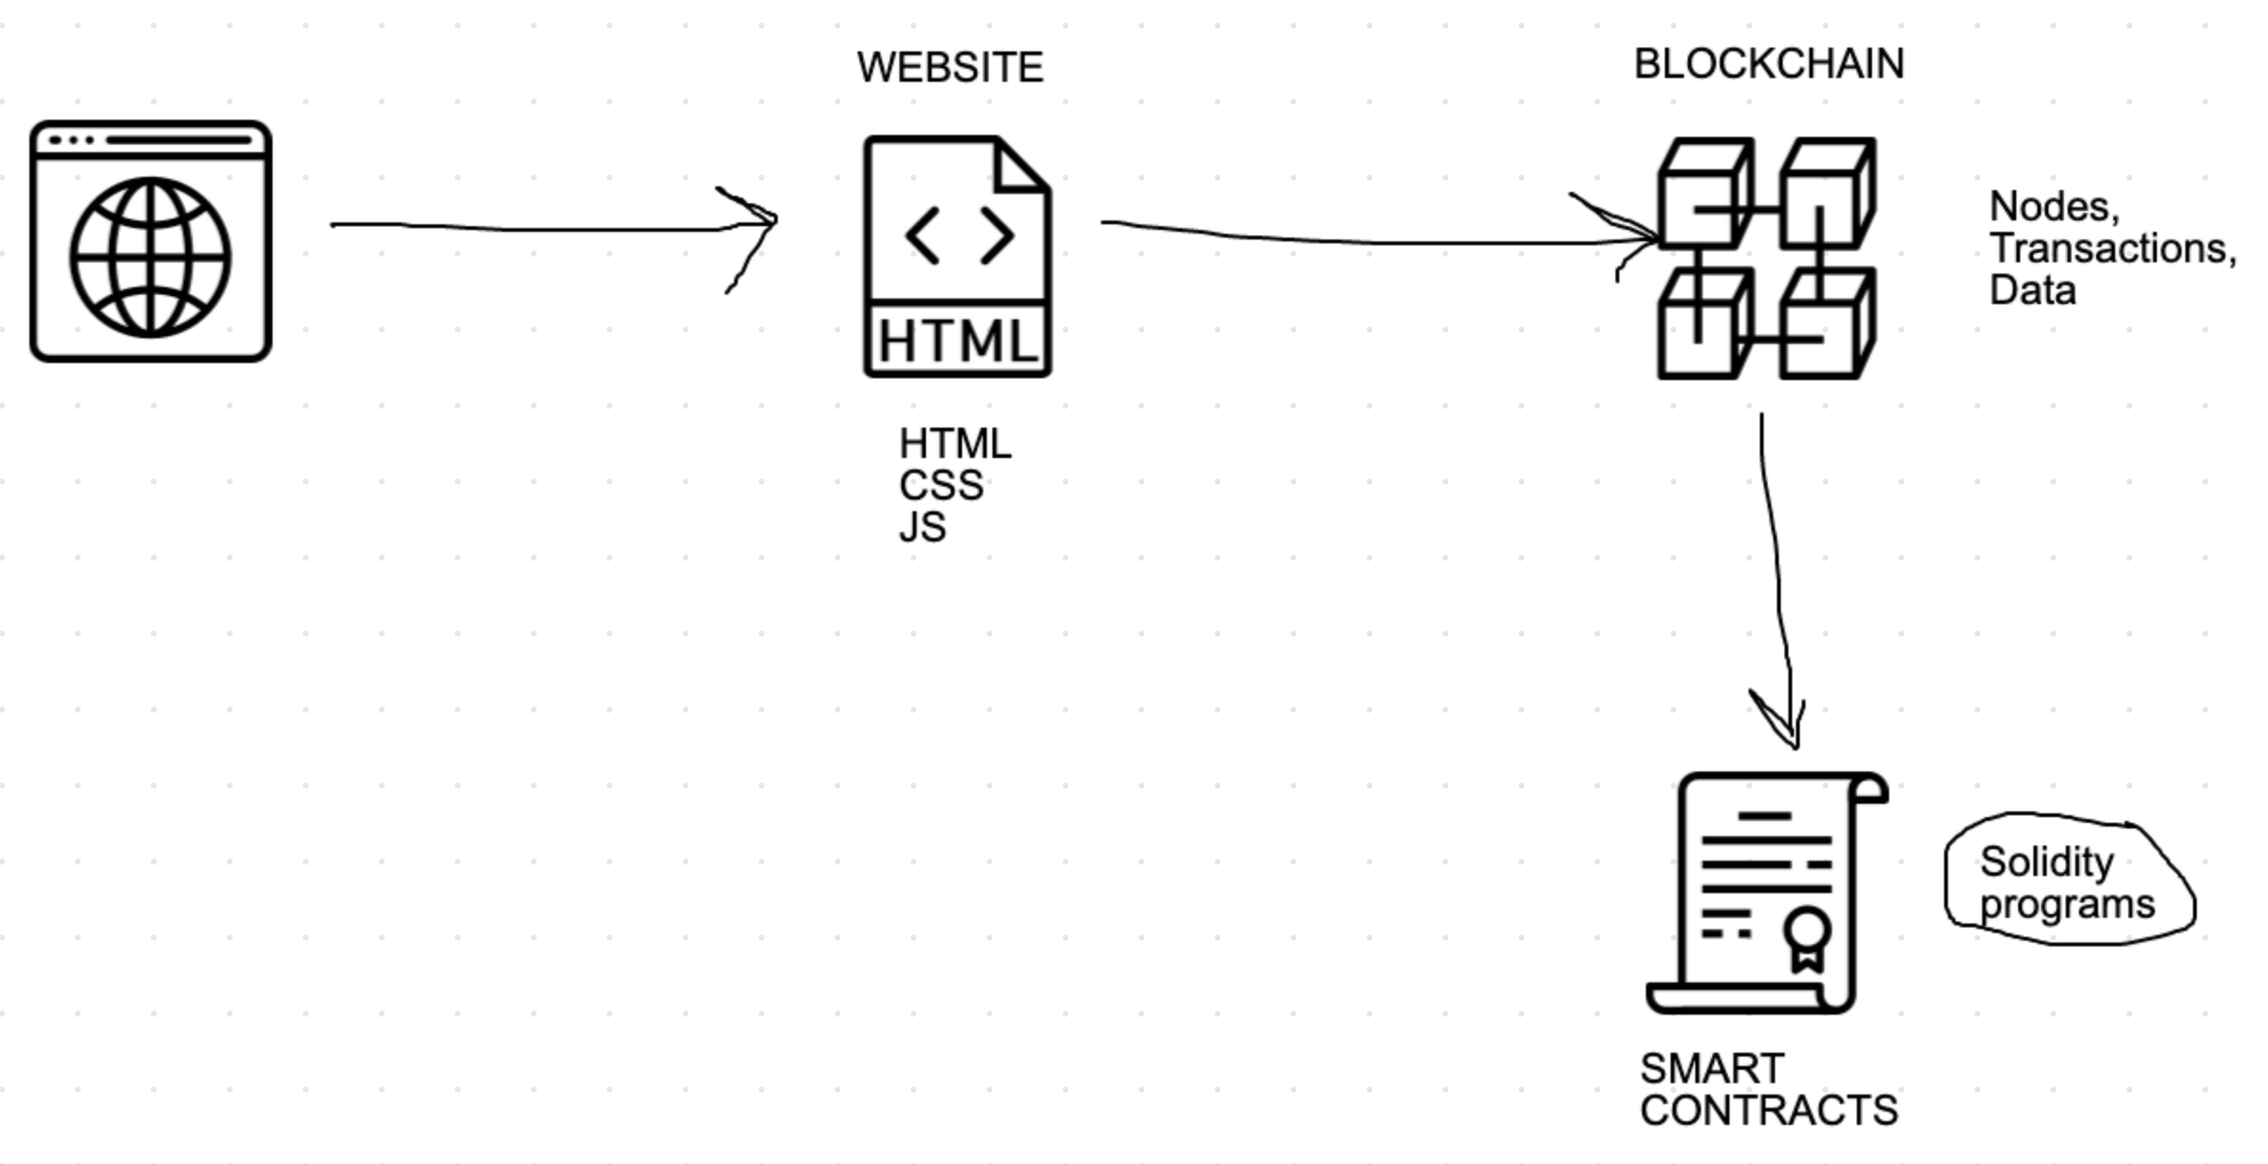
To access the application, you use your browser to connect to a front end website written in HTML, CSS, and JS.
Then, instead of talking to a backend web server, this website talks directly to the blockchain. This is where all of the code and data and code for the application live.
This code is contained in Smart Contracts, written in with the Solidity Programming language, which looks a lot like JavaScript. These smart contracts are immutable, which means the the code cannot change.
All of the data is stored on the public ledger, which is also immutable. Any time we add new data to the blockchain, it will be permanent publicly verifiable.
So that’s an overview of what a blockchain is, and how it works.
Now let’s get a preview of the app that we’re going to build together and how it leverages the power for the blockchain.
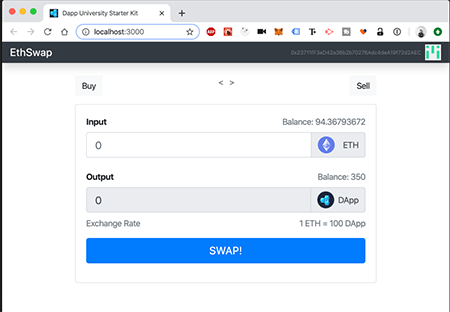
This is an instant cryptocurrency exchange called "EthSwap" that lets you buy and sell cyrptocurrencies at a fixed price.
We'll create a fictional cryptocurrency called "Dapp Token" together, which can be purchased with Ether, the native cryptocurrency of the Ethereum blockchain.
Here's a diagram of how the application will work.
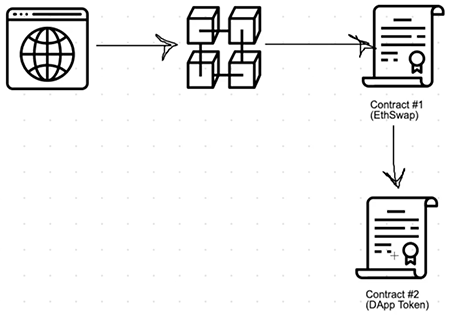
We'll create a client side website that with React.js that talks directly to two Ethereum smart contracts on the blockchain:
- The first smart contract "EthSwap" will facilitate buying and selling cryptocurrencies.
- The second smart contract will power the fictional "DApp Token" that we'll create together.
We'll code each of these smart contracts with the Solidity programming language, write test for them in JavaScript, and deploy them to the blockchain.
Fwew! We have covered a lot of ground so far. Don't worry if it all doesn't make sense just yet. Keep going, and it will become clear in time.
Dependencies
There's one last step before we start coding. We must set up our computer with a few system dependencies.
Node.js
Before you get started, make sure you have Node.js installed. You can see if you have Node already installed by typing the following command into your terminal:
$ node -vOtherwise, you can download it directly from the Node.js website.
Ganache
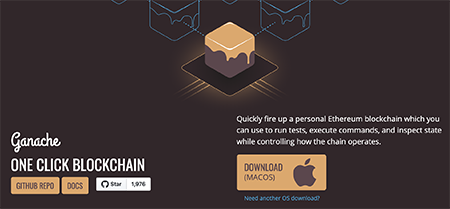
Next, you need a development blockchain. That's what Ganache is for. Go ahead and install the latest version of Ganache here.
Truffle

Next, you need Truffle. This is a smart contract development framework. It will allow us to develop Ethereum smart contracts with the Solidity programming language, write tests for them in Javascript, and deploy them to a blockchain.
You can install Truffle directly from the command line with NPM like this:
$ npm install -g [email protected]Note: I suggest you use the exact version of Truffle specified here to successfully complete this tutorial.
Metamask
Finally, make sure you install the Metamask chrome extension. This will connect your web browser to the blockchain (most browsers don't do this by default). You can install it directly from the Google Chrome web store here.
Part 1: Project Setup
Now let's start building the project! Instead creating every single file from scratch, let's use a custom template that I already created.
You can easily create your new project by cloning this starter kit template from Github like this:
$ git clone https://github.com/dappuniversity/starter_kit eth_swapGreat! You just created a new project called eth_swap with the template.
Now enter the project like this:
$ cd eth_swapOnce you're inside, you can install all of the project dependencies with NPM like this:
$ npm installGreat! Now we've added all the project dependencies we need for blockchain development... with ONE exception.
Before we proceed, we must install another library that wasn't included in the project template: identicon.js. This will allow us to create custom avatars for our application users based upon their Ethereum address.
You can install Identicon.js like this:
$ npm install --save identicon.js@^2.3.3Now let's get a quick tour of the project. I'm going to open this project in my text editor. I use Sublime Text, but you can use whatever editor you like.
If you look at the structure of the project, you'll see that everything is already configured. That's the benefit we get by using the starter kit template! I'll point out a few things worth noting.
First, open the truffle-config.js file.
This is where we specify all of the settings for the Truffle project. Do you see the "network" settings? That's where we establish the connection to the blockchain. For development, we tell Truffle that Ganache, our development blockchain, is running on localhost port 7545.
I'll also mention that if you've used Truffle in the past, the project structure might look slightly different. I moved the "contracts_directory" and "contracts_build_directory" to the "src" directory so that they can be accessed by the client side application. You can see those settings defined inside this file as well.
Next, take note of other key directories inside the project.
src/This is where all of the client side code will go for the React.js app that we'll create.src/contracts/This is where Solidity smart contract source code will live.migrations/This is where we'll create migration files that will deploy the Smart Contracts to the blockchain.package.jsonThis file tracks all of the project dependencies, as well as other NPM settings.
Now let's start the web server to ensure that the client side template works:
$ npm run startA new browser window should open automatically, and you should see the starter kit template website running at localhost:3000.

Great! The client side application template works. We'll revisit this part of the project later when we build our own website for the exchange. Feel free to leave this server running in a separate terminal tab for now.
Now let's create our first smart contract. Run this command in your terminal to create a new Solidity file:
$ touch src/contracts/EthSwap.solNow open this file in your text editor. Inside of here is where we'll write all of the Solidity source code for the EthSwap exchange smart contract.
Let's add the following code to this file:
pragma solidity ^0.5.0;

contract EthSwap {

}
This code creates the basic skeleton for the smart contract. We first start of by declaring the Solidity programming language version that we'll use with pragma solidity ^0.5.0;, which means we'll use version "0.5.0" or greater.
Then we declare the smart contract with the contract keyword, followed by the smart contract name EthSwap. All of the smart contract code that we'll write in this tutorial goes inside the curly braces like this: { ... }.
Next, let's add one more line of code so that we can do a basic "heartbeat check" for the smart contract:
pragma solidity ^0.5.0;

contract EthSwap {
  string public name = "EthSwap Instant Exchange";
}
This line simply creates a new state variable called "name", which is written to the blockchain.
Now let's interact with our smart contract in the development console and see if the name was set properly. In order to do this, we must first add this smart contract to the blockchain.
This will require us to create a migration file like this:
$ touch migrations/2_deploy_contracts.jsInside this file, we'll perform a special operation that will move, or "migrate", our smart contracts to the blockchain. This is much like a migration file in other web development frameworks where you're adding new tables to a database. Same thing here... you're adding new smart contracts to the blockchain.
Add the following code to this file:
const EthSwap = artifacts.require("EthSwap");

module.exports = function(deployer) {
  await deployer.deploy(EthSwap, token.address);
};
This simply a JavaScript version of the smart contract, and deploys it to the blockchain with Truffle's deployment procedure.
Now let's run the migrations and deploy the contract to the blockchain like this:
$ truffle migrateGreat! Now we can interact with the EthSwap smart contract from the Truffle console like this:
$ truffle consoleThis will open a new JavaScript runtime environment where we can interact with the Blockchain. This means that we'll write JavaScript commands inside of here, and we'll talk directly to Ganache.
Since we just added the EthSwap smart contract to the Blockchain (Ganache), we can now fetch it inside the console like this:
contract = await EthSwap.deployed()
// undefined
Now return the contract by calling the variable like this:
contract
// { ... }
Yay! You should now see the JavaScript version of your contract inside the console.
We can inspect the contract address like this:
contract.address
// 0x...
This is the unique address for the smart contract on the blockchain. Now, let's check to see that the name was set correctly like this:
name = await contract.name()
// undefined
Then call the name variable like this:
name
// "EthSwap Instant Exchange"
Great! It worked. 😃
Now we've successfully created the skeleton for the EthSwap smart contract. This is the first contract that we'll create in this tutorial. Next, we want to create a second smart contract as seen in the diagram below.
This second smart contract will be the token that we buy and sell with Ether inside of our exchange. The EthSwap smart contract will talk directly to this token smart contract to facilitate all of the buying and selling functionality that we'll program in this tutorial.
Let me further explain how this token works. Ethereum allows you to create your own cryptocurrency without creating your own blockchain.
That's exactly what we'll do here. We'll create our own cryptocurrency with a smart contract.
Specifically, Ethereum has a standard for creating token smart contracts called ERC-20. You might have heard of "ERC-20" tokens before (there are many famous ones).
This standard exists to ensure that all tokens work the same way so that they can be used inside of blockchain wallets, and traded on cryptocurrency exchanges. It specifies the types of functions that the token must have, and how they work.
For example, it specifies that these tokens must have a balanceOf() function that returns the user's account balance, and a transfer() function that allows the user to send tokens to someone else.
Because ERC-20 tokens are standardized, I'm going to import a basic ERC-20 token into this project, rather than coding it out step by step. This will save time, and it will allow us to focus on building the exchange.
Let's create a file for the token smart contract like this:
$ touch src/contracts/Token.solInside of this file, we'll add all of the code for the token:
pragma solidity ^0.5.0;

contract Token {
    string  public name = "DApp Token";
    string  public symbol = "DAPP";
    uint256 public totalSupply = 1000000000000000000000000; // 1 million tokens
    uint8   public decimals = 18;

    event Transfer(
        address indexed _from,
        address indexed _to,
        uint256 _value
    );

    event Approval(
        address indexed _owner,
        address indexed _spender,
        uint256 _value
    );

    mapping(address => uint256) public balanceOf;
    mapping(address => mapping(address => uint256)) public allowance;

    constructor() public {
        balanceOf[msg.sender] = totalSupply;
    }

    function transfer(address _to, uint256 _value) public returns (bool success) {
        require(balanceOf[msg.sender] >= _value);
        balanceOf[msg.sender] -= _value;
        balanceOf[_to] += _value;
        emit Transfer(msg.sender, _to, _value);
        return true;
    }

    function approve(address _spender, uint256 _value) public returns (bool success) {
        allowance[msg.sender][_spender] = _value;
        emit Approval(msg.sender, _spender, _value);
        return true;
    }

    function transferFrom(address _from, address _to, uint256 _value) public returns (bool success) {
        require(_value <= balanceOf[_from]);
        require(_value <= allowance[_from][msg.sender]);
        balanceOf[_from] -= _value;
        balanceOf[_to] += _value;
        allowance[_from][msg.sender] -= _value;
        emit Transfer(_from, _to, _value);
        return true;
    }
}
This is the fictional "Dapp Token" that I teach you how to create step-by-step in my tutorial "Code Your Own Cryptocurrency" on Ethereum. It implements all of the functionality specified by the ERC-20 standard.
You can browse this file to see functions like balanceOf() and transfer(). We'll make heavy use of these in this tutorial.
Now let's add this token contract to the blockchain. To do this, we must update the code inside of the file called migrations/2_deploy_contract.js. Replace everything inside that file with this:
const Token = artifacts.require("Token")
const EthSwap = artifacts.require("EthSwap")

module.exports = async function(deployer) {
  // Deploy Token
  await deployer.deploy(Token)
  const token = await Token.deployed()

  // Deploy EthSwap
  await deployer.deploy(EthSwap)
  const ethSwap = await EthSwap.deployed()

  // Transfer all tokens to EthSwap (1 million)
  await token.transfer(ethSwap.address, '1000000000000000000000000')
};
Let me explain this code.
- First, we import a JavaScript version of the token contract like this:
const Token = artifacts.require("Token"). This is the same thing we did with the EthSwap contract previously. - Next, we deploy the token with
await deployer.deploy(Token). - Next, we fetch the token from the blockchain with
const token = await Token.deployed(). We do the same for EthSwap after that. - Finally, we assign ALL of the tokens to the EthSwap smart contract like this:
await token.transfer(ethSwap.address, '1000000000000000000000000')
I want to elaborate on that last step. See, smart contracts can hold cryptocurrency just like human users on the blockchain. That allows us assign all of the tokens to the EthSwap exchange so that human users can buy them directly from the smart contract. We'll observe this when we create this part of the tutorial very soon.
We use the token's transfer() function to send the tokens to the EthSwap address.
Finally, you might notice that '1000000000000000000000000' looks much larger than "one million". You're correct. Here's why: we do not use decimal places when we store numbers on the blockchain. Therefore, we use very large numbers.
For example, if you wanted to store 1.00, on the blockchain, you would use 100.
That's how you would represent 1 US Dollar: 100 cents.
But see, this particular Ethereum token has 18 decimal places after the zero! That's 1.00000000000000000!!!
Therefore, we must express 1 million as '1000000000000000000000000'.
Finally, we can re-run the migrations and deploy both smart contracts to the blockchain like this:
$ truffle migrate --resetNote, that we must use the --reset flag here. Remember, that smart contract code is immutable! This means that it cannot change. Whenever we make code changes to our smart contracts, we cannot make these updates on the blockchain. We must deploy new copies of them to the blockchain. The --reset flag allows us to do this.
YAY! Now we've successfully created both smart contracts for this tutorial. In the next section, we'll continue building out the functionality for the EthSwap contract.
Part 2: Buy Tokens
Now let's continue building out the EthSwap smart contract that we started in the last section. We'll implement the functionality that allows users to buy tokens with Ether from the exchange.
We're going to write automated test for the smart contract while we do this. This will save us lots of time, and ensure that our smart contract works like we expect.
Let's create a new directory for this test like this:
$ mkdir testNow we'll create a file for our tests like this:
$ touch test/EthSwap.test.jsInside this file we'll write automated tests with JavaScript that can be run from our terminal with Truffle. Go ahead and add the following code to get started:
const Token = artifacts.require('Token')
const EthSwap = artifacts.require('EthSwap')

require('chai')
  .use(require('chai-as-promised'))
  .should()

function tokens(n) {
  return web3.utils.toWei(n, 'ether');
}

contract('EthSwap', (accounts) => {
  let token, ethSwap

  before(async () => {
    token = await Token.new()
    ethSwap = await EthSwap.new()
    // Transfer all tokens to EthSwap (1 million)
    await token.transfer(ethSwap.address, tokens('1000000'))
  })

  describe('Token deployment', async () => {
    it('contract has a name', async () => {
      const name = await token.name()
      assert.equal(name, 'DApp Token')
    })
  })

  describe('EthSwap deployment', async () => {
    it('contract has a name', async () => {
      const name = await ethSwap.name()
      assert.equal(name, 'EthSwap Instant Exchange')
    })

    it('contract has tokens', async () => {
      let balance = await token.balanceOf(ethSwap.address)
      assert.equal(balance.toString(), tokens('1000000'))
    })
  })

})
This is a basic test that checks for all the behavior that we've created so far:
- It ensures that the token was deployed to the network, and that it has the correct name
"Dapp Token". - Likewise, it ensures that EthSwap was deployed and has the correct name.
- Finally, checks that the EthSwap contract has 1 million tokens. We use a special
tokens()function to handle this conversion, that we define at the top of the file.
I'll also note a few more things:
- We're using the Mocha testing framework, which is a JavaScript testing framework that comes bundled with Truffle. It gives us functions like
before(),describe(), andit(). - Also, we're using the Chai assertion library, which allows us to handle comparisons like
assert.equal(). - We use a special
before()hook that allows us to write code that is run before each test example. In this case, we perform the same operation we did in the migration: we deploy both contracts, and assign all tokens to EthSwap.
Now we can run the test like this:
$ truffle testYay, they pass! 🎉
If you have any trouble here, I highly recommend watching this part of the video and comparing your code to mine.
In order to proceed with the "buy tokens" functionality, we must make the EthSwap contract aware of the token contract. To do this, we must first import the token contract file inside the EthSwap file like this:
pragma solidity ^0.5.0;

import "./Token.sol";

contract EthSwap {
  ...
}
Next, we must provide the Token smart contract address to EthSwap. We'll use EthSwap's constructor() function to do this. This is a special function that gets run once and only once: whenever the smart contract is created, i.e., deployed to the blockchain.
We'll pass in the token smart contract address to the constructor like this:
pragma solidity ^0.5.0;

import "./Token.sol";

contract EthSwap {
  string public name = "EthSwap Instant Exchange";
  Token public token;

  constructor(Token _token) public {
    token = _token;
}
Inside the constructor function, we store the token address to a state variable called token. This variable's value is stored on the blockchain, so we can access it later. Also, note that the variable has a type of Token, which is a special type provided by the token smart contract that we imported in the previous step.
Now that we have modified this constructor, we must update 2 things.
First, we must pass in the token's address inside the migration file when we deploy the contract. Update all of the code inside migrations/2_deploy_contracts.js like this:
const Token = artifacts.require("Token")
const EthSwap = artifacts.require("EthSwap")

module.exports = async function(deployer) {
  // Deploy Token
  await deployer.deploy(Token)
  const token = await Token.deployed()

  // Deploy EthSwap
  await deployer.deploy(EthSwap, token.address) // Add the token address here
  const ethSwap = await EthSwap.deployed()

  // Transfer all tokens to EthSwap (1 million)
  await token.transfer(ethSwap.address, '1000000000000000000000000')
};
Note that we simply added the token address here: await deployer.deploy(EthSwap, token.address).
Next, we must update the before() hook inside our test file like this:
before(async () => {
  token = await Token.new()
  ethSwap = await EthSwap.new(token.address)
  // Transfer all tokens to EthSwap (1 million)
  await token.transfer(ethSwap.address, tokens('1000000'))
})
This passes in the token address here like this: ethSwap = await EthSwap.new(token.address).
Now let's re-run the tests to ensure that they pass:
$ truffle testYesssss, they pass! 😃
Now let's create a new function for buying tokens inside the EthSwap contract like this:
pragma solidity ^0.5.0;

import "./Token.sol";

contract EthSwap {
  string public name = "EthSwap Instant Exchange";
  Token public token;
  uint public rate = 100;

  event TokensPurchased(
    address account,
    address token,
    uint amount,
    uint rate
  );

  // ...

  function buyTokens() public payable {
    // Calculate the number of tokens to buy
    uint tokenAmount = msg.value * rate;

    // Require that EthSwap has enough tokens
    require(token.balanceOf(address(this)) >= tokenAmount);

    // Transfer tokens to the user
    token.transfer(msg.sender, tokenAmount);

    // Emit an event
    emit TokensPurchased(msg.sender, address(token), tokenAmount, rate);
  }

}
Let me explain this code.
- First, we create a function called
buyTokens(). We make this functionpublicso that anyone can call it outside the smart contract. And then we make itpayableso that the user can send Etherereum cryptocurrency (Ether) when calling the function. - Next, we calculate the number of tokens that the user can purchase. We first determine the amount of Ether sent in with the fuction with
msg.value. Then we multiply this value by the redemption rate, which we've stored in a state variable at the top of the smart contract like this:uint public rate = 100;. This rate means that for every 1 Ether that the user sends, they receive 100 tokens. - Next, we ensure that the EthSwap exchange has enough tokens for the user to purchase. We use Solidity's
require()function. If the expression passed into this function evaluates to "true", then thebuyTokens()function will continue as normal. If it evaluates to "false", then thebuyTokens()function will stop execution and throw an error. In this case, if the EthSwap exchange has enough tokens, it be "true". We check that like this:token.balanceOf(address(this)) >= tokenAmount, whereaddress(this)is the address of the current smart contract "EthSwap". - Next, we transfer tokens to the user with
token.transfer(msg.sender, tokenAmount);. Here,msg.senderis the user who's calling this function. - Finally, we emit a
TokensPurchased()event. Solidity supports events that anyone can subscribe to in order to receive alerts that something happened on the blockchain. In this case, we can get alerts any time tokens are purchased. We define the event at the top of the smart contract withevent TokensPurchased(...);. Then we "emit" it inside the function withemit TokensPurchased(...), passing in the address of the user buying tokens, the token address, the amount of tokens purchased, and the token price.
Now let's write a test for this new function like this:
contract('EthSwap', ([deployer, investor]) => {
  // ...

  describe('buyTokens()', async () => {
    let result

    before(async () => {
      // Purchase tokens before each example
      result = await ethSwap.buyTokens({ from: investor, value: web3.utils.toWei('1', 'ether')})
    })

    it('Allows user to instantly purchase tokens from ethSwap for a fixed price', async () => {
      // Check investor token balance after purchase
      let investorBalance = await token.balanceOf(investor)
      assert.equal(investorBalance.toString(), tokens('100'))

      // Check ethSwap balance after purchase
      let ethSwapBalance
      ethSwapBalance = await token.balanceOf(ethSwap.address)
      assert.equal(ethSwapBalance.toString(), tokens('999900'))
      ethSwapBalance = await web3.eth.getBalance(ethSwap.address)
      assert.equal(ethSwapBalance.toString(), web3.utils.toWei('1', 'Ether'))

      // Check logs to ensure event was emitted with correct data
      const event = result.logs[0].args
      assert.equal(event.account, investor)
      assert.equal(event.token, token.address)
      assert.equal(event.amount.toString(), tokens('100').toString())
      assert.equal(event.rate.toString(), '100')
    })
  })

})
Let's see what this test does:
- First, we purchase tokens inside the
before()hook withresult = await ethSwap.buyTokens({ from: investor, value: web3.utils.toWei('1', 'ether')}). Here we specify who is buying tokens withfrom:, specifying theinvestorvariable. This comes from the top of the test suite herecontract('EthSwap', ([deployer, investor]) => { ... }. This allows us to reference each account individually as its own named variable, rather than a singleaccountsvariable, like we had before. Then we specify the amount of Ether we send in with the function withvalue:. We convert 1 Ether to Wei withweb3.utils.toWei('1', 'ether'). - Next, we write tests for the results after the purchase. First, we check that the investor now has 100 tokens.
- Next, we check that the EthSwap contract receive 1 Ether.
- Finally, we inspect the logs to ensure that the
TokensPurchased()event was emitted with the correct values. We can get the event values from the logs like thisevent = result.logs[0].args(try doingconsole.log(result)) to see what the logs look like.
Now let's run the tests:
$ truffle testYay, the pass! 😀
If you have any trouble with this, check out this section in the video for help and compare your code with mine.
Part 3: Sell Tokens
Now that we can purchase tokens with the EthSwap contract, let's add the ability to sell them. Let's create a sellTokens() function like this:
pragma solidity ^0.5.0;

import "./Token.sol";

contract EthSwap {
  // ...

  event TokensSold(
    address account,
    address token,
    uint amount,
    uint rate
  );

  // ...

  function sellTokens(uint _amount) public {
    // User can't sell more tokens than they have
    require(token.balanceOf(msg.sender) >= _amount);

    // Calculate the amount of Ether to redeem
    uint etherAmount = _amount / rate;

    // Require that EthSwap has enough Ether
    require(address(this).balance >= etherAmount);

    // Perform sale
    token.transferFrom(msg.sender, address(this), _amount);
    msg.sender.transfer(etherAmount);

    // Emit an event
    emit TokensSold(msg.sender, address(token), _amount, rate);
  }

}
This function does the exact OPPOSITE of the buyTokens() function. Let me explain how:
- First, we require that the user cannot sell more tokens than they currently hold with
require(token.balanceOf(msg.sender) >= _amount);. - Next, we calculate the amount of Ether to redeem. We do this by dividing the number of tokens by the rate:
uint etherAmount = _amount / rate;. - Next, we require that the EthSwap contract has enough Ether like this:
require(address(this).balance >= etherAmount);. - Then, we transfer the tokens to EthSwap contract with
token.transferFrom(msg.sender, address(this), _amount);. NOTE: this different from thetransfer()function that we used in the previous function because a smart contract is "spending" tokens on behalf of the user. We'll need to call the token'sapprove()function before we can do this. We'll see that in action momentarily inside the test suite. You can get a full explanation of this concept by checking out this part of the video. - Next, we transfer the Ether to the user with
msg.sender.transfer(etherAmount);. - Finally, we emit a
TokensSold()event just like the last section. We define this event at the top of the file withevent TokensSold(...).
Now let's write tests for this function like this:
describe('sellTokens()', async () => {
    let result

    before(async () => {
      // Investor must approve tokens before the purchase
      await token.approve(ethSwap.address, tokens('100'), { from: investor })
      // Investor sells tokens
      result = await ethSwap.sellTokens(tokens('100'), { from: investor })
    })

    it('Allows user to instantly sell tokens to ethSwap for a fixed price', async () => {
      // Check investor token balance after purchase
      let investorBalance = await token.balanceOf(investor)
      assert.equal(investorBalance.toString(), tokens('0'))

      // Check ethSwap balance after purchase
      let ethSwapBalance
      ethSwapBalance = await token.balanceOf(ethSwap.address)
      assert.equal(ethSwapBalance.toString(), tokens('1000000'))
      ethSwapBalance = await web3.eth.getBalance(ethSwap.address)
      assert.equal(ethSwapBalance.toString(), web3.utils.toWei('0', 'Ether'))

      // Check logs to ensure event was emitted with correct data
      const event = result.logs[0].args
      assert.equal(event.account, investor)
      assert.equal(event.token, token.address)
      assert.equal(event.amount.toString(), tokens('100').toString())
      assert.equal(event.rate.toString(), '100')

      // FAILURE: investor can't sell more tokens than they have
      await ethSwap.sellTokens(tokens('500'), { from: investor }).should.be.rejected;
    })
  })

})
Let me explain this code:
- First, we sell tokens inside the
before()hook. This is a two-step process. First, the investor must approve their tokens to be sold withawait token.approve(ethSwap.address, tokens('100'), { from: investor }). Next, they sell the tokens with the EthSwap contract withawait ethSwap.sellTokens(tokens('100'), { from: investor }). As I noted in thebuyTokens()function explanation, approving tokens is a necessary step because internally the function is using the token'stransferFrom()function to spend tokens on the investor's behalf. AnytimetransferFrom()is used, the tokens must be approved with theapprove()function. - Next, we check that the the results are correct, first by checking that investor's token balance is now 0.
- Then we ensure that the EthSwap exchange's token balance is 1 million, and that its Ether balance is 0.
- Next, we inspect the logs to ensure that the
SellTokens()event was emitted with the correct arguments. - Finally, we check for errors to ensure that this function will revert if the investor sells more tokens than they have.
Now let's run the test like this:
$ truffle testYAY! They pass. 🎉
Congratulations! You've just completed your first smart contract. The finished code should look like this:
pragma solidity ^0.5.0;

import "./Token.sol";

contract EthSwap {
  string public name = "EthSwap Instant Exchange";
  Token public token;
  uint public rate = 100;

  event TokensPurchased(
    address account,
    address token,
    uint amount,
    uint rate
  );

  event TokensSold(
    address account,
    address token,
    uint amount,
    uint rate
  );

  constructor(Token _token) public {
    token = _token;
  }

  function buyTokens() public payable {
    // Calculate the number of tokens to buy
    uint tokenAmount = msg.value * rate;

    // Require that EthSwap has enough tokens
    require(token.balanceOf(address(this)) >= tokenAmount);

    // Transfer tokens to the user
    token.transfer(msg.sender, tokenAmount);

    // Emit an event
    emit TokensPurchased(msg.sender, address(token), tokenAmount, rate);
  }

  function sellTokens(uint _amount) public {
    // User can't sell more tokens than they have
    require(token.balanceOf(msg.sender) >= _amount);

    // Calculate the amount of Ether to redeem
    uint etherAmount = _amount / rate;

    // Require that EthSwap has enough Ether
    require(address(this).balance >= etherAmount);

    // Perform sale
    token.transferFrom(msg.sender, address(this), _amount);
    msg.sender.transfer(etherAmount);

    // Emit an event
    emit TokensSold(msg.sender, address(token), _amount, rate);
  }

}
And your finished test file should look like this:
const Token = artifacts.require('Token')
const EthSwap = artifacts.require('EthSwap')

require('chai')
  .use(require('chai-as-promised'))
  .should()

function tokens(n) {
  return web3.utils.toWei(n, 'ether');
}

contract('EthSwap', ([deployer, investor]) => {
  let token, ethSwap

  before(async () => {
    token = await Token.new()
    ethSwap = await EthSwap.new(token.address)
    // Transfer all tokens to EthSwap (1 million)
    await token.transfer(ethSwap.address, tokens('1000000'))
  })

  describe('Token deployment', async () => {
    it('contract has a name', async () => {
      const name = await token.name()
      assert.equal(name, 'DApp Token')
    })
  })

  describe('EthSwap deployment', async () => {
    it('contract has a name', async () => {
      const name = await ethSwap.name()
      assert.equal(name, 'EthSwap Instant Exchange')
    })

    it('contract has tokens', async () => {
      let balance = await token.balanceOf(ethSwap.address)
      assert.equal(balance.toString(), tokens('1000000'))
    })
  })

  describe('buyTokens()', async () => {
    let result

    before(async () => {
      // Purchase tokens before each example
      result = await ethSwap.buyTokens({ from: investor, value: web3.utils.toWei('1', 'ether')})
    })

    it('Allows user to instantly purchase tokens from ethSwap for a fixed price', async () => {
      // Check investor token balance after purchase
      let investorBalance = await token.balanceOf(investor)
      assert.equal(investorBalance.toString(), tokens('100'))

      // Check ethSwap balance after purchase
      let ethSwapBalance
      ethSwapBalance = await token.balanceOf(ethSwap.address)
      assert.equal(ethSwapBalance.toString(), tokens('999900'))
      ethSwapBalance = await web3.eth.getBalance(ethSwap.address)
      assert.equal(ethSwapBalance.toString(), web3.utils.toWei('1', 'Ether'))

      // Check logs to ensure event was emitted with correct data
      const event = result.logs[0].args
      assert.equal(event.account, investor)
      assert.equal(event.token, token.address)
      assert.equal(event.amount.toString(), tokens('100').toString())
      assert.equal(event.rate.toString(), '100')
    })
  })

  describe('sellTokens()', async () => {
    let result

    before(async () => {
      // Investor must approve tokens before the purchase
      await token.approve(ethSwap.address, tokens('100'), { from: investor })
      // Investor sells tokens
      result = await ethSwap.sellTokens(tokens('100'), { from: investor })
    })

    it('Allows user to instantly sell tokens to ethSwap for a fixed price', async () => {
      // Check investor token balance after purchase
      let investorBalance = await token.balanceOf(investor)
      assert.equal(investorBalance.toString(), tokens('0'))

      // Check ethSwap balance after purchase
      let ethSwapBalance
      ethSwapBalance = await token.balanceOf(ethSwap.address)
      assert.equal(ethSwapBalance.toString(), tokens('1000000'))
      ethSwapBalance = await web3.eth.getBalance(ethSwap.address)
      assert.equal(ethSwapBalance.toString(), web3.utils.toWei('0', 'Ether'))

      // Check logs to ensure event was emitted with correct data
      const event = result.logs[0].args
      assert.equal(event.account, investor)
      assert.equal(event.token, token.address)
      assert.equal(event.amount.toString(), tokens('100').toString())
      assert.equal(event.rate.toString(), '100')

      // FAILURE: investor can't sell more tokens than they have
      await ethSwap.sellTokens(tokens('500'), { from: investor }).should.be.rejected;
    })
  })

})
Part 4: Front End Setup
Now let's start building the front end website for the EthSwap exchange. Before we continue, make sure that you have migrated your contracts to the blockchain like this:
$ truffle migrate --resetNext, let's make sure that your development server is running like this:
$ npm run startNow let's start modifying the code inside the src/components/App.js file. This is the main file that we'll use to write the code for the client side website.
You should see all of the template code that came with the starter kit that we cloned in the very beginning of this tutorial.
This file contains a React.js component. Don't worry if you're unfamiliar with React.js. You'll be able to pick it up as you follow along with me. If you'd like a full explanation of React, then check out this point in the video.
Let's edit the code in this file to ensure that our changes are reflected in the web browser. We'll use a basic "Hello World" example to accomplish this.
Find this:
<h1>Dapp University Starter Kit</h1>And replace it with this:
<h1>Hello, World!</h1>Once you see those changes automatically reflected in your browser, you know that the project is set up properly!
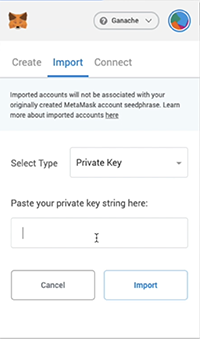
Before we proceed, we must set up Metamask. Specifically, we must import our account from Ganache into Metamask. Simply reveal the private key for the first account in Ganache first.
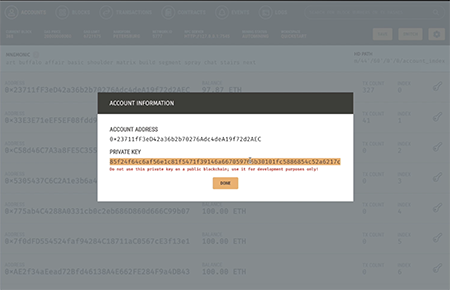
Then add it to Metamask in "settings > import account". Please see this point in the video for detailed instructions on how to do this.
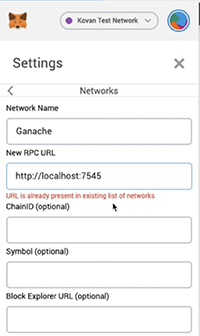
Then, we must ensure that we connect Metamask to Ganache at localhost:7545 as shown below. You can also watch me do this step-by-step in this point of the video.
Next, we must connect the application to the blockchain. We're going to use the Web3.js library to do this.
Let's import web3 at the top of the App.js file like this:
import Web3 from 'web3'Next, let's load Web3 inside our component like this:
async componentWillMount() {
    await this.loadWeb3()
    await this.loadBlockchainData()
  }

  async loadBlockchainData() {
    const web3 = window.web3

  }

  async loadWeb3() {
    if (window.ethereum) {
      window.web3 = new Web3(window.ethereum)
      await window.ethereum.enable()
    }
    else if (window.web3) {
      window.web3 = new Web3(window.web3.currentProvider)
    }
    else {
      window.alert('Non-Ethereum browser detected. You should consider trying MetaMask!')
    }
  }
This code uses React's componentWillMount() function to instantiate the connection to the blockchain. It calls the loadWeb3() function that we create below, which configures the web3 connection. Don't worry if you don't understand everything inside this function. This is simply "copy and paste" code from Metamask's own instruction on how to load web3 in our app.
Next, we create a function called loadBlockchainData() which fetches the web3 connection and stores it to a local variable. Let's go ahead and build out that function like this:
async loadBlockchainData() {
  const web3 = window.web3

  const accounts = await web3.eth.getAccounts()
  this.setState({ account: accounts[0] })

  const ethBalance = await web3.eth.getBalance(this.state.account)
  this.setState({ ethBalance })
}
Let me explain this code.
- First, we fetch the account from Metamask with
web3.eth.getAccounts(). - Then, we store the account in React's state object. This is where we'll keep all of the data for the front end application for later use. Add items to React's state object with
this.setState({ myValue: myValue }), and we fetch them out later like this:this.state.myValue. We'll see this in action momentarily. - Then, we fetch the account's Ether balance with
web3.eth.getBalance(this.state.account), and store it to the React state.
Now let's go ahead and create a default state inside of React's constructor() function like this:
constructor(props) {
  super(props)
  this.state = {
    account: '',
    ethBalance: '0'
  }
}
Next, let's create a new component for the Navbar. Create a new file inside the same directory as App.js called Navbar.js.
Add the following code to this file:
import React, { Component } from 'react'
import Identicon from 'identicon.js';

class Navbar extends Component {

  render() {
    return (
      <nav className="navbar navbar-dark fixed-top bg-dark flex-md-nowrap p-0 shadow">
        <a
          className="navbar-brand col-sm-3 col-md-2 mr-0"
          href="http://www.dappuniversity.com/bootcamp"
          target="_blank"
          rel="noopener noreferrer"
        >
          EthSwap
        </a>

        <ul className="navbar-nav px-3">
          <li className="nav-item text-nowrap d-none d-sm-none d-sm-block">
            <small className="text-secondary">
              <small id="account">{this.props.account}</small>
            </small>

            { this.props.account
              ? <img
                className="ml-2"
                width='30'
                height='30'
                src={`data:image/png;base64,${new Identicon(this.props.account, 30).toString()}`}
                alt=""
              />
              : <span></span>
            }

          </li>
        </ul>
      </nav>
    );
  }
}

export default Navbar;
This creates a special component specifically for the Navbar that does a few things:
- Changes the name of the navbar to "EthSwap".
- Displays the current account in the Navbar
- Displays generates a unique Identicon avatar for the user based upon their Ethereum address.
Now let's add this new Navbar to the page. Let's import it inside of App.js like this:
import Navbar from './Navbar'Then replace the Navbar code in the body like this:
<Navbar account={this.state.account} />That's it! Go ahead and refresh your page to see your current account and your fancy Identicon! 😃

If you had any troubles, please reference this part of the video and compare your code to mine. At this point, your completed App.js file should look like this:
import React, { Component } from 'react'
import Web3 from 'web3'
import Navbar from './Navbar'
import './App.css'

class App extends Component {

  async componentWillMount() {
    await this.loadWeb3()
    await this.loadBlockchainData()
  }

  async loadBlockchainData() {
    const web3 = window.web3

    const accounts = await web3.eth.getAccounts()
    this.setState({ account: accounts[0] })

    const ethBalance = await web3.eth.getBalance(this.state.account)
    this.setState({ ethBalance })
  }

  async loadWeb3() {
    if (window.ethereum) {
      window.web3 = new Web3(window.ethereum)
      await window.ethereum.enable()
    }
    else if (window.web3) {
      window.web3 = new Web3(window.web3.currentProvider)
    }
    else {
      window.alert('Non-Ethereum browser detected. You should consider trying MetaMask!')
    }
  }

  constructor(props) {
    super(props)
    this.state = {
      account: '',
      ethBalance: '0'
    }
  }

  render() {
    return (
      <div>
        <Navbar account={this.state.account} />
        <div className="container-fluid mt-5">
          <div className="row">
            <main role="main" className="col-lg-12 d-flex text-center">
              <div className="content mr-auto ml-auto">
                <a
                  href="http://www.dappuniversity.com/bootcamp"
                  target="_blank"
                  rel="noopener noreferrer"
                >
                </a>
                <h1>Hello, World!</h1>
              </div>
            </main>
          </div>
        </div>
      </div>
    );
  }
}

export default App;
Part 5: Buy Tokens (Front End)
Now let's create a way for users to buy tokens from the client side application.
First, we must import both smart contracts at the top of the App.js file like this:
import Token from '../abis/Token.json'
import EthSwap from '../abis/EthSwap.json'
Than inside the loadBlockchainData() function we'll load both smart contracts like this:
async loadBlockchainData() {
  const web3 = window.web3
  const accounts = await web3.eth.getAccounts()
  this.setState({ account: accounts[0] })

  const ethBalance = await web3.eth.getBalance(this.state.account)
  this.setState({ ethBalance })
  console.log(this.state.ethBalance)

  // Load Token
  const networkId = await web3.eth.net.getId()
  const tokenData = Token.networks[networkId]
  if(tokenData) {
    const token = new web3.eth.Contract(Token.abi, tokenData.address)
    this.setState({ token })
    let tokenBalance = await token.methods.balanceOf(this.state.account).call()
    this.setState({ tokenBalance: tokenBalance.toString() })
  } else {
    window.alert('Token contract not deployed to detected network.')
  }

  // Load EthSwap
  const ethSwapData = EthSwap.networks[networkId]
  if(ethSwapData) {
    const ethSwap = new web3.eth.Contract(EthSwap.abi, ethSwapData.address)
    this.setState({ ethSwap })
  } else {
    window.alert('EthSwap contract not deployed to detected network.')
  }

  this.setState({ loading: false })
}
This procedure uses web3's web3.eth.Contract() to create JavaScript versions of the smart contracts. We can use this to call its functions. We assign both contracts to the React state object as well.
Whenever the contracts are finished loading, we set React's state to loading = false. We'll show a loader any time the app is loading, and we want to hide it whenever these contracts have loaded.
Next, we'll update React's default state like this:
constructor(props) {
  super(props)
  this.state = {
    account: '',
    token: {},
    ethSwap: {},
    ethBalance: '0',
    tokenBalance: '0',
    loading: true
  }
}
Next, we'll create a new React component to store all of the "main" content for the page. Create a new file called Main.js inside the same directory as App.js. Add this code inside:
import React, { Component } from 'react'
import tokenLogo from '../token-logo.png'
import ethLogo from '../eth-logo.png'

class Main extends Component {
  constructor(props) {
    super(props)
    this.state = {
      output: '0'
    }
  }

  render() {
    return (
      <div id="content">

        <div className="card mb-4" >

          <div className="card-body">

          <form className="mb-3" onSubmit={(event) => {
              event.preventDefault()
              let etherAmount
              etherAmount = this.input.value.toString()
              etherAmount = window.web3.utils.toWei(etherAmount, 'Ether')
              this.props.buyTokens(etherAmount)
            }}>
            <div>
              <label className="float-left"><b>Input</b></label>
              <span className="float-right text-muted">
                Balance: {window.web3.utils.fromWei(this.props.ethBalance, 'Ether')}
              </span>
            </div>
            <div className="input-group mb-4">
              <input
                type="text"
                onChange={(event) => {
                  const etherAmount = this.input.value.toString()
                  this.setState({
                    output: etherAmount * 100
                  })
                }}
                ref={(input) => { this.input = input }}
                className="form-control form-control-lg"
                placeholder="0"
                required />
              <div className="input-group-append">
                <div className="input-group-text">
                  <img src={ethLogo} height='32' alt=""/>
                      ETH
                </div>
              </div>
            </div>
            <div>
              <label className="float-left"><b>Output</b></label>
              <span className="float-right text-muted">
                Balance: {window.web3.utils.fromWei(this.props.tokenBalance, 'Ether')}
              </span>
            </div>
            <div className="input-group mb-2">
              <input
                type="text"
                className="form-control form-control-lg"
                placeholder="0"
                value={this.state.output}
                disabled
              />
              <div className="input-group-append">
                <div className="input-group-text">
                  <img src={tokenLogo} height='32' alt=""/>
                    DApp
                </div>
              </div>
            </div>
            <div className="mb-5">
              <span className="float-left text-muted">Exchange Rate</span>
              <span className="float-right text-muted">1 ETH = 100 DApp</span>
            </div>
            <button type="submit" className="btn btn-primary btn-block btn-lg">SWAP!</button>
          </form>

          </div>

        </div>

      </div>
    );
  }
}

export default Main;
This component creates a basic form that allows the user to purchase tokens. It displays the user's Token balance as well as their Ether balance.
You'll notice that this file also imports the logos for each currency. You can find the image files for each logo inside the completed project code here.
Now let's import this component inside the App.js file like this:
import Main from './Main'Next, let's render the component out on the page. Here, we'll do this conditionally. If the app is currently loading, we'll show the loader. Otherwise, we'll show the Main component like this:
render() {
  let content
  if(this.state.loading) {
    content = <p id="loader" className="text-center">Loading...</p>
  } else {
    content = <Main
      ethBalance={this.state.ethBalance}
      tokenBalance={this.state.tokenBalance}
      buyTokens={this.buyTokens}
    />
  }
// ...
}
Then we'll render the content out on the page. Replace this:
<h1>Hello, World!</h1>With this:
{content}Finally, we must create the buyTokens() function that this component needs so that the user can actually purchase tokens whenever they submit the form.
Just above the constructor() function, add this code:
buyTokens = (etherAmount) => {
  this.setState({ loading: true })
  this.state.ethSwap.methods.buyTokens().send({ value: etherAmount, from: this.state.account }).on('transactionHash', (hash) => {
    this.setState({ loading: false })
  })
}
Now your completed App.js file should look like this:
import React, { Component } from 'react'
import Web3 from 'web3'
import Token from '../abis/Token.json'
import EthSwap from '../abis/EthSwap.json'
import Navbar from './Navbar'
import Main from './Main'
import './App.css'

class App extends Component {

  async componentWillMount() {
    await this.loadWeb3()
    await this.loadBlockchainData()
  }

  async loadBlockchainData() {
    const web3 = window.web3

    const accounts = await web3.eth.getAccounts()
    this.setState({ account: accounts[0] })

    const ethBalance = await web3.eth.getBalance(this.state.account)
    this.setState({ ethBalance })

    // Load Token
    const networkId =  await web3.eth.net.getId()
    const tokenData = Token.networks[networkId]
    if(tokenData) {
      const token = new web3.eth.Contract(Token.abi, tokenData.address)
      this.setState({ token })
      let tokenBalance = await token.methods.balanceOf(this.state.account).call()
      this.setState({ tokenBalance: tokenBalance.toString() })
    } else {
      window.alert('Token contract not deployed to detected network.')
    }

    // Load EthSwap
    const ethSwapData = EthSwap.networks[networkId]
    if(ethSwapData) {
      const ethSwap = new web3.eth.Contract(EthSwap.abi, ethSwapData.address)
      this.setState({ ethSwap })
    } else {
      window.alert('EthSwap contract not deployed to detected network.')
    }

    this.setState({ loading: false })
  }

  async loadWeb3() {
    if (window.ethereum) {
      window.web3 = new Web3(window.ethereum)
      await window.ethereum.enable()
    }
    else if (window.web3) {
      window.web3 = new Web3(window.web3.currentProvider)
    }
    else {
      window.alert('Non-Ethereum browser detected. You should consider trying MetaMask!')
    }
  }

  buyTokens = (etherAmount) => {
    this.setState({ loading: true })
    this.state.ethSwap.methods.buyTokens().send({ value: etherAmount, from: this.state.account }).on('transactionHash', (hash) => {
      this.setState({ loading: false })
    })
  }

  constructor(props) {
    super(props)
    this.state = {
      account: '',
      token: {},
      ethSwap: {},
      ethBalance: '0',
      tokenBalance: '0',
      loading: true
    }
  }

  render() {
    let content
    if(this.state.loading) {
      content = <p id="loader" className="text-center">Loading...</p>
    } else {
      content = <Main
        ethBalance={this.state.ethBalance}
        tokenBalance={this.state.tokenBalance}
        buyTokens={this.buyTokens}
      />
    }

    return (
      <div>
        <Navbar account={this.state.account} />
        <div className="container-fluid mt-5">
          <div className="row">
            <main role="main" className="col-lg-12 ml-auto mr-auto" style={{ maxWidth: '600px' }}>
              <div className="content mr-auto ml-auto">
                <a
                  href="http://www.dappuniversity.com/bootcamp"
                  target="_blank"
                  rel="noopener noreferrer"
                >
                </a>

                {content}

              </div>
            </main>
          </div>
        </div>
      </div>
    );
  }
}

export default App;
Now go try to purchase tokens from your browser! You can watch me do this live on screen at this point in the video. Feel free to use this as a reference if you get stuck.
Part 6: Sell Tokens (Front End)
Now let's finish off the project by allowing the user to sell tokens from the front end.
First, inside the App.js file, let's create a sellTokens() function just below the buyTokens() function we created in the last section:
sellTokens = (tokenAmount) => {
  this.setState({ loading: true })
  this.state.token.methods.approve(this.state.ethSwap.address, tokenAmount).send({ from: this.state.account }).on('transactionHash', (hash) => {
    this.state.ethSwap.methods.sellTokens(tokenAmount).send({ from: this.state.account }).on('transactionHash', (hash) => {
      this.setState({ loading: false })
    })
  })
}
Then we must pass it down to the Main component like this:
content = <Main
  ethBalance={this.state.ethBalance}
  tokenBalance={this.state.tokenBalance}
  buyTokens={this.buyTokens}
  sellTokens={this.sellTokens} // Add this line to pass down the sellTokens() function
/>
Then we're going to create 2 separate forms: one for purchasing tokens, and one for selling tokens.
Inside the components directory, create 2 new files: one called BuyForm.js and the other called SellForm.js.
Inside the buy form, we'll move all of the code that we created in the last section inside of here. Use this code inside your BuyForm.js file:
import React, { Component } from 'react'
import tokenLogo from '../token-logo.png'
import ethLogo from '../eth-logo.png'

class BuyForm extends Component {
  constructor(props) {
    super(props)
    this.state = {
      output: '0'
    }
  }

  render() {
    return (
      <form className="mb-3" onSubmit={(event) => {
          event.preventDefault()
          let etherAmount
          etherAmount = this.input.value.toString()
          etherAmount = window.web3.utils.toWei(etherAmount, 'Ether')
          this.props.buyTokens(etherAmount)
        }}>
        <div>
          <label className="float-left"><b>Input</b></label>
          <span className="float-right text-muted">
            Balance: {window.web3.utils.fromWei(this.props.ethBalance, 'Ether')}
          </span>
        </div>
        <div className="input-group mb-4">
          <input
            type="text"
            onChange={(event) => {
              const etherAmount = this.input.value.toString()
              this.setState({
                output: etherAmount * 100
              })
            }}
            ref={(input) => { this.input = input }}
            className="form-control form-control-lg"
            placeholder="0"
            required />
          <div className="input-group-append">
            <div className="input-group-text">
              <img src={ethLogo} height='32' alt=""/>
                  ETH
            </div>
          </div>
        </div>
        <div>
          <label className="float-left"><b>Output</b></label>
          <span className="float-right text-muted">
            Balance: {window.web3.utils.fromWei(this.props.tokenBalance, 'Ether')}
          </span>
        </div>
        <div className="input-group mb-2">
          <input
            type="text"
            className="form-control form-control-lg"
            placeholder="0"
            value={this.state.output}
            disabled
          />
          <div className="input-group-append">
            <div className="input-group-text">
              <img src={tokenLogo} height='32' alt=""/>
                DApp
            </div>
          </div>
        </div>
        <div className="mb-5">
          <span className="float-left text-muted">Exchange Rate</span>
          <span className="float-right text-muted">1 ETH = 100 DApp</span>
        </div>
        <button type="submit" className="btn btn-primary btn-block btn-lg">SWAP!</button>
      </form>
    );
  }
}

export default BuyForm;
Next, fill in the SellForm file with this:
import React, { Component } from 'react'
import tokenLogo from '../token-logo.png'
import ethLogo from '../eth-logo.png'

class SellForm extends Component {
  constructor(props) {
    super(props)
    this.state = {
      output: '0'
    }
  }

  render() {
    return (
      <form className="mb-3" onSubmit={(event) => {
          event.preventDefault()
          let etherAmount
          etherAmount = this.input.value.toString()
          etherAmount = window.web3.utils.toWei(etherAmount, 'Ether')
          this.props.sellTokens(etherAmount)
        }}>
        <div>
          <label className="float-left"><b>Input</b></label>
          <span className="float-right text-muted">
            Balance: {window.web3.utils.fromWei(this.props.tokenBalance, 'Ether')}
          </span>
        </div>
        <div className="input-group mb-4">
          <input
            type="text"
            onChange={(event) => {
              const tokenAmount = this.input.value.toString()
              this.setState({
                output: tokenAmount / 100
              })
            }}
            ref={(input) => { this.input = input }}
            className="form-control form-control-lg"
            placeholder="0"
            required />
          <div className="input-group-append">
            <div className="input-group-text">
              <img src={tokenLogo} height='32' alt=""/>
                DApp
            </div>
          </div>
        </div>
        <div>
          <label className="float-left"><b>Output</b></label>
          <span className="float-right text-muted">
            Balance: {window.web3.utils.fromWei(this.props.ethBalance, 'Ether')}
          </span>
        </div>
        <div className="input-group mb-2">
          <input
            type="text"
            className="form-control form-control-lg"
            placeholder="0"
            value={this.state.output}
            disabled
          />
          <div className="input-group-append">
            <div className="input-group-text">
              <img src={ethLogo} height='32' alt=""/>
                  ETH
            </div>
          </div>
        </div>
        <div className="mb-5">
          <span className="float-left text-muted">Exchange Rate</span>
          <span className="float-right text-muted">100 DApp = 1 ETH</span>
        </div>
        <button type="submit" className="btn btn-primary btn-block btn-lg">SWAP!</button>
      </form>
    );
  }
}

export default SellForm;
Now let's import both of those components into the Main.js file at the top like this:
import BuyForm from './BuyForm'
import SellForm from './SellForm'
Now let's add the ability to toggle between the buy form and sell form. We'll add 2 buttons to do this: one for "buy" and one for "sell". Whenever you click each button, the corresponding form will appear.
We can keep track of the current form with React's state object. We'll simply update React's state any the buy/sell button is clicked and show the appropriate form on the page.
Here is the completed Main.js code that accomplishes this:
import React, { Component } from 'react'
import BuyForm from './BuyForm'
import SellForm from './SellForm'

class Main extends Component {
  constructor(props) {
    super(props)
    this.state = {
      currentForm: 'buy'
    }
  }

  render() {
    let content
    if(this.state.currentForm === 'buy') {
      content = <BuyForm
        ethBalance={this.props.ethBalance}
        tokenBalance={this.props.tokenBalance}
        buyTokens={this.props.buyTokens}
      />
    } else {
      content = <SellForm
        ethBalance={this.props.ethBalance}
        tokenBalance={this.props.tokenBalance}
        sellTokens={this.props.sellTokens}
      />
    }

    return (
      <div id="content" className="mt-3">

        <div className="d-flex justify-content-between mb-3">
          <button
              className="btn btn-light"
              onClick={(event) => {
                this.setState({ currentForm: 'buy' })
              }}
            >
            Buy
          </button>
          <span className="text-muted"><;   ></span>
          <button
              className="btn btn-light"
              onClick={(event) => {
                this.setState({ currentForm: 'sell' })
              }}
            >
            Sell
          </button>
        </div>

        <div className="card mb-4" >

          <div className="card-body">

            {content}

          </div>

        </div>

      </div>
    );
  }
}

export default Main;
YAY! Now go test it out in the browser. See if you can toggle between the buy form and sell form. Then see if you can buy and sell tokens through the interface.
CONGRATULATIONS! 🎉 You've just built an entire blockchain application from start to finish. If you have any trouble along the way, feel free to reference my completed code, as well as watch me perform the steps live on video.
Happy with this tutorial? Then you NEED to join my free training here where I'll show you how to build a real world blockchain app so that you can become a highly paid blockchain developer!